Page is loading ...

Workrite Ergonomics | 800.959.9675 www.workriteergo.com 1 of 4
3/4"
3/4"
0.373"
#2 Drive
0.133"3/4"
0.190"
#10 Screw Size
0.373"
#2 Drive
0.133"1/2 "
0.190"
#10 Screw Size
0.373"
#2 Drive
0.133"3/4"
0.190"
#10 Screw Size
0.373"
#2 Drive
0.133"1/2 "
0.190"
#10 Screw Size
Right Left
Right Left
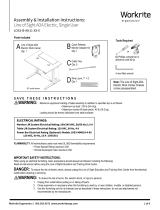
Assembly & Installation Instructions:
LOS3 Electric & Manual Monitor Li
Dual Row Rear Divider Panel
LOS3-SUDRDMNT-XX-X
LOS3-DUDRDMNT-XX-X
Parts Included (LOS3-SUDRDMNT-X)
Parts Included (LOS3-DUDRDMNT-X)
D #10 × 32 Keps Nut
Qty: 4
D #10 × 32 Keps Nut
Qty: 8
A LOS3 Single User Dual Row
Divider Mount Bracket
Qty: 2
A LOS3 Dual User Dual Row
RT Divider Mount Bracket
Qty: 2
B LOS3 Dual User Dual Row
LF Divider Mount Bracket
Qty: 2
C #10 × 32TPI × ¾"
Phillips Pan Head
Screw
Qty: 4
C #10 × 32TPI × ¾"
Phillips Pan Head
Screw
Qty: 8
Tools Required: Required, Sold Separately:
Model LOS3-SR-AD-XX24-X
LOS3 Single User Rear Acrylic Dividers
Model LOS3-DR-AD-XX24-X
LOS3 Dual User Rear Acrylic Dividers
Power Drill/Screw Gun
with #2 Phillips driver bit
#2 Phillips Screwdriver ⅜" End Wrench
or
E #10 × ½" Phillips Pan
Head Screw
Qty: 6
E #10 × ½" Phillips Pan
Head Screw
Qty: 16

2 of 4 Workrite Ergonomics | 800.959.9675 www.workriteergo.com
3/4"
3/4"
Attach the two LOS3 Single User Dual
Row Divider Mount Brackets (A) using two
#10 × 32TPI × ¾" Phillips pan head screws
(C) and two #10 × 23 Keps nuts (D) to the
LOS3-SR-AD-XX24-X as shown and tighten
securely.
Attach the two LOS3 Dual User Dual Row
Divider Mount Brackets (A) using two
#10 × 32TPI × ¾" Phillips pan head screws
(C) and two #10 x 23 Keps nuts (D) to the
LOS3-SR-AD-XX24-X as shown and tighten
securely.
Repeat this assembly for the second divider panel for the
Dual User Divider Kit
ASSEMBLE MOUNT BRACKETS AND ACRYLIC DIVIDER PANEL
Single User Unit
Dual User Unit
a
a
b
1
Divider Panel
Divider Panel
C
C
A
D
D
Hardware at actual size
C #10 × 32 × ¾" Phillips
Pan Head Screw
3/4"
B
A

Workrite Ergonomics | 800.959.9675 www.workriteergo.com 3 of 4
Lift the monitor compartment lid(s) open.
Align the second Dual User Dual Row Divider
Panel and Bracket Assembly to the pre-drilled
chassis tube as shown
*Note: The small holes in the end of the Dual Row
Divider Mount Brackets always faces outward.
Align the rst Single/Dual User Dual Row Divider
Panel and Bracket Assembly to the pre-drilled
chassis tube as shown.
*Note: The small holes in the end of the Dual Row
Divider Mount Brackets always faces outward.
Install three #10 × ½" screws (E) as shown and
tighten securely.
*If you have a Single User Unit proceed to Step 3.
Install three #10 × ½" screws (E) as shown and
tighten securely.
ATTACH DIVIDER ASSEMBLY TO LOS3 UNIT
a
d
b
c
e
2
2a
2b
2d
2c
2e
E
E
0.373"
#2 Drive
0.133"3/4"
0.190"
#10 Screw Size
0.373"
#2 Drive
0.133"1/2 "
0.190"
#10 Screw Size
Hardware at actual size
E #10 × ½" Phillips Pan
Head Screw
Divider Panel
Divider Panel

4 of 4 Workrite Ergonomics | 800.959.9675 www.workriteergo.com
1500523Rev A
Lift the monitor compartment lid(s) open on the LOS3
unit to be attached.
Slide the second LOS3 unit into place and align the Divider
Panel Assembly and Brackets to the pre-drilled chassis
tube that the monitor compartment lid attaches to.
Install three #10 × ½" screws (E) into each Dual Row
Rear Divider Mount as shown and tighten securely.
ATTACH SECOND LOS3 UNIT
a
b
c
3
Divider Panels
3b
0.373"
#2 Drive
0.133"3/4"
0.190"
#10 Screw Size
0.373"
#2 Drive
0.133"1/2 "
0.190"
#10 Screw Size
3c
3c
E
3a
/