Workrite Ergonomics Dual Installation guide
- Type
- Installation guide

Workrite Ergonomics | 800.959.9675 www.workriteergo.com 1 of 3
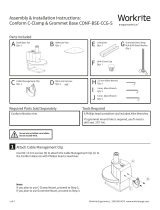
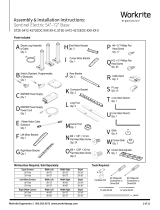
Assembly & Installation Instructions:
LOS3 Electric & Manual Monitor Li
Dual User Center Acrylic Rear Divider Panel
LOS3-DCPNLMNT-X
Parts Included
D Washer ½" Black
Qty: 2
A LOS3 Center Divider
Front Mount Bracket
Qty: 1
B LOS3 Center Divider
Rear Mount Bracket
Qty: 1
C M6 × 1.0p × 30 mm
Allen Bolt
Qty: 3
E 5 mm Allen
Wrench
Qty: 1
Tools Required: Required, Sold Separately:
LOS3-CTR-AD-2XX24-X
Pencil Tape Measure
F Corner Connector Kit
Qty: 1
a. Acrylic Corner Connector
Qty: 2
b. M4 Allen Wrench
Qty: 1
Install the M6 × 1.0p × 30 mm Allen Bolt
(C) into the LOS3-Center Divider Front
Mount Bracket (A)
Place the Center Divider Front
Mount Bracket (A) onto the front
edge of the LOS desk in the center.
*Note: Measure left to right to be
sure the bracket is in the center of
the table.
Place the ½" washer (D) above
the M6 × 1.0p × 30 mm Allen Bolt
and tighten the bolt with the M5
Allen Wrench (E).
ATTACH CENTER DIVIDER FRONT MOUNT BRACKET
*Note: When using the LOS3 Center Divider with Dual Rear Divider Panels, install the rear panels rst.
a
b
c
1
Center Line
A
E
C

2 of 3 Workrite Ergonomics | 800.959.9675 www.workriteergo.com
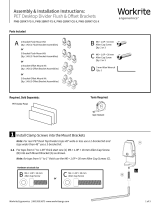
Place a mark ¼" behind the center grommet hole. Measure from the outside edge of
the top to the following dimension for the LOS3 unit width:
60" : 2715⁄16" or 66" : 3015⁄16" or 72" : 3315⁄16"
Using the Pencil place mark the top as shown with the dimension given for your LOS3 desk.
Peel the backing off the adhesive tape on the back of the Center Divider Rear Mount (B)
and carefully align it to the pencil mark and press it onto the top surface.
Measure from both the left and right side to make sure the bracket is centered.
*Note: If the bracket is not centered move and remeasure and remark the new
edge location
Place the LOS3 Center Rear Divider Mount Bracket (B) behind the center grommet
location on the top aligned with the measured pencil marks.
*Note: DO NOT PEEL THE BACKING OF THE DOUBLE FACE TAPE YET!
ATTACH CENTER DIVIDER REAR MOUNT BRACKET
a
b
e
d
c
2
B
2a
2e
¼"

3 of 3 Workrite Ergonomics | 800.959.9675 www.workriteergo.com
1500522 Rev A
Using the 5 mm Allen Wrench (E) loosen the clamps on
the front and rear Divider Mounts.
After the installation of the Center Divider Panel Brackets and Rear Dividers install the Corner
Connector Brackets. Instruction for installing the Corner Brackets is in the Corner Bracket Kit
*Note: It may be necessary to adjust the position of the Center Divider Panel slightly to install the
corner brackets. Loosen, move the Divider, and re-tighten the Divider Clamps as required.
Place the LOS3-CTR-AD-XX24-X Center Divider into the
clamps. Align the front edge of the Divider Panel to the
front edge of the LOS top.
Tighten the Middle and Rear Divider Mount Clamps
with the 5 mm Allen Wrench (E).
*Note: Make sure that the doors open and close
easily without touching the Center Divider Panel.
DO NOT OVER TIGHTEN THE CLAMPS
INSTALL CENTER DIVIDER PANEL
ATTACH CORNER BRACKETS
*Note: Install the Cable Grommet or the Power USB Charger unit or the Wireless
Charger into the grommet hole prior to mounting the acrylic divider panel.
a
b
c
3
4
Center Divider Panel
Center Divider Panel
3b
3c
3c
E
B
-
 1
1
-
 2
2
-
 3
3


Workrite Ergonomics Dual Installation guide
- Type
- Installation guide
Ask a question and I''ll find the answer in the document
Finding information in a document is now easier with AI
Related papers
-
 Workrite Ergonomics Divider Installation guide
-
 Workrite Ergonomics CONF-BSE-CCG-S Installation guide
-
 Workrite Ergonomics Dual Row Rear Divider Panel Installation guide
-
 Workrite Ergonomics Power Bar Installation guide
-
 Workrite Ergonomics Conform Triple Static Monitor Arm Installation guide
-
 Workrite Ergonomics ADA Single Installation guide
-
 Workrite Ergonomics Conform K-Rail® Adaptor Installation guide
-
 Workrite Ergonomics Conform LT Dual Slider Installation guide
-
 Workrite Ergonomics PET Desktop Divider Installation guide
-
 Workrite Ergonomics ST2E-5472-4272EOC Series Installation guide


Other documents
-
Workrite PET Desktop Divider Installation guide
-
-
-
 ISE SB-ASC2-3-23-SM-DRMS Assembly And Installation Instructions Manual
-
-
-
-
-
Silicon Labs Si5341, Si5340 Rev D Family Reference guide
-
Intel T1/E1 User manual
