Page is loading ...

Workrite Ergonomics | 800.959.9675 www.workriteergo.com 1 of 4
1"
1"
3/4"
3/4"
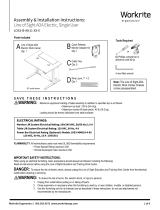
Assembly & Installation Instructions:
LOS3 Electric & Manual Monitor Li Side and
Middle End Acrylic Divider Panel
LOS3-FEPNLMNT-X / LOS3 Side End Divider Mount Kit
LOS3-MEPNLMNT-X / LOS3 Middle End Divider Mount Kit
Parts Included (LOS3-FEPNLMNT-X)
Parts Included (LOS3-MEPNLMNT-X)
B #10 × 1" Phillips Pan
Head Screw
Qty: 3
B #10 × 1" Phillips Pan
Head Screw
Qty: 6
F Screw Cover Base
Qty: 2
G Screw Cover Cap
Qty: 2
H Corner Connector Kit
Qty: 1
a. Acrylic Corner Connector
Qty: 2
b. M4 Allen Wrench
Qty: 1
E Corner Connector Kit
Qty: 1
a. Acrylic Corner Connector
Qty: 2
b. M4 Allen Wrench
Qty: 1
C #10 × 32 Keps Nut
Qty: 2
C #10 × 32 Keps Nut
Qty: 2
A LOS3 End Divider
Mount Bracket
Qty: 1
A LOS3 End Divider
Mount Bracket
Qty: 2
E LOS3 End Divider
Clamp Plate
Qty: 1
D #10 × 32TPI × ¾" Phillips
Pan Head Screw
Qty: 2
D #10 × 32TPI × ¾" Phillips
Pan Head Screw
Qty: 2
Tools Required: Required, Sold Separately:
Model LOS3-END-AD-2624-X
26" Deep End Acrylic Divider Panel
Model LOS3-END-AD-3024-X
30" Deep End Acrylic Divider Panel
Power Drill/Screw Gun
with #2 Phillips driver bit
#2 Phillips Screwdriver ⅜" End Wrench
or

2 of 4 Workrite Ergonomics | 800.959.9675 www.workriteergo.com
3/4"
Remove three #10 × ¾" Phillips pan head
screws from LOS3 Top Bracket.
Align End Panel LOS3-END-AD-XX-X with the LOS3 End Divider Mount Bracket (A) and
the LOS3 End Divider Clamp Plate (E) and attach with two #10 × 32 × ¾" Phillips Pan Head
Screws (D) two Screw Cover Bases (F) and two #10 × 32 Keps Nuts (C) as shown and
tighten securely.
Attach one LOS3 End Divider Mount Bracket (A)
with three #10 × 1" Phillips pan head screws (B)
as shown.
Snap on the two Screw Cover Caps (G) over the #10 × 32TPI screws and screw cover base.
(If you are installing a Finished End Divider Panel, the assembly is complete at this step).
INSTALL LOS3 END DIVIDER MOUNT BRACKET (BOTH LOS3-FEPNLMNT-X, LOS3-MEPNLMNT-X)
INSTALL END DIVIDER PANEL (FOR MIDDLE END DIVIDER PANEL SKIP TO STEP 3)
a
a
b
b
1
2
1a 1b
A
B
Hardware at actual size
A #10 × 1" Phillips Pan
Head Screw
1"
Hardware at actual size
D #10 × 32 × ¾" Phillips
Pan Head Screw
3/4"
End Panel
C
E
F
D
G
E

Workrite Ergonomics | 800.959.9675 www.workriteergo.com 3 of 4
On the second LOS3 Unit for the Middle Divider, remove
the existing three #10 ¾" Phillips pan head screws from the
LOS3 Top Bracket.
Place the second LOS3 Unit to be connected to the
Middle End Divider near the rst LOS3 unit and End
Divider Mount Bracket.
Attach the remaining End Divider Mount Bracket (A) with
three #10 × 1" Phillips Pan Head Screws (B) as shown.
Carefully slide the second unit into place aligning
the End Panel Bracket mounting holes of both LOS3
units leaving at ¼" gap between the units to slide the
LOS-END-AD-XX24-X Divider Panel into place.
MIDDLE END DIVIDER PANEL
CONNECT LOS3 UNIT WITH END PANEL TO ADJOINING LOS3 UNIT
a
a
b
b
3
4
A
B
Middle Divider
4a
4b
¼"

4 of 4 Workrite Ergonomics | 800.959.9675 www.workriteergo.com
1500511 Rev A
Attach the LOS-END-AD-XX24-X Divider Panel between the End Panel Brackets (A) with two
#10 × 32 × ¾" Phillips pan head screws (D) and two #10 × 32 Keps Nuts (C) as shown and
tighten securely
*Note: It may be required to adjust the leveling glides to level the two LOS3 units before nal attachment.
CORNER CONNECTOR BRACKETS
(SEE INSTRUCTIONS INCLUDED WITH THE CORNER BRACKET KIT TO INSTALL CORNER
CONNECTOR BRACKETS BETWEEN END AND REAR PANELS)
c
5
4c
C
D
/