Page is loading ...

Workrite Ergonomics | 800.959.9675 www.workriteergo.com 1 of 3
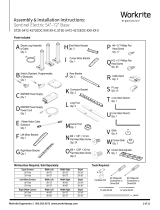
D 5 mm Allen Wrench
Qty: 1
AB M6 × 1.0P × 18 mm
Allen Cap Screw
Qty: 2 or 3
C M6 × 1.0P × 30 mm
Allen Cap Screw
Qty: 2 or 3
Required, Sold Separately: Tools Required:
tape measure
PET Divider Panel
Assembly & Installation Instructions:
PET Desktop Divider Flush & Oset Brackets
PMB-2BRKT-FS-X, PMB-3BRKT-FS-X, PMB-2BRKT-OS-X, PMB-3BRKT-OS-X
Parts Included
2 Bracket Flush Mount Kit
Qty: 1 Kit (2 Flush Bracket Assemblies)
3 Bracket Flush Mount Kit
Qty: 1 Kit (3 Flush Bracket Assemblies)
2 Bracket Oset Mount Kit
Qty: 1 Kit (2 Oset Bracket Assemblies)
3 Bracket Oset Mount Kit
Qty: 1 Kit (3 Oset Bracket Assemblies)
1 Install Clamp Screws into the Mount Brackets
Note: For rear PET Desk Top Dividers tops 48" wide or less use a 2-bracket kit and
tops wider than 48" use a 3-bracket kit.
1.1 For tops from 1" to 1.39" thick start one (1) M6 × 1.0P × 18 mm Allen Cap Screw
(B) into each Mount Bracket (A) as shown.
Note: for tops from ½" to 1" thick use the M6 × 1.0P × 30 mm Allen Cap Screws (C).
or
or
or
or
B M6 × 1.0P × 18 mm
Allen Cap Screw
Hardware at actual size
C M6 × 1.0P × 30 mm
Allen Cap Screw
1.1
B
A

2 of 3 Workrite Ergonomics | 800.959.9675 www.workriteergo.com
2a Rear Divider—Attach Rear Divider Mounts to Top
2.1 Place one Mount Bracket (A) in 6" from the le end of the rear edge of the top. Tighten the M6 Top Clamp Screw
using the 5 mm Allen Wrench (D).
2.2 If you have a divider wider than 48", place the middle Mount Bracket in the middle of the rear edge of the top.
Tighten the M6 Top Clamp Screw using the 5 mm Allen Wrench (D).
2.3 Place remaining Mount Bracket (A) in 6" from the Right end of the rear edge of the top. Tighten the M6 Clamp Screw
using the 5 mm Allen Wrench (D).
2b End Divider—Attach End Divider Mounts to Top
Note: End Dividers are intended to be installed using Flush Mount Kits ONLY
2.4 From the right side of the top, place one Mount Bracket (A) in 4" from the rear right side of the top. Tighten the
M6 Top Clamp Screw using the 5 mm Allen Wrench (D).
2.5 From the right side of the top, place one Mount Bracket (A) in 4" from the front right side of the top. Tighten the M6
Top Clamp Screw using the 5 mm Allen Wrench (D).
Note: Repeat the steps and measurements to install Divider Mounts to the Le End of the top.
=
=
6"
4"
6"
4"
D
A
2.1
2.2
2.3
2.3
2.5
2.4

Workrite Ergonomics | 800.959.9675 www.workriteergo.com 3 of 3
#1500559 Rev A
3a Insert Rear PET Divider and Tighten Clamps
3.1 Loosen the M6 Divider Clamp Screws in the Mount Brackets (A).
3.2 Place the Rear PET Divider into the Mount and center the divider le to right.
Note:The Mount Brackets has a small shelf to the inside that the divider rests on. Make sure the divider is placed properly
into the bracket before tightening.
3.3 Tighten the M6 Divider Clamp Screws using the 5 mm Allen Wrench (D).
3b End Divider—Attach End Divider Mounts to Top
3.4 Loosen the M6 Divider Clamp Screws in the Mount Brackets (A).
3.5 Place the End PET Divider into the Mount and slide it toward the Rear Divider until the gap is equal between the
Rear and End Divider.
Note: The Mount Brackets have a small shelf to the inside that the divider rests on. Make sure the divider is placed
properly into the bracket before tightening.
3.6 Tighten the M6 Divider Clamp Screws using the 5 mm Allen Wrench (D).
3.7 Repeat steps 3.4 to 3.6 for the opposing end panel.
Note: It is recommended to install Corner Joining
Kit #PMB-BRKT-CJK-C (sold separately) to connect
and stabilize dividers where rear and end divider
panels meet. Installation instructions and tools
needed for this kit are included in the Corner
Joining Kit.
D
A
3.2
3.3
3.5
3.6
3.7
3.1
/