Page is loading ...


1
1.
INTRODUCTION
The System 6001 Wireless Intercom provides private, secure communication. Each base station can
have up to a total of fifteen Belt-pac or Odyssey IQ Headset COMMUNICATOR®s, or a combination
of Belt-pacs and Odyssey IQ Headsets “registered” to it. Four of the fifteen Communicators can
transmit at the same time.
Communicators can be used either in the Push-To-Talk (PTT) or Hands-Free (HF) mode. The base
station operator can stop any Communicator from transmitting.
The Base Station can be operated using standard AC electricity, an external DC power source or six
AA batteries. A power supply, cable and a battery sled are included for use with the base station.

2
2.
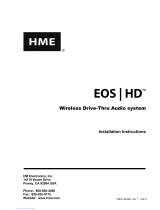
EQUIPMENT IDENTIFICATION
The following equipment is standard with the System 6001 Wireless Intercom. As you unpack the
equipment, check the enclosed shipping documents to be sure you received all items listed.
Base Station Antennas
(2 per Base Station)
115/230 Volt AC Power Supply
(1 per Base Station, with Power Cord)
(1 per AC40A Battery Charger, with Power Cord)
Base Station Battery Sled
OPTIONAL EQUIPMENT
Equipment Model Number
Lightweight Headset HS12
Mobile Headset no number
Headset Interface HSI6000
Headset Earmuff no number
Earmates disposable earpad cover no number
N
ylon belt (46 inch/ 1.17 meter) no number
HS6000 Service Kit no number
Battery BAT41
Rechargeable Battery for Base Station BAT850
Battery Charger for Rechargeable Battery AC850
Remote Antenna Kit EC20
Remote Antenna Kit (6 ft/1.83 meter cable) ANT20-6
Remote Antenna Kit (30 ft/9.14 meter cable) ANT20-30
AC40A
Battery Charger
Base Station
HS12 Headset
COM6000BP Belt-pac
Belt-pac Pouch
Battery
Standard
(2 each) Optional
Battery
Odyssey IQ
Headset

3
1
2.1 MAIN EQUIPMENT FEATURES
2.1.1 Base Station Features
1. POWER indicator light
2. RECEIVE indicator light
3. RESET button
4. REGISTRATION STATUS display
5. PWR power button
6. REG registration button
7. UN-LATCH button
8. CLR REG clear registration button
9. Antennas
10. Power connector
11. Battery compartment cover
12. Battery compartment cover release latches
2.1.2 Belt-pac COMMUNICATOR® Features
1. Headset cable connector
2. Power lights
3. Channel A2 button
4. Channel B button
5. Channel A1 button
6. PWR (Power) button
7. Volume-up S button
8. Volume-down T button
9. Battery release latch
10. Battery
9 10
1 2 3 4 5 6 7 8
9
12
10
11
2 3 4 5 2
6
7
8

4
6
3
4
1
7
2
2.1.3 Odyssey IQ Headset COMMUNICATOR® Features
1. Power light
2. Transmit light
3. Channel A1 button
4. Channel A2 button
5. Channel B button
6. Volume-up S button
7. Volume-down T button
8. Power button
9. Battery release latch
10. Battery
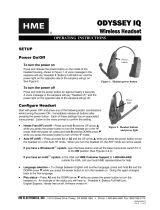
2.1.4 How to Wear the COMMUNICATOR®
Wear the headset with the microphone on either your right or left side, next to your mouth.
Adjust the headband and microphone boom as needed.
If you are using a Belt-pac Communicator, clip the Belt-pac to your belt or waistband on either your
right or left side. Clip the clothing clips on the headset cable to the back of your shirt and collar.
If you are using an Odyssey IQ Headset, put it on your head with the headset band behind your neck.
9
8
10
5
Belt-pac headset Odyssey IQ headset
Headset band
Hold microphone
boom here to adjust
microphone position
Clothing clip

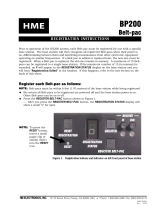
5
Charged batteries in
storage ports
Battery in
charging port
Empty charging
ports
Battery
charger
Battery charger cable
AC power supply
3.
EQUIPMENT SETUP
3.1 BATTERY CHARGER SETUP
The AC40A Battery Charger is used to charge COMMUNICATOR® batteries, for either Belt-pacs or
Odyssey IQ Headsets. Connect the AC power supply to the Battery Charger and plug it into an
electrical outlet, and charge the batteries as described below.
3.1.1 Connect AC Power Supply
Connect the battery charger cable to the 24VDC power supply as shown below.
Plug the power supply into an AC electrical outlet.
The red lights on the charger will come on and go off, and then the yellow lights will come on and stay on.
Whenever a charging port is empty, the yellow light next to it will stay on.
3.1.2 Charge Batteries
Up to four batteries can be charged in the battery charger at the same time.
Charging time is about 3 hours.
Insert a battery in a charging port until it clicks in place.
When a battery is in a charging port, a red light next to it
stays on while the battery is CHARGING.
A flashing yellow light next to the battery means CHARGE
PENDING, which indicates the battery is too hot. Adjust the
room temperature or move the charger to a cooler area.
A yellow light on steady next to the battery means
CHARGE FAILED. If this happens, follow the
instructions on the side of battery charger.
A green light next to a battery in a charging port
goes on when a battery is fully charged and READY.
Store fully charged batteries in storage ports. Up to
six batteries can be stored in the storage ports.
NOTE: The storage ports neither charge nor maintain
the batteries. They simply provide a place to store the
charged batteries until they are needed.
Batteries should not be left in charging ports after
being fully charged. If a battery is left in a charging
port for more than three weeks, the yellow indicator
may light up. In this case, it does not indicate a
faulty battery.

8
If using the base station with battery power ⎯
Press in and up on the two battery cover release latches to lift the cover and open the battery
compartment.
Insert six AA batteries into the battery sled, in the positions shown inside the sled, and install the
sled in the battery compartment as shown below.
If replacing batteries, remove the battery sled from the base station, replace the batteries in the sled
with fresh AA batteries and reinstall the sled in the battery compartment as shown below.
NOTE: An HME BAT850 Rechargeable NiMH Battery may be used instead of AA batteries.
Close the battery compartment by pressing its cover down until both latches snap in place.
Press down on the cover next to both latches at the same time, to assure its proper closing.
Having a fully charged (or new) battery in its battery compartment when operating the System 6001
base station with AC power can prevent interruption of communication during a power outage, as
the base station will automatically switch to battery power.
Battery sled
with batteries
Battery cover
release latches
(Push latches in
direction of arrows
and flip lid up.)

10
REGISTRATION
STATUS
display
REG
button
Step 1
Ste
p
2
Ste
p
3
3.3 BELT-PAC & ODYSSEY IQ HEADSET
SETUP AND REGISTRATION
The first time you operate the System 6001, you must register each Belt-pac and/or Odyssey IQ
Headset for use with a specific base station. The base station will then recognize all registered
Belt-pacs/Headsets when their power is on, and will know the difference between them and other
electronic equipment operating on the same frequencies. If a Belt-pac/Headset is added or
replaced later, the new one must be registered but the old one will remain in memory. Since only
15 Belt-pacs and/or Odyssey IQ Headsets can be in memory, whether currently in use or not, all
memory must be cleared to remove any old Belt-pac/Headset registrations.
3.3.1 Set Up Belt-pacs
Before registering them, set up each Belt-pac as follows.
Step 1. Insert a fully charged battery in the
Belt-pac, with the metal contacts on the end of
the battery inserted first. Press it in until it snaps.
Step 2. Place the Belt-pac in the pouch.
Step 3. Plug the headset cable connector into the Belt-pac.
3.3.2 Register Belt-pacs
NOTE: Belt-pacs must be within 6 feet (1.83 meters) of the base station while you are registering
them. Press the base station PWR button to turn it on, and be sure each Belt-pac you are going to
register is turned off before you begin. Belt-pacs that are already registered can be on or off.
Step 1. Put the headset, of the Belt-pac being registered, on your head.
Step 2. Press the REG button on the front panel of the base station.
The REGISTRATION STATUS display on the
base station will show a small “o” for open.
NOTE: If you wait too long before going on
to Step 3, the base station will go out of the
registration mode and you will have to repeat Step 2.
Step 3. Press and hold the B button on the Belt-pac while you press and release the PWR (power) button to
turn the unit on, then release the B button. This will cause the Belt-pac to enter the registration mode.
The two power lights will begin blinking red,
then will blink green two or three times and go off.
Wait! There may be a short delay.
Power lights

11
REGISTRATION
STATUS
display
CLR REG
button
REGISTRATION
STATUS
display
RESET
button
If registration is successfully completed:
After a delay of up to 15 seconds, the REGISTRATION STATUS display will show the ID number
assigned to this Belt-pac for about 10 seconds.
NOTE: ID numbers are assigned sequentially as 0 thru 9, A, b, C, d and E.
The power lights on the Belt-pac, next to the Channel A1 button, will remain on steady green.
Repeat Steps 1 to 3 at the bottom of page 10 for each Belt-pac to be registered.
If registration failed:
After a delay of up to 90 seconds, a voice message in the headset will say “Registration failed.”
Press the RESET button on the base station. When the REGISTRATION STATUS display
becomes blank, press the REG button on the base station and register the Belt-pac again.
If registration fails again, call your dealer for assistance.
If you try to register more than 15 Belt-pacs and/or Odyssey IQ Headsets to a base station:
An F will appear on the
REGISTRATION STATUS display
on the base station and you will hear
“Registration failed” in the headset.
Clear all current registrations by
pressing the CLR REG button and
the RESET button at the same time.
Continue holding the CLR REG button
after you release the RESET button, until
the clear code “c” (lower case) appears on
the REGISTRATION STATUS display.
Register all active Belt-pacs, one at a time.
Previously registered Odyssey IQ Headsets must also be re-registered.

12
REGISTRATION
STATUS
display
REG
button
3.3.3 Set Up Odyssey IQ Headsets
Before registering them, install a fully charged battery
in each Odyssey IQ Headset, with the metal contacts
on the end of the battery inserted first.
Press it in until it snaps.
3.3.4 Register Odyssey IQ Headsets
NOTE: Odyssey IQ Headsets must be within 6 feet (1.83 meters) of the base station while you are
registering them. Be certain the base station power is on, and each Headset you are going to register is
turned off before you begin. Headsets that are already registered can be on or off.
Step 1. Press the REG button on the front panel of
the base station.
The REGISTRATION STATUS display on
the base station will show a small “o” for open.
NOTE: If you wait too long before going
on to Step 2, the base station will go out of
the registration mode and you will have to
repeat Step 1.
Step 2. Press and hold the B button on the Headset while you press and release the power button to turn the
unit on, then release the B button. This will cause the Headset to enter the registration mode.
The Headset power light will begin blinking red, then will blink green two or three times and go off.
Wait! There may be a short delay.
Power
button
Power
light

13
REGISTRATION
STATUS
display
CLR REG
button
REGISTRATION
STATUS
display
RESET
button
If the registration is successfully completed:
After a delay of up to 15 seconds, the REGISTRATION STATUS display will show the ID number
assigned to this Headset for about 10 seconds.
NOTE: ID numbers are assigned sequentially as 0 thru 9, A, b, C, d and E.
The power light on the Headset will remain on steady green.
Repeat Steps 1 to 3 at the bottom of page 12 for each headset to be registered.
If registration failed:
After a delay of up to 90 seconds, a voice message in the Headset will say “Registration failed.”
Press the RESET button on the base station. When the REGISTRATION STATUS display becomes
blank, press the REG button on the base station and register the Headset again. If registration fails
again, call your dealer for assistance.
If you try to register more than 15 Belt-pacs and/or Odyssey IQ Headsets to a base station:
An F will appear on the
REGISTRATION STATUS display
on the base station and you will hear
“Registration failed” in the Headset.
Clear all current registrations by pressing
the CLR REG button and the RESET
button at the same time. Continue holding
the CLR REG button after you release the
RESET button, until the clear code “c”
(lower case) appears on the
REGISTRATION STATUS display.
Register all active Odyssey IQ Headsets, one at a time.
Previously registered Belt-pacs must also be re-registered.

14
4.
EQUIPMENT OPERATION
4.1 BASE STATION OPERATION
4.1.1 Controls and Indicators
POWER indicator light
Lights red when power is on. Blinks every
8 – 10 seconds when the battery is running low.
RECEIVE indicator light
Lights green when Belt-pacs/Headsets are
transmitting.
RESET button
Press to reset all communication links, or press
together with the CLR REG button to clear all
Belt-pac/Headset registrations.
REGISTRATION STATUS display
Displays “8” briefly when base station power is
turned on. Indicates status as you register each
Belt-pac/Headset. See pages 10 - 13.
Power “PWR” button
Press and release to turn the base station power on. Press and hold for 2 seconds to turn power off.
Registration “REG” button
Use this button to register each Belt-pac/Headset used with this base station. See pages 10 - 13.
UN-LATCH button
Use this button to unlatch all Belt-pac and/or Odyssey IQ Headset transmitters. Users can configure
their Belt-pacs/Headsets to “latch” on, in order to talk and listen to each other. Base station operators
can use the UN-LATCH button to stop Belt-pac/Headset conversations. Also, if a Belt-pac/Headset user
takes a Belt-pac/Headset off and leaves it “latched on” in an unknown location, sounds from the area
where it is left are picked up by its microphone and transmitted to other Belt-pac/Headset users. This
distraction can be stopped by pressing the UN-LATCH button on the base station.
Clear Registration “CLR REG” button
Use this button to clear Belt-pac/Headset registrations when needed. See pages 10 - 13.
4.1.2 Low Battery Indicator
If you are using the base station with battery power, when the base station battery power is low,
repeating beeps will be heard and the POWER light on the base station will be blinking red. When this
happens, replace the batteries in the base station immediately with ones that are new or fully charged,
as instructed on page 8.
Battery life varies with the type of batteries used. With the HME BAT850 (NimH) Battery, up to 10
hours can be expected.

15
4.2 COMMUNICATOR® OPERATION
The Belt-pac and/or Odyssey IQ Headset Communicator can be operated in Hands-Free (HF) or
Push-To-Talk (PTT) modes. In the HF mode, communication can be transmitted and received at the
same time, as in a normal telephone conversation. Transmission and reception are activated by
touching and releasing one of the A or B buttons on the Communicator. In the PTT mode, one of the
A or B buttons on the Communicator must be held while the operator is talking to crew members.
4.2.1 Routine Operation
Hands-Free (HF) Mode:
With the power off, press and hold the volume-up ▲ and B buttons while you press and release the
PWR button to turn the power on in the HF mode. The Communicator will remember this setting.
A voice message in the headset will say “Belt-pac #, battery low/half/full, hands free on, lane one,”
followed by a single beep. (“Lane one” only applies to stores that have outside drive-thru lanes.)
The green power light next to the A1 button on the Belt-pac will be on steady.
Touch and release the A1 or A2 button to speak and listen to other crew members.
The green power light next to the A1 button on the Belt-pac will be flashing while the communication
channel is open.
Use the volume-up ▲ and down ▼ buttons to adjust the voice level in your headset if necessary.
You will hear beeps of higher/lower pitch as the volume increases/decreases. When maximum volume
is reached, you will hear “maximum” repeating until you release the ▲ button. When minimum
volume is reached, you will hear rapidly repeating beeps until you release the ▼ button.
Touch and release the A1, A2 or B button to close the communication channel and end communication.
Touch and release the A1 or A2 button if you want to speak to crew members again.
Push-To-Talk (PTT) Mode:
With the power off, press and hold the volume-down ▼ and B buttons while you press and release the
PWR button to turn the power on in the PTT mode. The Communicator will remember this setting.
A voice message in the headset will say “Belt-pac #, battery low/half/full, hands free off, lane one.”
(“Lane one” only applies to stores that have outside drive-thru lanes.)
Use the volume-up ▲ and down ▼ buttons to adjust the voice level in your headset if necessary.
You will hear beeps of higher/lower pitch as the volume increases/decreases. When maximum volume
is reached, you will hear “maximum” repeating until you release the ▲ button. When minimum
volume is reached, you will hear rapidly repeating beeps until you release the ▼ button.
Press and hold the A1 or A2 button while you speak to other crew members. Release to listen.
While you are pressing the A1 or A2 button, the green power light will be flashing. When you are not
pressing the A1 or A2 button, the green power light will be on steady.
4.2.2 Obtaining COMMUNICATOR® Status
To obtain Communicator status, with the Communicator power off, press and hold the volume-down
▼ button and the A2 button while you press the power PWR button. You will hear the status message
in the headset earpiece when the power goes on.
4.2.3 Changing Languages
To change the language of the cues heard in the Communicator from English to Spanish/French and
back to English, with the Communicator power off, press and hold the volume-down ▼ button and the
A1 button while you press the power PWR button. The language of the cues heard in the headset
earpiece will change when the power goes on.

16
Battery-release
latch
4.2.4 COMMUNICATOR® Battery Removal and Replacement
COM6000BP Belt-pac Batteries —
To change batteries:
If a battery is weak when the COMMUNICATOR® power
is turned on, a voice in the earpiece will say “Battery low.”
If a battery becomes weak during operation, a voice in the
earpiece will say “Change battery.” When this happens,
take the Communicator out of its pouch and slide the
battery-release latch in the direction of the arrow. Pull up
on the end of the battery near the latch and lift it out of the
Communicator, or turn the Communicator over and catch
the battery in your hand.
To replace batteries:
Place the end of the battery with the metal contacts into
the Communicator, in the same position as the battery
you removed. Press the top of the battery carefully down
into the Communicator until it snaps in place.
Odyssey IQ Headset Batteries —
To change batteries:
When a battery becomes weak, a voice in the Headset will say
“Change battery.” When this happens, remove the battery from
the Headset by carefully sliding the battery-release latch and
lifting the battery out.
To replace batteries:
When replacing a battery in the Headset, place the end of the
battery with the metal contacts into the battery holder on the
Headset, in the same position as the battery you removed.
Press the top of the battery carefully into the battery holder
until it snaps in place under the battery-release latch.
Recharge batteries according to the instructions on page 5.
Battery-release
latch
Battery

17
5.
TROUBLESHOOTING
If you are unable to correct any of the problems described below, contact your dealer for assistance.
Red light on base station does not come on.
Be certain power cords are properly connected to base station, power supply and electrical outlet.
If battery operated, be certain six good AA batteries are inserted in the indicated positions in the
battery sled, and the sled is installed in the base station. See page 8.
Belt-pac power lights do not turn green.
Be certain your base station power is on. Turn the Belt-pac/Headset and base station power on and off.
The COMMUNICATOR® may be too far from the base station. The range varies with each location’s
layout. If you have more than one base station, be sure the Belt-pac/Headset is registered to the base
station it is being used with. If you are not sure, re-register it.
When trying to register, it keeps saying registration failed.
Refer to “If registration failed” on page 11 or 13, and repeat the registration procedure.
Others cannot hear me when I talk.
Be certain you are pressing the A1, A2 or B button on the Belt-pac/Headset. If you are using a Belt-
pac, be certain the headset is securely connected to the Belt-pac unit. See section 3.3.1.
In the event of an electrical power outage —
such as from a lightning storm or power generator failure, if you experience problems with your HME
equipment after the electricity comes on again, unplug the AC power supplies from their electrical outlets,
remove any batteries and wait 15 seconds, then plug them back in.
2400MHz cordless telephone interference —
If there is a 2400MHz cordless telephone nearby, interference may occur. However, since the System 6001
is a frequency-hopping system, this problem is unlikely. If it does occur, changing frequencies on the
telephone may alleviate the problem. If not, move the phone as far as practical from the base station, or use
another type phone.

18
6.
EQUIPMENT SPECIFICATIONS
6.1 Base Station
GENERAL ⎯
Frequency Range: 2400 – 2483.5 MHz
Frequency Response: 200 Hz to 3.5 kHz
Power Requirements: 100-240VAC, 50-60Hz or 12-14VDC
Temperature Range: 32-122°F (0-50°C)
Size: 10.2” x 6.45” x 3.33” (1-RU) (25.91 x 16.38 x 8.46 cm)
Weight: 2.35 lbs. (1.07 kg) maximum
# of Belt-pacs per Base: 15 can be registered
Any 4 can have simultaneous full-duplex communication at one time.
Others would be listen-only until a channel becomes available.
Front Panel Controls: Power, Register Belt-pac, Reset, Unlatch and Clear Registration
buttons
Front Panel Indicators: Registration Status display, Power and Receive LEDs
Antenna Type: External ½ -wave dipole (R-TNC connector)
RX/TX horizontal/vertical diversity
System Distortion: <2%
Communication Security: 64-bit encryption dual-slot diversity
Splash Resistant: IEC529 IP Code 4 (under battery operation only)
TRANSMITTER ⎯
Type: Frequency hopping, spread spectrum
Transmit Power: 100mW burst
Modulation Type: Gaussian filtered FSK, TDM
Frequency Stability: 13 ppm
Harmonics/Spurious: Exceeds FCC and ETSI specifications over temperature
RECEIVER ⎯
Type: Frequency hopping, spread spectrum
RF Sensitivity: <−90dBm w 10-3 BER
Frequency Stability: 13 ppm
Distortion: <2%

19
6.2 COM6000BP Belt-pac
Frequency Range: 2400 MHz – 2483.5 MHz
Antenna: Internal, horizontal/vertical diversity
Frequency Response: 200 Hz to 3.5 kHz
Transmit Power: 100mW burst
RF Sensitivity: <−90dBm w 10-3 BER
Battery Requirements: 3.6V lithium ion, rechargeable
Battery Life: Hands-free – up to 14 hours, PTT – up to 20 hours
Temperature Range: 32-122°F (0-50°C)
Weight: 7.4 oz (.21 kg) with battery and pouch
Headset Connector: 4-pin, mini-DIN
Microphone: Electret
Headset Output: 160mW into 32Ω
Controls: Power, Volume-up S, Volume-down T, IC, ISO
Indicators: Dual-color LED (red/green)
6.3 Odyssey IQ Headset
Frequency Range: 2400 MHz – 2483.5 MHz
Antenna: Internal
Frequency Response: 200 Hz to 3.5 kHz
Transmit Power: 100mW burst
RF Sensitivity: <−90dBm w 10-3 BER
Battery Requirements: 3.6V lithium ion, rechargeable
Battery Life: Hands-free – up to 14 hours, PTT – up to 20 hours
Temperature Range: 32-122°F (0-50°C)
Weight: 5.7 oz (.16 kg) with battery
Microphone: Electret
Headset Output: 160mW into 32Ω
Controls: Power, Volume-up S, Volume-down T, IC1, IC2, ISO
Indicators: Transmit LED (red/green), Power LED (red/green)
6.4 AC40 Battery Charger
Voltage input 12-14 VDC
Charging time 3 hrs maximum
Dimensions 7.6” x 4.6” x 2.6” (193mm x 117mm x 66mm)
Weight 1.5 lb (.68 kg)

20
IMPORTANT!
DISPOSAL OF WASTE ELECTRICAL AND ELECTRONIC EQUIPMENT
Waste Electrical and Electronic Equipment (WEEE)
The European Union (EU) WEEE Directive (2002/96/EC) places an obligation on producers (manufacturers,
distributors and/or retailers) to take-back electronic products at the end of their useful life. The WEEE Directive
covers most HME products being sold into the EU as of August 13, 2005. Manufacturers, distributors and retailers
are obliged to finance the costs of recovery from municipal collection points, reuse, and recycling of specified
percentages per the WEEE requirements.
Instructions for Disposal of WEEE by Users in the European Union
The symbol shown below is on the product or on its packaging which indicates that this product was put on the
market after August 13, 2005 and must not be disposed of with other waste. Instead, it is the user’s responsibility to
dispose of the user’s waste equipment by handing it over to a designated collection point for the recycling of
WEEE. The separate collection and recycling of waste equipment at the time of disposal will help to conserve
natural resources and ensure that it is recycled in a manner that protects human health and the environment.
For more information about where you can drop off your waste equipment for recycling, please contact your local
authority, your household waste disposal service or the seller from whom you purchased the product.
/