Page is loading ...

Important: READ INSTRUCTIONS CAREFULLY BEFORE INSTALLING. KEEP THESE
INSTRUCTIONS FOR FUTURE REFERENCE.
WARNING - Risk of re or electric shock. Luminaire wiring and electrical parts may be
damaged when drilling for installation of led retrot kit, check for enclosed wiring and
components.
To prevent wiring damage or abrasion, do not expose wiring to edges of sheet metal or
other sharp objects. Turn off the power when you perform any maintenance.
Verify that supply voltage is correct by comparing it with the luminaire label information.
Make all electrical and grounded connections in accordance with the National Electrical
Code and any applicable local code requirements.
All wiring connections should be capped with UL approved wire connectors.
CAUTION: RISK OF INJURY
Wear gloves and safety glasses at all times when removing luminaire from carton,
installing, servicing or performing maintenance.
Avoid direct eye exposure to the light source while it is on.
Account for small parts and destroy packing material, as these may be hazardous
to children.
CAUTION: RISK OF FIRE
Keep combustible and other materials that can burn away from luminaire and lamp/lens.
MIN 90°C SUPPLY CONDUCTORS
Halco Slim Area Lights
Installation Instructions
®
Halco Lighting Technologies | 2940 Pacific Drive | Norcross, GA 30071 | Toll Free 800.677.3334 | Phone 770.242.3612 | Fax 800.880.0822 | halcolighting.com | Atlanta | Cleveland | Houston | Los Angeles | Phoenix
© 2018 Halco Lighting Technologies, LLC. All rights reserved. Halco and ProLED are registered trademarks of Halco Lighting Technologies. All sizes and specifications are subject to change. Print Edition 07-13-18
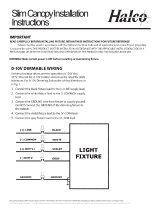
General Wiring Diagram:
CAUTION: Turn off electrical power at fuse or circuit breaker box before wiring xture to the power supply.
AREA LIGHT
Square & Round
Pola Adapter
Sliptter Knuckle
Mounting Options
Trunnion Swivel
STEP 1. Connect the black xture wire to the (+) LINE supply wire.
STEP 2. Connect the white xture wire to the (-) COMMON supply wire.
STEP 3. Connect the green xture wire to supply ground wire.
120-277V, 347-480V Wiring:
STEP 1. Connect the black xture wire to the HOT LINE
supply wire.
STEP 2. Connect the white xture wire to the NEUTRAL
supply wire.
STEP 3. Connect the green xture wire to supply
ground wire.
STEP 4. Connect the purple xture wire to the (V+)
DIM wire.
STEP 5. Connect the gray xture wire to the (V-)
DIM wire.
Model Nomenclature:
Where:
AL=Area Light
XXX=Wattage; 100=100W; 150=150W; 200=200W;
240=240W; 300=300W
TT=Optics; T2=Type II; T3=Type III; T4=Type IV;
T5=Type V
V=Voltage; U=120-277V; H=347-480V
CC=CCT; 40=4000K; 50=5000K
@@@@=Included Accessories;
7PRS= 7-PIN Receptacle with Shorting Cap
$$=Options; MS=Motion Sensor
Shorting Cap
$$=Options; MS=Motion Sensor
WARNING - Make certain power is switched OFF before starting installation or attempting any maintenance. Consult an electrician if not qualied to
prevent electrical shock.
NOT FOR USE IN DWELLINGS
Suitable for Wet Locations. Operating temperature: -40°C to 50°C. Illustrations are for installation purposes only. It may not be identical to the
xture purchased.

Mounting Options
Trunnion Swivel Mount:
STEP 1- Secure Trunnion to Area Light by tightening (2) 5/16-18
Internal HEX Head bolts with split washers.
STEP 2- (2) pivot bolts and angle locking screws.
STEP 3-
STEP 4 -Tighten the Pivot Bolts and Angle Locking Screw.
STEP 1- internal HEX head bolts with split washers and gasket.
STEP 2- wire connectors.
STEP 3- screws with Allen key.
STEP 4 - pivot bolt and rotating arm.
Square & Round Pole Adapter:
This adapter is suitable for both square and round pole;
Drilling holes on the pole according to diagram 1;
STEP 1- Attach main pole mount housing to the fixture
STEP 2- Place the mounting plate onto the pole, aligning to the drilled holes; use the provided hexagon head
screw with spring washer and flat washer to install back plate to plate fastened to the pole;
STEP 3- Slide on fixture and pole mount housing then secure with two more hexagon headed screws on the outer
holes of the mounting plate
STEP 4- Open the adapter cover, correctly connect the power cord,put the connected wires inside the adapter,
Finally cover the adapter cover plate and lock the screws.

Warranty Information:
ve years from the date of purchase. If this product does not perform to the speci cations supplied on this package, send an email or write to the address below for product
return and replacement. This replacement is the sole remedy available. Liability for incidental or consequential damage is expressly excluded.
Visit www.halcolighting.com for full warranty details and compatibility information.
Halco Lighting Technologies | 2940 Pacific Drive | Norcross, GA 30071 | Toll Free 800.677.3334 | Phone 770.242.3612 | Fax 800.880.0822 | halcolighting.com | Atlanta | Cleveland | Houston | Los Angeles | Phoenix
© 2018 Halco Lighting Technologies, LLC. All rights reserved. Halco and ProLED are registered trademarks of Halco Lighting Technologies. All sizes and specifications are subject to change. Print Edition 07-13-18
Pole Mount Drill Pattern for Square & Round Pole Adapter
Pole Mount Drill Pattern for Trunnion Swivel Mount
Pole Mount Drilling Pattern
4.65"(118)
.
35"
.70
"
2.32"(59)
To securely fasten, the 2 inner holes are
required. The 2 outer holes may be used at
the installer’s discretion. 5/16” drill bit
required.
/