Page is loading ...

Slim Canopy Installation
Instructions®
Halco LightingTechnologies | 2940 PacificDrive| Norcross, GA 30071 | Toll Free 800.677.3334| Phone770.242.3612| Fax 800.880.0822| halcolighting.com | Atlanta | Carlstadt| Cleveland| Houston | LosAngeles | Phoenix
© 2018 Halco Lighting Technologies, LLC. All rights reserved. Halco and ProLED are registered trademarks of Halco Lighting Technologies. All sizes and specifications are subject to change. Print Edition12-18-18.
1.To prevent personal injury or product damage only licensed electricians should install.
2.To avoid electrical shock or component damage, disconnect power before attempting installation or servicing.
3.This product must be installed in accordance with the national electric code (NEC) and all applicable federal,
state and local electric codes and safety standards.
4.Disconnect product and allow cooling prior to any furthersteps.
5.Any alteration or modification of this product is expressly forbidden as it may cause serious personal injury, death,
property damage and/or product malfunction.
6.To prevent product malfunction and/or electrical shock this product must be properly grounded.
7.This luminaire is designed to operate in ambient temperatures ranging from -25 °C to 40 °C and to be horizontally
mounted with the LED board facing downward.
INSTALLATION

Halco LightingTechnologies | 2940 PacificDrive| Norcross, GA 30071 | Toll Free 800.677.3334| Phone770.242.3612| Fax 800.880.0822| halcolighting.com | Atlanta | Carlstadt| Cleveland| Houston | LosAngeles | Phoenix
© 2018 Halco Lighting Technologies, LLC. All rights reserved. Halco and ProLED are registered trademarks of Halco Lighting Technologies. All sizes and specifications are subject to change. Print Edition12-18-18.
INSTALLATION
Surface Mount:
1. Unfasten surface mount plate side screw.
2. Slide surface mount plate out and up to remove.
3. Mount surface mount plate onto J Box.
4. Secure fixture onto surface mount plate by first hooking fixture onto ring.
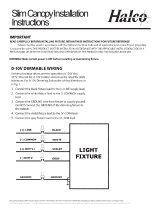
5. Wire fixture (according to diagram above.)
6. Lift fixture and fasten with surface mount plate screw.
Side Entry Mount:
1. Remove the four screws attaching the lens diffuser to the fixture and set the screws and
lens aside.
2. Remove the screws attaching the housing cover to the housing and set aside.
3. Remove 1/2” plug from direction you intend to feed conduit.
4. Fixture is best mounted by drilling through back of fixture securing it to the mounting surface
using the -appropriate mounting hardware for the surface. Mounting hardware supplied by
others. When drilling holes do not drill within 1/4” (6 mm) from edges of fixture. All unused
holes must be plugged. Waterproof silicone will ensure a tight seal.
5. Complete the wiring to the incoming power and ground (refer to “Fixture Wiring” section).
6. Replace the housing cover and lens diffuser. Note: Make sure no wires are pinched when
replacing parts.
Pendant Mount:
1. Unfasten surface mount plate side screw.
2. Slide surface mount plate out and up to remove.
3. Wire fixture (according to diagram above.)
4. Secure the fixture to the pendant via ¾” knockout, screwing tightly until secured.
Halco LightingTechnologies | 2940 PacificDrive| Norcross, GA 30071 | Toll Free 800.677.3334| Phone770.242.3612| Fax 800.880.0822| halcolighting.com | Atlanta | Carlstadt| Cleveland| Houston | LosAngeles | Phoenix
© 2018 Halco Lighting Technologies, LLC. All rights reserved. Halco and ProLED are registered trademarks of Halco Lighting Technologies. All sizes and specifications are subject to change. Print Edition12-18-18.

- 4 -
Settings
Detection Area
1 2
100% ON ON
75% ON -
50% - ON
25% - -
3 4 5
8S ON ON ON
30S ON - ON
1min - ON ON
5 min ON - -
10min - ON -
15min - - ON
30min - - -
Hold time
Stand-by Period
6 7 8
0s ON ON ON
1min ON - ON
3min - ON ON
5min ON - -
10min - ON -
30min - - ON
+∞- - -
Stand-by Dim Level
1 2
10% ON ON
20% ON -
30% - ON
40% --

- 5 -
3 4 5 6
5Lux ON ON ON ON
15Lux - ON ON ON
30Lux ON - ON ON
50lux - - ON ON
100lux ON ON - ON
150lux ON ON ON -
Disable - - - -
Remote Control MH02
Daylight Sensor
/