Page is loading ...

© 2018 Halco Lighting Technologies, LLC. All rights reserved. Halco and ProLED are registered trademarks of Halco Lighting Technologies. All sizes and specications are subject to change. Print Edition 12-18-18.
Halco Lighting Technologies | 2940 Pacic Drive | Norcross, GA 30071 | Toll Free 800.677.3334 | Phone 770.242.3612 | Fax 800.880.0822 | halcolighting.com | Atlanta | Carlstadt | Cleveland | Houston | Los Angeles | Phoenix
Linear LED Strip
Installation Instructions
®
SAFETY PRECAUTION
• To reduce the risk of death, personal injury or property damage from fire, electric shock, falling parts,
cuts/abrasions, and other hazards read all warnings and instructions included with and on the fixture box and
all fixture labels.
• Before installing, servicing, or performing routine maintenance upon this equipment, follow these general
precautions.
• Commercial installation, service and maintenance of luminaires should be performed by a qualified licensed
electrician.
• For the installation: If you are unsure about the installation or maintenance of the luminaires, consult a
qualified licensed electrician and check your local electrical code.
• To prevent wiring damage or abrasion, do not expose wiring to edges of sheet metal or other sharp objects.
• Do not make or alter any open holes in an enclosure of wiring or electrical components during kit installation.
WARNING: RISK OF FIRE OR ELECTRICAL SHOCK
• Turn off electrical power at fuse or circuit breaker box before wiring fixture to the power supply.
• Turn off the power when you perform any maintenance.
• Verify that supply voltage is correct by comparing it with the luminaire label information.
• All wiring connections should be capped with UL approved wire connectors.
CAUTION: RISK OF INJURY
• Avoid direct eye exposure to the light source while it is on.
• Account for small parts and destroy packing material, as these may be hazardous to children.
• Risk of burns. Disconnect power and allow fixture to cool before changing bulb or handling fixture.
SUITABLE FOR DRY OR DAMP LOCATION
GREEN GROUND SCREW PROVIDED IN PROPER LOCATION. DO NOT RELOCATE.
MINIMUM 90˚C SUPPLY CONDUCTORS.
SPECIFICATIONS AND DIMENSIONS ARE SUBJECT TO CHANGE WITHOUT NOTICE.
INSTALLATION
BEFORE INSTALLATION, ENSURE THAT POWER SUPPLY IS DISCONNECTED FROM MAIN CIRCUIT BREAKER!
LINEAR LED STRIP
Installation Instructions

© 2018 Halco Lighting Technologies, LLC. All rights reserved. Halco and ProLED are registered trademarks of Halco Lighting Technologies. All sizes and specications are subject to change. Print Edition 12-18-18.
Halco Lighting Technologies | 2940 Pacic Drive | Norcross, GA 30071 | Toll Free 800.677.3334 | Phone 770.242.3612 | Fax 800.880.0822 | halcolighting.com | Atlanta | Carlstadt | Cleveland | Houston | Los Angeles | Phoenix
STRIP LIGHT
Installation Instructions
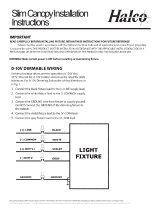
LED DRIVER
BLACK (Line)
WHITE (Neutral)
GREEN (Grd)
120-277V
Blue (-)
Red (+)
Purple (Dim+)
Grey (Dim-)
Dimming Wire
to 0-10v IEC
complaint control
Lead wire to LED load
GENERAL WIRING DIAGRAM
CHAIN MOUNTING WITH V-HOOK
Attach manufacturer-supplied V-hooks to each end of the
luminaire base. Attach customer-supplied chain to the
V-hooks and mounting surface. As shown in point B.
SURFACE MOUNTING
For easy surface mounting installation, remove the lens and
secure the luminaire base by inserting customer-supplied #8
anchor screws toggle bolts, or other suitable fasteners into
V-hook/surface mount slots or keyhole slot on the top side of
the luminaire base. As shown in point B and C.
MOUNTING OPTIONS
A: End Cap
B: V-Hook/Surface Mount Slots
C: Keyhole Slots
D: Wiring Knockouts
Figure 1
Figure 2
Figure 3
D
A
B
C
B
Easy Surface Mount Installation
– – – – – – – – – – – – –
– – – – – – – – – – –
STRIP LIGHT
Installation Instructions
LED DRIVER
BLACK (Line)
WHITE (Neutral)
GREEN (Grd)
120-277V
Blue (-)
Red (+)
Purple (Dim+)
Grey (Dim-)
Dimming Wire
to 0-10v IEC
complaint control
Lead wire to LED load
GENERAL WIRING DIAGRAM
CHAIN MOUNTING WITH V-HOOK
Attach manufacturer-supplied V-hooks to each end of the
luminaire base. Attach customer-supplied chain to the
V-hooks and mounting surface. As shown in point B.
SURFACE MOUNTING
For easy surface mounting installation, remove the lens and
secure the luminaire base by inserting customer-supplied #8
anchor screws toggle bolts, or other suitable fasteners into
V-hook/surface mount slots or keyhole slot on the top side of
the luminaire base. As shown in point B and C.
MOUNTING OPTIONS
A: End Cap
B: V-Hook/Surface Mount Slots
C: Keyhole Slots
D: Wiring Knockouts
Figure 1
Figure 2
Figure 3
D
A
B
C
B
Easy Surface Mount Installation
– – – – – – – – – – – – –
– – – – – – – – – – –
/