Page is loading ...

4FT High Efficiency/High Output
Type B T8 LED Installation Guide
For Skus 87200, 87201, 87202, 87203, 87204, 87205
®
© 2023 Halco Lighting Technologies, LLC. All rights reserved. Halco is a registered trademark of Halco Lighting Technologies. All sizes and specifications are subject to change.
Halco Lighting Technologies | 2940 Pacific Drive | Norcross, GA 30071 | Toll Free 800.677.3334 | Phone 770.242.3612 | Fax 800.880.0822 | halcolighting.com | Atlanta | Chicago | Cleveland | Houston | Los Angeles | Phoenix
LED T8 LINEAR RETROFIT LAMPS
READ ALL WARNINGS AND INSTRUCTIONS PRIOR TO INSTALLING
THE T8 RETROFIT LAMPS TO ENSURE SAFETY AND PROPER
OPERATION
WARNINGS
Risk of fire or electric shock. LED Retrofit Kit installation requires knowledge
of luminaires electrical systems. If not qualified, do not attempt installation.
Contact a qualified electrician in accordance with the National Electrical
Code and relevant local code. Install this kit only in the luminaires that have
the construction features and dimensions shown in the photographs and/or
drawings.
WARNING - To prevent wiring damage or abrasion, do not expose wiring to
edges of sheet metal or other sharp objects.Do not make or alter any open
holes in an enclosure of wiring or electrical components during kit
installation.
WARNING – Risk of electric shock – Do not use where direct exposed to
water. Direct replacement for the following lamps only: 32W/ 48T8.
WARNING – Risk of fire – If the LED tube exhibits undesirable operation
(Buzzing, flickering, etc.), immediately turn off power, remove LED tube
from luminaire and contact manufacturer.
WARNING – Risk of fire – Do not install this LED tube in a pre-heat
luminaire. This LED tube works on 120V to 277V AC. If lamp does not light
when the luminaire is energized, remove LED tube from luminaire and
contact LED tube manufacturer or qualified electrician.
SUITABLE FOR DAMP LOCATIONS.
BALLAST BYPASS DOUBLE-ENDED

4FT High Efficiency/High Output
Type B T8 LED Installation Guide ®
© 2023 Halco Lighting Technologies, LLC. All rights reserved. Halco is a registered trademark of Halco Lighting Technologies. All sizes and specifications are subject to change.
Halco Lighting Technologies | 2940 Pacific Drive | Norcross, GA 30071 | Toll Free 800.677.3334 | Phone 770.242.3612 | Fax 800.880.0822 | halcolighting.com | Atlanta | Chicago | Cleveland | Houston | Los Angeles | Phoenix
This device is not intended for use with emergency exits. Suitable for use with both
shunted and non-shunted lamp holders.
INSTALLATION GUIDE
1.Read all WARNINGS before continuing this section.
2.This item is rated at 120-277V. Installer must determine whether line voltage
120-277V is available at the luminaire before installation.
3. Make sure POWER IS TURNED OFF AT THE SOURCE. Do not simply switch off
fixture.
4. Remove existing covers from the light fixtures according to the light fixture
manufacturer’s instructions. Carefully remove the existing fluorescent tubes and dispose
of them according to federal, state and local laws.
5. Cut off wires connected to ballast, and remove ballast (and starter if present).
Dispose of removed ballast according to federal, state and local laws.
6. If applicable, replace lamp holders at power end with both shunted and non-
shunted lamp holders.
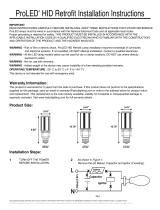
7. Connect (AC-L) from power source into lamp holder “L In”.
8. Connect Neutral (N) from power source into lamp holder “N In”.
9. If installing a single tube refer to follow chart. If connecting multiple lamps, continue
reading.
10. Connect separate hot wire into “Hot out” from primary source lamp holder and
connect that wire into “Hot in” on the adjacent tube.
11. Connect separate neutral wire into “Neutral out” from primary source lamp holder
and connect that wire into “Neutral in” on the adjacent tube. See Diagram below.
12. Continue this process for additional lamps.
13. This device is powered on Double-ended, the end with L and N markings. See
following chart. Do not wire opposite end of lamp holder.
14. Install lamp with the L and N markings into the wired lamp holder end.
15. Visibly affix “Modification Sticker” to the fixture and reinstall housing cover and lens
if applicable.
16. Return power back to source and installation is now completed.

4FT High Efficiency/High Output
Type B T8 LED Installation Guide ®
© 2023 Halco Lighting Technologies, LLC. All rights reserved. Halco is a registered trademark of Halco Lighting Technologies. All sizes and specifications are subject to change.
Halco Lighting Technologies | 2940 Pacific Drive | Norcross, GA 30071 | Toll Free 800.677.3334 | Phone 770.242.3612 | Fax 800.880.0822 | halcolighting.com | Atlanta | Chicago | Cleveland | Houston | Los Angeles | Phoenix
L
I
L
N
la�
p

®
© 2023 Halco Lighting Technologies, LLC. All rights reserved. Halco is a registered trademark of Halco Lighting Technologies. All sizes and specifications are subject to change.
Halco Lighting Technologies | 2940 Pacific Drive | Norcross, GA 30071 | Toll Free 800.677.3334 | Phone 770.242.3612 | Fax 800.880.0822 | halcolighting.com | Atlanta | Chicago | Cleveland | Houston | Los Angeles | Phoenix
4FT High Efficiency/High Output
Type B T8 LED Installation Guide
BALLAST BYPASS SINGLE-ENDED POWER
READ ALL WARNINGS AND INSTRUCTIONS PRIOR TO INSTALLING THE T8 RETROFIT
LAMPS TO ENSURE
SAFETY AND PROPER OPERATION
WARNINGS
Risk of fireor electric shock.LEDRetrofit Kit installation requires knowledgeof luminaires electrical
systems. If not
qualified, do not attempt installation. Contact a qualified electricianinaccordance with the National
Electrical Code and
relevant local code. Install this kit only in the luminaires that have the construction features and
dimensions shown in
the photographs and/or drawings.
WARNING - To prevent wiring damage or abrasion, do not expose wiring to edges of sheet metal
or other sharp
objects.
Do not make or alter any open holes in an enclosure of wiring or electrical components during kit
installation.
WARNING - To avoid potential fire or shock hazard, do not use this retrofit kit in luminaires
employing shunted bi-pin
lamp holders. Note: Shunted lamp holders are found only in fluorescent luminaires with
Instant-Start ballasts.
Instant-start ballasts can be identified by the words “Instant Start”or“I.S.”markedon the ballast.
This designation may
be in the form of a statement pertaining to the ballast itself, or may be combined with the marking
for the lamps with
which the ballast is intended to be used, for example F40T12/IS. For more information, contact the
LED luminaire
retrofit kit manufacturer.
Installers shouldnot disconnect existing wires from lampholder terminals to make new connections
at lamp holder
terminals. Instead installers should cut existing lamp holder leads away from the lamp holder and
make new electrical
connections to lamp holder lead wires by employing applicable connectors.This device is not
intended for use with
emergency exits.
““TThhiiss lluummiinnaaiirree hhaass bbeeeenn mmooddiiffiieedd aanndd ccaann nnoo lloonnggeerr ooppeerraattee tthhee oorriiggiinnaallllyy iinntteennddeedd llaammpp,,’’’’sshhaallll
bbeemmaarrkkeedd oonn tthhee rreettrrooffiitt lluummiinnaaiirree wwhheerree rreeaaddiillyy vviissiibbllee bbyy tthhee uusseerr dduurriinngg nnoorrmmaall mmaaiinntteennaannccee
iinncclluuddiinngg rree--llaammppiinngg.."
Suitable for use with NON-SHUNTED lamp holders only. See Diagram 1 below.
This item is rated at 120-277V. Installer must determine whether line voltage 120-277V is available
at the luminaire
before installation.
Connect hot wire only to end cap with the L and N markings. Opposite end cap is dead, do not wire.
SUITABLE FOR DAMP LOCATIONS

© 2023 Halco Lighting Technologies, LLC. All rights reserved. Halco is a registered trademark of Halco Lighting Technologies. All sizes and specifications are subject to change.
Halco Lighting Technologies | 2940 Pacific Drive | Norcross, GA 30071 | Toll Free 800.677.3334 | Phone 770.242.3612 | Fax 800.880.0822 | halcolighting.com | Atlanta | Chicago | Cleveland | Houston | Los Angeles | Phoenix
®
4FT High Efficiency/High Output
Type B T8 LED Installation Guide
INSTALLATION GUIDE
1.Read all WARNINGS before continuing this section.
2.Ensure fixture is 120-277V.
3.Make sure POWER IS TURNED OFF AT THE SOURCE. Do not simply switch off
fixture.
4.Remove existing covers from the light fixtures according to the light fixture manufacturer’
s instructions.
Carefully remove the existing fluorescent tubes and dispose of them according to federal,
state and local laws.
5.Cut off wires connected to ballast, and remove ballast (and starter if present). Dispose of
removed ballast
according to federal, state and local laws.
6.If applicable, replace lamp holders at power end with non-shunted lamp holders.
7.Connect Live (L) from power source into non-shunted lamp holder “L In”.
8.Connect Neutral (N) from power source into non-shunted lamp holder “N In”.
9.If installing a single tube refer to Diagram 3 and go to section 13. If connecting multiple
lamps, continue
reading.
10.Connect separate hot wire into “Hot out”from primary source lamp holder and
connect that wire into “Hot in”
on the adjacent tube.
11.Connect separate neutral wire into “Neutral out”from primary source lamp holder and
connect that wire into
“Neutral in”on the adjacent tube. See Diagram 4 below.
12.Continue this process for additional lamps.
13.This device is powered on one end only, the end with L and N markings. See Diagram
14. Do not wire opposite end of lamp holder.
15. Install lamp with the L and N markings into the wired lamp holder end.
16.Visibly affix“Modification Sticker”to the fixture and reinstall housing cover and lens if
applicable.
17. Return power back to source and installation is now completed.

© 2023 Halco Lighting Technologies, LLC. All rights reserved. Halco is a registered trademark of Halco Lighting Technologies. All sizes and specifications are subject to change.
Halco Lighting Technologies | 2940 Pacific Drive | Norcross, GA 30071 | Toll Free 800.677.3334 | Phone 770.242.3612 | Fax 800.880.0822 | halcolighting.com | Atlanta | Chicago | Cleveland | Houston | Los Angeles | Phoenix
®
4FT High Efficiency/High Output
Type B T8 LED Installation Guide
Warranty Information:
This product is warranted for five years from the date of purchase. If this product does not perform to the specifications supplied on this package, send an email or write to
the address below for product return and replacement. This replacement is the sole remedy available. Liability for incidental or consequential damage is expressly excluded.
Visit www.halcolighting.com for full warranty details and compatibility information.
/