Page is loading ...

© 2018 Halco Lighting Technologies, LLC. All rights reserved. Halco and ProLED are registered trademarks of Halco Lighting Technologies. All sizes and specications are subject to change. Print Edition 12-18-18.
Halco Lighting Technologies | 2940 Pacic Drive | Norcross, GA 30071 | Toll Free 800.677.3334 | Phone 770.242.3612 | Fax 800.880.0822 | halcolighting.com | Atlanta | Carlstadt | Cleveland | Houston | Los Angeles | Phoenix
Linear LED Strip Retrot
Installation Instructions
®
Phone: 86 21 3127 5318
Fax: 86 21 3127 2277
SHANGHAI HONGBAO LIGHTING CO., LTD.
NO.888 EAST HUIWANG ROAD, JIADING DISTRICT, SHANGHAI, CHINA 201815
LED STRIP RETROFIT KIT

© 2018 Halco Lighting Technologies, LLC. All rights reserved. Halco and ProLED are registered trademarks of Halco Lighting Technologies. All sizes and specications are subject to change. Print Edition 12-18-18.
Halco Lighting Technologies | 2940 Pacic Drive | Norcross, GA 30071 | Toll Free 800.677.3334 | Phone 770.242.3612 | Fax 800.880.0822 | halcolighting.com | Atlanta | Carlstadt | Cleveland | Houston | Los Angeles | Phoenix
Remove lamps, ballast cover/reector, socket
bracket, and lamp holders from existing host
strip luminaire.
Secure Safety Lanyard cables (D) by fastening
self-tapping tek screws (C) to existing strip
housing. Make sure to feed tek screws through
safety lanyard washers before fastening. Clip
opposing end of safety cable to Gear Tray (A).
Disconnect AC mains from existing ballast.
Depending on size and position of existing
ballast, ballast may be removed or left intact.
Clip opposing end of safety cable to Gear Tray
(A). Use (2) Safety Lanyards for each 4-ft. gear
tray section. Hang gear tray with safety cable in
order to make electrical wire connection.
Use Self-tapping Tek Screws (C) to fasten Strip
Bracket (B) to existing host strip xture. For 8ft,
make sure to align center piece of Strip Bracket
with the center line of the host xture.
Place Label (E) inside existing host strip
housing.
Phone: 86 21 3127 5318
Fax: 86 21 3127 2277
SHANGHAI HONGBAO LIGHTING CO., LTD.
NO.888 EAST HUIWANG ROAD, JIADING DISTRICT, SHANGHAI, CHINA 201815
TOOLS REQUIRED
a. Drill
b. Pliers
c. Wire Cutters
d. General Purpose Gloves
e. Screw Driver (Optional)
A. LED Reector Gear Tray
B. Strip Bracket
C. Tek Screws
D. Safety Lanyard Kit
E. Luminaire Modication Label
F. 1/4-Turn Fasteners
A
B
C
E
LED STRIP RETROFIT KIT
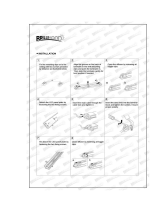
Installation
Remove lamps, ballast cover/reector, socket
bracket, and lamp holders from existing host
strip luminaire.
Secure Safety Lanyard cables (D) by fastening
self-tapping tek screws (C) to existing strip
housing. Make sure to feed tek screws through
safety lanyard washers before fastening. Clip
opposing end of safety cable to Gear Tray (A).
Disconnect AC mains from existing ballast.
Depending on size and position of existing
ballast, ballast may be removed or left intact.
Clip opposing end of safety cable to Gear Tray
(A). Use (2) Safety Lanyards for each 4-ft. gear
tray section. Hang gear tray with safety cable in
order to make electrical wire connection.
Use Self-tapping Tek Screws (C) to fasten Strip
Bracket (B) to existing host strip xture. For 8ft,
make sure to align center piece of Strip Bracket
with the center line of the host xture.
Place Label (E) inside existing host strip
housing.
Phone: 86 21 3127 5318
Fax: 86 21 3127 2277
SHANGHAI HONGBAO LIGHTING CO., LTD.
NO.888 EAST HUIWANG ROAD, JIADING DISTRICT, SHANGHAI, CHINA 201815
TOOLS REQUIRED
a. Drill
b. Pliers
c. Wire Cutters
d. General Purpose Gloves
e. Screw Driver (Optional)
A. LED Reector Gear Tray
B. Strip Bracket
C. Tek Screws
D. Safety Lanyard Kit
E. Luminaire Modication Label
F. 1/4-Turn Fasteners
A
B
C
E
LED STRIP RETROFIT KIT
Installation

© 2018 Halco Lighting Technologies, LLC. All rights reserved. Halco and ProLED are registered trademarks of Halco Lighting Technologies. All sizes and specications are subject to change. Print Edition 12-18-18.
Halco Lighting Technologies | 2940 Pacic Drive | Norcross, GA 30071 | Toll Free 800.677.3334 | Phone 770.242.3612 | Fax 800.880.0822 | halcolighting.com | Atlanta | Carlstadt | Cleveland | Houston | Los Angeles | Phoenix
Push Gear Tray towards Strip Brackets so that
the Gear Tray sits aush with the brackets and
strip housing. Make sure the slots of the gear
tray and bracekts are aligned. Fasten Gear Tray
by inserting and turning 1/4-turn fasteners (F)
90°.
Remove protective packaging from LED modules and lens.
Place Lens Diffuser onto retrot kit by squeezing sides of
Lens Diffuser and inserting edges into grooves of Gear Tray.
Lens may need to be adjusted by squeezing sides or pressing
the face of the lens.
OPTION A:
Securely fasten ground screw lead from Gear
Tray (B) to host strip xture if host strip is
grounded.
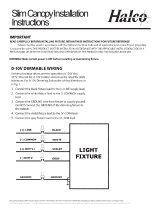
Follow instructions and wiring diagram on Page 2 to connect AC
mains to Gear Tray input leads. Retrot kit comes equipped with
quick disconnect. Hide wires behind Gear Tray. Ensure leads do
not hang out of Gear Tray to avoid electrical wiring being clamped
between metal parts.
For 8ft. kit, the kit will come with (2) LED Gear Trays (A and B). Gear tray A will have a driver. Connect output leads
from Driver located on Gear Tray A to the leads on Gear Tray B by plugging in connector. Ensure leads are connected
correctly: Red (+) and Blue (-) from Driver to LED modules.
OPTION B:
Connect ground from Gear Tray (B) to supply
ground lead from conduit.
Phone: 86 21 3127 5318
Fax: 86 21 3127 2277
SHANGHAI HONGBAO LIGHTING CO., LTD.
NO.888 EAST HUIWANG ROAD, JIADING DISTRICT, SHANGHAI, CHINA 201815
LED STRIP RETROFIT KIT
Push Gear Tray towards Strip Brackets so that
the Gear Tray sits aush with the brackets and
strip housing. Make sure the slots of the gear
tray and bracekts are aligned. Fasten Gear Tray
by inserting and turning 1/4-turn fasteners (F)
90°.
Remove protective packaging from LED modules and lens.
Place Lens Diffuser onto retrot kit by squeezing sides of
Lens Diffuser and inserting edges into grooves of Gear Tray.
Lens may need to be adjusted by squeezing sides or pressing
the face of the lens.
OPTION A:
Securely fasten ground screw lead from Gear
Tray (B) to host strip xture if host strip is
grounded.
Follow instructions and wiring diagram on Page 2 to connect AC
mains to Gear Tray input leads. Retrot kit comes equipped with
quick disconnect. Hide wires behind Gear Tray. Ensure leads do
not hang out of Gear Tray to avoid electrical wiring being clamped
between metal parts.
For 8ft. kit, the kit will come with (2) LED Gear Trays (A and B). Gear tray A will have a driver. Connect output leads
from Driver located on Gear Tray A to the leads on Gear Tray B by plugging in connector. Ensure leads are connected
correctly: Red (+) and Blue (-) from Driver to LED modules.
OPTION B:
Connect ground from Gear Tray (B) to supply
ground lead from conduit.
Phone: 86 21 3127 5318
Fax: 86 21 3127 2277
SHANGHAI HONGBAO LIGHTING CO., LTD.
NO.888 EAST HUIWANG ROAD, JIADING DISTRICT, SHANGHAI, CHINA 201815
LED STRIP RETROFIT KIT

© 2018 Halco Lighting Technologies, LLC. All rights reserved. Halco and ProLED are registered trademarks of Halco Lighting Technologies. All sizes and specications are subject to change. Print Edition 12-18-18.
Halco Lighting Technologies | 2940 Pacic Drive | Norcross, GA 30071 | Toll Free 800.677.3334 | Phone 770.242.3612 | Fax 800.880.0822 | halcolighting.com | Atlanta | Carlstadt | Cleveland | Houston | Los Angeles | Phoenix
SHANGHAI HONGBAO LIGHTING CO., LTD.
NO.888 EAST HUIWANG ROAD, JIADING DISTRICT, SHANGHAI, CHINA 201815
Phone: 86 21 3127 5318
Fax: 86 21 3127 2277
LED STRIP RETROFIT KIT
/