Page is loading ...

MODEL 401 USB FLASH
MODULE
Installation Guide
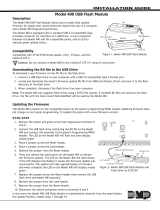
Figure 1: Model 401 USB Flash Module
Bottom
Top
4-Pin Connector USB Connector
Load Button
View LED
The Model401 USB Flash Module allows
you to easily field update firmware
without the use of a computer and a
Model399 Programming Harness.
The Model401 is equipped with a
standard USB 2.0 compatible TypeA
female connector for interface to a
FAT32USBDrive, a 4‑pin connector
between the Model401 and the
compatible panel, a load button to
initiate the update, and an LED to
indicate panel update status.
Compatibility
• XT30/XT50 Series panels
• XTLplus
• iCom/CellCom/DualCom Series
communicators
Caution: Do not connect the
Model401 to communicators using
24V power.
What is Included?
• Model401 USB Flash Module
1DOWNLOAD THE RU FILE
Use the directions below to download a new firmware
update file (RU) to the USB flash drive to use with the
Model401.
Note: The Model401 only supports USB2.0 flash
drives using a FAT32 file system. USB3.0 drives
are not compatible.
Caution: Do not save multiple files to the flash
drive. Keep only one file (RU) on the flash drive at
a time.
1. Plug the flash drive into one of your computer’s
USB drives.
2. Download the panel’s firmware update file (RU)
from DMP.com/software_downloads. Save it
to the root directory of the flash drive, not in a
folder.
3. When complete, eject the flash drive.
DESCRIPTION
2UPDATE THE FIRMWARE
The Model401 connects to the compatible panel
through the panel’s PROG header. Updating firmware
does not change current panel programming. To
update the panel with a new firmware version, use the
following directions.
XT30/XT50 Series panels
1. Place a jumper across the Reset header.
2. Remove the wires from the keypad bus
terminals.
3. Connect the USB flash drive with the file (RU)
to the Model401. Connect the assembly to the
panel’s PROG header. The LED on the Model401
will flash and display steady green.
4. Place a jumper across the Load header.
5. Remove the jumper from the Reset header.
6. Press and release the button on the Model401
to initiate the firmware update. The LED on the
Model401 will flash slowly. If the LED displays
fast flashes, it means the firmware update
was unsuccessful. The update will last up to
five minutes. When complete, the LED on the
Model401 will display steady green.
7. Replace the jumper across the Reset header.
Remove the USB flash drive and Model401
assembly.
8. Remove the jumper from the Load header.
9. Reconnect the keypad bus wires.
10. Remove the jumper from the Reset header.
In the event the Model401 is removed from the panel
before the update finishes, reset the panel and repeat
steps1 through 10.

Designed, engineered, and
manufactured in Springfield, MO
using U.S. and global components.
LT-1912 19194
INTRUSION • FIRE • ACCESS • NETWORKS
2500 North Partnership Boulevard
Springfield, Missouri 65803-8877
800.641.4282 | DMP.com
iCom/CellCom/DualCom Series communicators and XTLplus Series panels
1. Connect the USB flash drive to the Model401.
2. Press and hold the Reset button on the device. You will continue to hold Reset until step 6.
Caution: Do not connect the Model401 to communicators using 24V power.
3. Connect the assembly to the device’s programming header.
4. Press and release the button on the Model401.
5. With your finger still on Reset, press and hold the Load button. Continue to hold Load until
step 8.
6. Release the Reset button.
7. Press and release the button on the Model401.
8. When the green LED on the Model401 starts a slow flash, release the Load button. The
slow flash will last up to five minutes, then the green LED will become steady, indicating the
firmware version is updated.
Note: If the LED blinks rapidly, the update was unsuccessful. Press and release Reset.
Begin again at step1.
9. Press and hold Reset. Remove the Model401, then release Reset to resume normal
operation.
In the event the Model401 USB Flash Module is removed from the device before the update
finishes, press and release the Reset button. Repeat steps 1‑9.
3VERIFY THE FIRMWARE
1. At the keypad, enter the Diagnostic code 2313 (DIAG).
2. Press CMD until Panel Settings displays. Press any select key.
3. Press CMD until Firmware Version displays. Verify the panel firmware version is correct.
4. Press CMD until STOP displays. Press any select key to exit the Diagnostic menu.
Specifications
Dimensions 3‑3/8” L x 7/8” W x 1/2” H
Certifications
FCC Part 15
MODEL 401 USB FLASH
MODULE
/