Page is loading ...

Remote Link Helpfile
Remote Link Help
Exported on 10/24/2022

Remote Link Help – Remote Link Helpfile
– 2
Table of Contents
1 How can we help you? ...................................................................... 12
2 Welcome to Remote Link.................................................................. 13
2.1 Remote Link Quick Reference..............................................................................13
2.2 Copyright Statement ...........................................................................................13
2.3 Related Documentation .......................................................................................13
3 Install Remote Link........................................................................... 14
3.1 System Requirements .........................................................................................14
3.1.1 Additional Requirements ...........................................................................................................................15
3.1.2 Using a Virtual Environment......................................................................................................................15
3.2 Install on Windows ..............................................................................................15
3.2.1 Registry Keys..............................................................................................................................................15
3.2.2 Database Setup..........................................................................................................................................15
3.2.3 Link Server..................................................................................................................................................15
3.3 System Connection Options ................................................................................16
3.4 Safeguarding Your Remote Link Database...........................................................16
3.4.1 Location......................................................................................................................................................16
3.5 Log ON/OFF.........................................................................................................17
3.5.1 Default Remote Link Login ........................................................................................................................17
4 Configure Remote Link Options ........................................................ 18
4.1 Receiver Tab .......................................................................................................18
4.1.1 Configure Receiver Options.......................................................................................................................18
4.1.2 Select the Receiver Model.........................................................................................................................18
4.1.3 Configure Communication Options ..........................................................................................................18
4.1.4 Configure General Options ........................................................................................................................18
4.1.5 Configure Lengths .....................................................................................................................................19
4.1.6 Set Up Hardware Receivers.......................................................................................................................19
4.1.7 SCS-105 Firmware Requirements.............................................................................................................19
4.1.8 SCS-1R System Configuration...................................................................................................................19
4.1.9 Line Configuration......................................................................................................................................20

Remote Link Help – Remote Link Helpfile
– 3
4.2 Modem Tab .........................................................................................................20
4.2.1 Configure Modem Options ........................................................................................................................20
4.3 Database Tab ......................................................................................................21
4.3.1 Configure a Database ................................................................................................................................21
Select a Database Location ......................................................................................................................21
Backup the Database.................................................................................................................................21
Merge Databases.......................................................................................................................................21
Purge the Database ...................................................................................................................................22
Repair a Database......................................................................................................................................22
Restore a Database....................................................................................................................................22
4.4 Other Tab ............................................................................................................23
4.4.1 Configure Other Settings ...........................................................................................................................23
Configure General Options ........................................................................................................................23
Configure Pass Through Options..............................................................................................................24
Configure Auto Account Archive...............................................................................................................24
Configure Admin Reader Settings.............................................................................................................24
4.5 Network Tab........................................................................................................25
4.5.1 Configure Network Options.......................................................................................................................25
Configure TCP Trap Settings ....................................................................................................................25
Configure Traps to Send Automatically ...................................................................................................25
Configure a SOCKS Proxy..........................................................................................................................25
Enable a Cellular Network .........................................................................................................................25
4.6 Modules Tab .......................................................................................................26
4.6.1 Configure Monitoring Options...................................................................................................................26
Host Monitoring .........................................................................................................................................26
Direct Monitoring .......................................................................................................................................26
Command Center.......................................................................................................................................26
4.7 Custom Fields Tab...............................................................................................26
4.7.1 Configure Custom Fields...........................................................................................................................26
Edit List.......................................................................................................................................................26
Edit Caption and Make Selections ............................................................................................................27
4.8 Configure the Toolbar..........................................................................................27
5 Operators ......................................................................................... 29

Remote Link Help – Remote Link Helpfile
– 4
5.1 Configure Operators............................................................................................29
5.1.1 Change the Default Admin Login ..............................................................................................................29
5.1.2 Add an Operator.........................................................................................................................................29
5.2 Configure Authentication.....................................................................................30
5.2.1 Configure Classic Authentication .............................................................................................................30
5.2.2 Configure Single Sign-On or Windows Credentials Authentication ........................................................30
6 Manage Receivers............................................................................ 31
6.1 Add a Receiver ....................................................................................................31
6.2 Program a Receiver .............................................................................................31
6.2.1 Receiver System Options ..........................................................................................................................31
6.2.2 Print Operation ...........................................................................................................................................31
6.2.3 Receiver Line Cards ...................................................................................................................................32
SCS-104 Option Reference........................................................................................................................32
6.2.4 Receiver Host Programming .....................................................................................................................33
6.2.5 Receiver Status ..........................................................................................................................................33
6.2.6 Serial Ports .................................................................................................................................................34
6.2.7 Receiver Diagnostics .................................................................................................................................34
7 Manage Panels................................................................................. 35
7.1 Add a Panel .........................................................................................................35
7.1.1 Connection Type Reference ......................................................................................................................35
SCS-1 / SCS-105 ........................................................................................................................................35
Network (standard)....................................................................................................................................35
Direct...........................................................................................................................................................36
Modem........................................................................................................................................................36
Modem Special ..........................................................................................................................................36
Cellular........................................................................................................................................................37
7.1.2 Example: Seize the Panel with Pickup Only (SCS-1 / SCS-105)..............................................................37
7.1.3 Extra Information Reference .....................................................................................................................37
7.2 Filter Panels ........................................................................................................37
7.2.1 Quick Filter..................................................................................................................................................38
7.2.2 Create a Custom Panel Filter ....................................................................................................................38
7.2.3 Export Filter Results...................................................................................................................................38

Remote Link Help – Remote Link Helpfile
– 5
7.3 SecureCom Wireless Activations.........................................................................38
7.3.1 Establish Cellular Service ..........................................................................................................................38
7.3.2 Register the SecureCom Wireless Module in Remote Link.....................................................................38
7.3.3 Activate the SIM/MEID ..............................................................................................................................39
7.3.4 Deactivate the SIM/MEID ..........................................................................................................................41
7.3.5 Transfer the SIM/MEID..............................................................................................................................41
7.4 Connect a Panel ..................................................................................................41
7.4.1 Connection Error Reference ......................................................................................................................41
7.5 Program the Panel...............................................................................................43
7.5.1 Retrieve Programming from Panel ...........................................................................................................43
7.5.2 Quick Programming Reference.................................................................................................................43
7.5.3 XR550 .........................................................................................................................................................43
XR550 .........................................................................................................................................................43
7.5.4 XR150 .........................................................................................................................................................50
7.5.5 XT50............................................................................................................................................................55
7.5.6 XT30............................................................................................................................................................62
7.5.7 XTL..............................................................................................................................................................67
7.5.8 Communication Paths...............................................................................................................................72
Configure Paths .........................................................................................................................................72
Configure Supervision ...............................................................................................................................72
Configure Checkin......................................................................................................................................72
Configure Comm Type Details (Network, Cellular, Wi-Fi)........................................................................73
Configure DD/CID Details (Digital Dialer, Contact ID)..............................................................................73
7.5.9 Advanced Tab ............................................................................................................................................73
Configure Details .......................................................................................................................................73
7.5.10 Network Options ........................................................................................................................................77
Configure Options......................................................................................................................................77
Configure Wi-Fi Settings (Wi-Fi only) ........................................................................................................77
Enable IPv6.................................................................................................................................................77
7.5.11 Messaging Setup .......................................................................................................................................77
7.5.12 Device Setup...............................................................................................................................................78
7.5.13 Z-Wave Setup .............................................................................................................................................78
7.5.14 Favorites.....................................................................................................................................................78
7.5.15 Remote Options .........................................................................................................................................79

Remote Link Help – Remote Link Helpfile
– 6
Standard Fields Reference ........................................................................................................................79
7.5.16 Entre............................................................................................................................................................80
7.5.17 Integrator Path ...........................................................................................................................................81
7.5.18 System Reports..........................................................................................................................................81
7.5.19 System Options..........................................................................................................................................82
System Options Programming Reference................................................................................................82
Options .......................................................................................................................................................82
Miscellaneous Options ..............................................................................................................................84
Languages..................................................................................................................................................84
Wireless ......................................................................................................................................................85
Advanced Options......................................................................................................................................86
7.5.20 Time Zone Table ........................................................................................................................................86
7.5.21 Bell Options ................................................................................................................................................87
7.5.22 Output Options ...........................................................................................................................................88
Output Options Programming Reference.................................................................................................88
7.5.23 Output Information ....................................................................................................................................91
7.5.24 Output Groups............................................................................................................................................91
7.5.25 Menu Display..............................................................................................................................................91
7.5.26 Status List...................................................................................................................................................91
Status List Programming Reference ........................................................................................................91
7.5.27 PC Log Reports ..........................................................................................................................................92
PC Log Reports Programming Reference ................................................................................................93
7.5.28 Area Information ........................................................................................................................................94
Area Information Programming Reference..............................................................................................94
7.5.29 Zone Information .......................................................................................................................................96
Zone Information Programming Reference .............................................................................................96
Action..........................................................................................................................................................97
Wireless / VPlex .........................................................................................................................................98
DMP Wireless.............................................................................................................................................98
Advanced....................................................................................................................................................99
7.5.30 Key Fobs ...................................................................................................................................................100
7.5.31 XR Schedules ...........................................................................................................................................101
Output/Door/Favorite Schedules............................................................................................................101
Area Schedules ........................................................................................................................................101
Time Schedules........................................................................................................................................101

Remote Link Help – Remote Link Helpfile
– 7
Holiday Dates ...........................................................................................................................................102
7.5.32 XT Schedules ...........................................................................................................................................102
Schedules (Arming) .................................................................................................................................102
Output Schedules.....................................................................................................................................102
Favorite Schedules ..................................................................................................................................103
7.6 Profiles .............................................................................................................104
7.7 User Codes........................................................................................................104
7.8 Scanning a Proximity Card ................................................................................104
7.9 Access Code .....................................................................................................105
7.10 Send Programming to Panel..............................................................................105
7.11 Program a Panel................................................................................................105
7.11.1 Retrieve Programming from Panel .........................................................................................................105
7.11.2 Quick Programming Reference...............................................................................................................106
7.11.3 XR550 .......................................................................................................................................................106
8 Templates ...................................................................................... 107
8.1 Create a Template .............................................................................................107
8.2 Manage Templates............................................................................................107
8.3 Modify Template Programming .........................................................................107
9 System Status ................................................................................ 108
10 Request Events............................................................................... 109
11 Account Archive ............................................................................. 110
12 Diagnostics .................................................................................... 111
13 Perform a Remote Update .............................................................. 112
13.1 Remote Update a Panel .....................................................................................112
13.2 Batch Remote Update Panels ............................................................................112
14 Export and Import Account Information .......................................... 113
14.1 Export Account Info...........................................................................................113
14.2 Import Account Info ..........................................................................................113

Remote Link Help – Remote Link Helpfile
– 8
15 Print Reports .................................................................................. 114
15.1 Account Information..........................................................................................114
15.2 Panel Programming...........................................................................................114
15.3 Activity..............................................................................................................114
15.4 Events ...............................................................................................................114
15.5 Activation Status...............................................................................................114
15.6 Recall Failure.....................................................................................................114
15.7 Compare Accounts............................................................................................115
15.8 1100 Update Reports.........................................................................................115
15.9 Data Export........................................................................................................115
15.10 Saved Reports ...................................................................................................115
16 Manage Alarms .............................................................................. 116
16.1 Visible Alarms ...................................................................................................116
16.2 Main Section .....................................................................................................116
16.3 General Information ..........................................................................................116
16.4 Location ............................................................................................................116
16.5 Information .......................................................................................................116
16.6 Commands........................................................................................................117
17 Advanced Tasks............................................................................. 118
17.1 Configure TCP Traps.........................................................................................118
17.1.1 Create and Send a Trap ...........................................................................................................................118
17.1.2 Troubleshooting.......................................................................................................................................118
17.2 Configure ECP Passthru ....................................................................................118
17.3 Configure DSC Passthru ....................................................................................119
18 Add-Ons......................................................................................... 120
18.1 Manage Modules...............................................................................................120
18.1.1 Add a Module ...........................................................................................................................................120
18.1.2 Activate a Module ....................................................................................................................................120

Remote Link Help – Remote Link Helpfile
– 9
18.1.3 Upgrade the Number of Accounts ..........................................................................................................120
18.1.4 Remove a Module ....................................................................................................................................120
18.2 Link Server ........................................................................................................121
18.2.1 Default Link Server Log In .......................................................................................................................121
18.2.2 Connect Link Server to the Database .....................................................................................................121
Computer Hard Drive ...............................................................................................................................121
Network Server.........................................................................................................................................121
Database Relocation................................................................................................................................121
18.3 Alarm Monitoring Module..................................................................................122
18.4 Advanced Reporting Module..............................................................................122
18.4.1 Printing Reports .......................................................................................................................................122
18.4.2 Report Category Reference .....................................................................................................................123
Zone Action ..............................................................................................................................................123
Arming/Disarming ...................................................................................................................................123
Area Late to Close....................................................................................................................................123
User Codes ...............................................................................................................................................123
Door Access Granted...............................................................................................................................124
Door Access Denied ................................................................................................................................124
Schedule Change .....................................................................................................................................124
System Monitors......................................................................................................................................124
System Events..........................................................................................................................................124
All Events..................................................................................................................................................125
Export Advanced Reports........................................................................................................................125
Real-Time Events .....................................................................................................................................125
18.5 SQL Server Module............................................................................................125
18.5.1 SQL Server Installation ............................................................................................................................125
18.5.2 Set up the ODBC Data Source .................................................................................................................126
Add a System DSN for SQL Server..........................................................................................................126
18.5.3 Import Panel Programming.....................................................................................................................126
18.6 Account Groups Module ....................................................................................127
18.6.1 Basic Requirements.................................................................................................................................127
18.6.2 Batch Account Group Maintenance........................................................................................................127
18.6.3 Send Programming to a Group ...............................................................................................................128
Group Send Status ...................................................................................................................................128

Remote Link Help – Remote Link Helpfile
– 10
18.7 Feature Upgrades ..............................................................................................128
18.7.1 Purchase Feature Upgrades....................................................................................................................128
18.7.2 Available Upgrade Features ....................................................................................................................128
Encryption (XR550 with Network only)...................................................................................................128
32 Door Add-On A / 32 Door Add-On B...................................................................................................128
Perform the Upgrade ...............................................................................................................................129
19 Update Remote Link and Link Server .............................................. 130
19.1 Requirements....................................................................................................130
19.2 More Information ..............................................................................................130
19.3 Update Link Server ............................................................................................130
19.3.1 Step 1: Download Link Server .................................................................................................................130
19.3.2 Step 2: Update Link Server ......................................................................................................................130
Determine If DBISAM Needs Upgraded..................................................................................................130
Update Link Server Only...........................................................................................................................130
Update Both Link Server and DBISAM....................................................................................................131
19.4 Update Remote Link ..........................................................................................131
19.4.1 Step 1: Download Remote Link ...............................................................................................................131
19.4.2 Step 2: Update Remote Link....................................................................................................................131
20 Reference....................................................................................... 132
20.1 Keyboard Shortcuts...........................................................................................132
20.1.1 Global Shortcuts ......................................................................................................................................132
20.1.2 Menu Keys................................................................................................................................................132
20.1.3 Dialog Box Keys .......................................................................................................................................133
20.2 Frequently Asked Questions..............................................................................133
20.3 Glossary............................................................................................................134
20.3.1 A ................................................................................................................................................................134
20.3.2 B ................................................................................................................................................................137
20.3.3 C ................................................................................................................................................................138
20.3.4 D ................................................................................................................................................................140
20.3.5 E ................................................................................................................................................................141
20.3.6 F ................................................................................................................................................................141
20.3.7 G................................................................................................................................................................143

Remote Link Help – Remote Link Helpfile
– 11
20.3.8 H................................................................................................................................................................143
20.3.9 I .................................................................................................................................................................143
20.3.10 K ................................................................................................................................................................143
20.3.11 L ................................................................................................................................................................144
20.3.12 M ...............................................................................................................................................................144
20.3.13 N................................................................................................................................................................144
20.3.14 O................................................................................................................................................................145
20.3.15 P ................................................................................................................................................................145
20.3.16 R ................................................................................................................................................................147
20.3.17 S ................................................................................................................................................................148
20.3.18 T ................................................................................................................................................................149
20.3.19 U ................................................................................................................................................................150
20.3.20 V ................................................................................................................................................................150
20.3.21 W ...............................................................................................................................................................150
20.3.22 Z ................................................................................................................................................................151

Remote Link Help – Remote Link Helpfile
Welcome to Remote Link– 13
•
•
•
•
•
•
•
•
•
•
•
•
2 Welcome to Remote Link
Remote Link offers an interface that is simple to navigate and provides easy access to the information you
need.
2.1 Remote Link Quick Reference
To close the account file and all open windows, select File > Close Panel.
To close all open windows, disconnect from all panels, and exit Remote Link, select File > Exit.
To switch between open windows or organize them in Remote Link, select Window. To quickly switch
between windows, press Ctrl + Tab.
To apply all current changes in a window when creating or editing information, select Apply.
To save any changes you have made in a window and to close the window, select OK.
To access context-sensitive help for the window currently open in Remote Link, press F1.
2.2 Copyright Statement
The information in this help file is subject to change without notice. The software program described herein
is furnished under the included license agreement (LT-1920). The software may be used or copied only in
accordance with the terms of the agreement.
No part of this document may be reproduced or transmitted in any form or by any means, electronic, or
mechanical, including photocopying, recording, or information storage and retrieval systems, for any purpose
other than the purchaser's personal use, without the express written permission of Digital Monitoring
Products, Inc.
IBM is a trademark of International Business Machines Corporation
Windows™ is a trademark of Microsoft® Corporation
Unless otherwise noted, all names of companies, street addresses, and persons contained herein are
part of a completely fictitious scenario and are designed solely to document the use of Remote Link
Remote Link™ © 2022 Digital Monitoring Products, Inc.
2.3 Related Documentation
Before using Remote Link, you should read and be familiar with the required panel documents. All
programming and installation guides are available on the DMP website and can be downloaded free in pdf
format. For more information, refer to the following resources:
DMP Product Guides DMP.com/resources
Technical Updates DMP.com/resources/technical-updates
Contact Information: DMP.com/company/contact-support

Remote Link Help – Remote Link Helpfile
Install Remote Link– 14
3 Install Remote Link
This section covers how to install Remote Link, including system requirements, installation, and logging on/
off. Before installing Remote Link, review the system requirements and additional documentation in this
section.
3.1 System Requirements
Before installing Remote Link, make sure that your computer system meets these minimum specifications.
You must have Administrator permissions or select Run as Administrator to install Remote Link software.
Operating System Minimum Requirements
Windows 2000 Pentium 150 Mhz processor 64 MB RAM
Windows XP Pentium II 300 MHz processor 128 MB RAM
Windows Vista 1 GHz processor
1 GB RAM (32-bit)
16 GB disk space available
DirectX 9 Graphics
Windows 7 1 GHz processor
1 GB RAM (32-bit)
16 GB disk space available
DirectX 9 Graphics
Windows Server 2008 R2 1 GHz processor
1 GB RAM (32-bit)
16 GB disk space available
DirectX 9 Graphics
Windows 10 1 GHz processor
1 GB RAM (32-bit)
16 GB disk space available
DirectX 9 Graphics
Note: Although Remote Link is compatible with versions of Windows that have surpassed their end-
of-support dates, DMP recommends using versions of Windows that currently have mainstream or
extended support. For more information, refer to Microsoft's Windows lifecycle documentation.

Remote Link Help – Remote Link Helpfile
Install Remote Link– 15
•
•
•
3.1.1 Additional Requirements
800 x 600 or higher resolution monitor
CD-ROM drive
One available COM port if connecting to an SCS-1R or SCS-105, or directly connecting to a panel. To
use the passthru feature, you must have two COM ports available
3.1.2 Using a Virtual Environment
Remote Link may be installed and used in a virtual environment, provided that the virtual machine is running
an operating system listed in the System Requirements table. When running in a virtual environment,
additional configuration of the virtual machine’s TCP and serial ports may be required.
3.2 Install on Windows
This section outlines specific steps to install and use Remote Link on Windows. A Workstation Administrator
must perform installation of Remote Link and Link Server. A Workstation Administrator must also perform
any version upgrades to Remote Link or Link Server.
3.2.1 Registry Keys
Once Remote Link and all modules are installed, the Workstation Administrator should give Remote Link
Administrators Full Control access to modify the DMP key shown and its sub-keys. An operator does not
require any additional registry privileges. The primary registry key that Remote Link uses to store application
data is: \HKEY_LOCAL_MACHINE\SOFTWARE\Digital Monitoring Products\
3.2.2 Database Setup
If a Link Administrator is not a Workstation Administrator, then the Link database should not be located in a
system drive, such as C:\ or C:\Program Files. Locating the Link database in a non-system directory will allow
the Link Administrator to manage and move the database without requiring the assistance of the
Workstation Administrator.
The Workstation Administrator should grant Link Administrators and Link Operators full access to the
database folder (and sub-folders) and the Link installation folder (and sub-folders). This should be done
irrespective of the database location.
3.2.3 Link Server
Link Server allows multiple Remote Link client workstations to use a single database. After Link Server is
installed by a Workstation Administrator, it may be used in day-to-day operation by a Link Operator. The
primary component that differentiates Link Server from other Link installations is the DBISAM Database
Server, a SQL database service. Once Link Server is installed, the DBISAM Database Server should start
automatically when the workstation is started. A Workstation Administrator can start and stop the service
using the Services tool. A Link Operator should not be able to stop the service. All Link Operator workstations
that run Remote Link must be able to establish a TCP/IP connection to the DBISAM Database Server address
and port.

Remote Link Help – Remote Link Helpfile
Install Remote Link– 16
•
•
•
•
•
•
•
3.3 System Connection Options
To use Remote Link, you must have a connection to the panel. Select one of the following hardware
configurations. For information about configuring software connection options, refer to "Configure Remote
Link Options" and "Manage Panels".
SCS-1 / SCS-105: Communicate through a receiver using dial-up.
Network (standard): Connect to a panel over a network. The workstation can be connected to a panel
on the same LAN or an external LAN. Connection to a panel on an external LAN requires that port
forwarding is enabled on the panel's network.
Network (ad hoc): Connect directly to the panel with an Ethernet cable. This method creates a
temporary LAN between the panel and Remote Link workstation.
Direct: Connect directly to the panel with a Model 399 cable.
Modem: Connect to the panel with a computer modem.
Modem Special: Connect to the panel with a computer modem when a slow, constant baud rate is
required to maintain connection data integrity.
Cellular: Connect to the panel over cell. This method requires that the Remote Link workstation is
connected to a network.
3.4 Safeguarding Your Remote Link Database
Your Remote Link database contains your subscriber account information, your password information, and
other valuable data. Protect this information by performing regular backups of the database.
3.4.1 Location
To locate the Remote Link database, select System > Configure > Remote Link, then open the Database tab.
The Database Location field displays the path to your database. If you would like to store your Remote Link
database in a different location than the default folder, change the location before setting up any accounts.
If you change the location listed in the Database Location field without first moving the database manually,
you will receive a message asking, "Do you wish to create a new database?". If you select OK, Remote Link
creates a new database at the location that you just assigned and ignores the previous database. This
means you will not have access to any account information and configurations settings from the previous
database.
Note: This connection method requires advanced network configuration. Use standard connection
methods whenever possible.
Note: Use this method only when connecting directly to a modem. To connect to a receiver with a
phone line, select SCS-1 / SCS-105.
Note: Do not attempt to move an existing database by changing the location listed in the Database
Location field.
Note: If you are using Remote Link on a computer connected to a network, run Remote Link from
your local hard drive instead of a network drive. Remote Link accesses the database faster if it is
located on the local workstation. Unless Link Server is installed, only one workstation at a time may
use a Remote Link database.

Remote Link Help – Remote Link Helpfile
Install Remote Link– 17
3.5 Log ON/OFF
Before using Remote Link, you must log into the program with a username and password. When you open
the program, the Remote Link Login window automatically displays. To log off then log on with a different
user, go to System > LOG ON/OFF. To prevent unauthorized system access, DMP recommends changing
default usernames and passwords for all software.
3.5.1 Default Remote Link Login
Username: new
Password: new

Remote Link Help – Remote Link Helpfile
Configure Remote Link Options– 18
1.
2.
3.
4.
1.
2.
3.
4.
4 Configure Remote Link Options
Before adding operators or panels, you'll need to configure global Remote Link settings, such as connection
options, receivers, and databases. Configure settings in each tab as needed.
4.1 Receiver Tab
The Receiver tab allows you to configure receivers used with Remote Link. This section covers how to
configure receiver options and settings for specific receiver models.
4.1.1 Configure Receiver Options
To access the Receiver tab, go to System > Configure > Remote Link > Receiver. After configuring the tab,
select OK to save your settings.
4.1.2 Select the Receiver Model
In Model, select your receiver model.
4.1.3 Configure Communication Options
To automatically configure communication, select Auto. To manually configure communication, complete
the following steps.
In Communication Options, go to COM Port and select the communications port connected to the
receiver from the drop-down menu. The SCS-1R can be configured when using the SCS-150 Processor
Board. Be careful to select a setting that does not interfere with your mouse, modem, or any other
device on your computer. The COM Port cannot be used for any other purpose while Remote Link is
running.
In Baud Rate, set your baud rate to the same setting as your receiver. The default setting is 9600
baud.
In Dial Out Line #, This number refers to which line card that your current receiver will use to dial out.
For any receiver except the SCS-150 that you wish to tone dial, select Tone Dial. To pulse dial, clear
Tone Dial.
4.1.4 Configure General Options
Available options differ by receiver type. Configure displayed options as needed.
In Areas, select which reporting format Remote Link will use to communicate with panels. Bin: 2-
character binary mode. Use this mode with SCS-105 Receivers. Dec: 2-character decimal mode. Select
this mode if the SCS-1R Receiver has been programmed to require Decimal mode.
In Start Character, select the appropriate option and enter the character programmed in the LSU Host
Configuration in the field next to the dropdown.
If the SCS-1R Receiver CRC option in the LSU Host Options is set to YES, select CRC.
If the Sequence Numbers option in the SCS-1R Receiver LSU Host Setup is set to YES, select
Sequence Numbers.
Note: The SCS-1R will always pulse dial, regardless of this setting.

Remote Link Help – Remote Link Helpfile
Configure Remote Link Options– 19
1.
2.
3.
1.
2.
3.
1.
2.
•
•
•
4.1.5 Configure Lengths
Configure the lengths for specific portions of messages sent to the receiver.
In Line#, select the number of digits assigned to report the line number.
In Zone#, select the number of digits assigned to report a zone number. This number should correlate
with the number of digits of the zones that report to the panel.
In User#, select the number of digits used to report a user number. For SCS-1R receivers, this number
must match the User number programmed in the Host setup programming on the receiver.
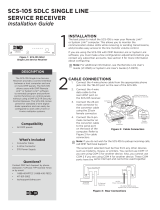
4.1.6 Set Up Hardware Receivers
The SCS-1R Receiver is a rack-mountable receiver that accepts up to eight line cards. For more information,
refer to the SCS-1R Installation Guide (LT-1037).
The SCS-105 receiver is a single line receiver that acts as an external modem which allows you to
communicate with a single alarm panel over a standard telephone line. For more information, refer to the
SCS-105 Installation Guide (LT-0153).
This section covers how to set up and configure SCS-1R and SCS-105 hardware receivers for use with
Remote Link.
4.1.7 SCS-105 Firmware Requirements
To be compatible with Remote Link, the SCS-105 Receiver must contain firmware revision level 204 or higher.
If your SCS-105 firmware level is less than 204, contact DMP Customer Service for an SCS-105 Firmware
Update kit. If you are not sure which revision level your SCS-105 is currently running, follow the steps below:
Remove power from the SCS-105 and disconnect all cables.
Open the front of the SCS-105 by removing the two machine screws.
Gently tilt the SCS-105 face down and hold the processor board as it slides out.
The SCS-105 firmware chip is located about two inches above the internal speaker. The firmware revision
number is on a label on top of the chip.
4.1.8 SCS-1R System Configuration
The SCS-1 System Configuration window allows you to configure Remote Link to communicate through an
attached receiver. If you are communicating with panels through either an SCS-1R or SCS-105 receiver,
follow the instructions below.
Go to System > Configure > SCS 1 System.
Enter information in the following fields:
System Number: If your central station has more than one receiver, enter the number of the
appropriate receiver.
Company Name: Enter the name of the company operating the central station receiver.
Receiver Key: The Receiver Key is a number that the receiver uses as a password to confirm its
identity to panels. Enter the number that you will use as a key to identify the receiver.
If the key numbers programmed into the panel and the receiver match, the receiver and the panel will
communicate. If the numbers do not match, you will receive an Invalid receiver number error.
Note: Record the receiver key and store it in a secure location for future reference.

Remote Link Help – Remote Link Helpfile
Configure Remote Link Options– 20
•
•
•
•
•
•
•
•
•
•
•
1.
2.
3.
4.
5.
6.
7.
8.
9.
4.1.9 Line Configuration
Go to System > Configure > SCS 1 Line. You must configure each line card used in the SCS-1R Receiver.
Line Number: Enter the number of the communication line assigned to the line card in the SCS-1R
Receiver that you are programming. Enter a single digit from 1 to 9.
Line Type: Select the communication line type for the receiver.
To clear all programmed information for the line prior to programming, select None.
If using multiplex communication over a polled communication line, select Multiplex (MPX).
If using Digital Dialer for communication over standard telephone lines, select Digital Dialer (DD).
If the line card is configured for multiplex or Digital Dialer accounts, select DDMX. You may have up to
128 DDMX accounts on one line card.
If the line card is configured for asynchronous network communications, select ASYNCH.
Phone Number: Enter the phone number of the telephone line connected to the receiver.
Billing Number: Enter the billing number that the telephone company has assigned to the telephone
line connected to this line card.
Comment: If necessary, enter any comments that might assist you in billing or system maintenance.
Select the checkboxes next to the number that corresponds to each multiplex account connected to
this line card.
Repeat this process for each line card in use.
4.2 Modem Tab
Use the Modem tab to configure Remote Link when connecting to an XR150/XR550 Series for programming
the panel at 2400 baud through the panel dialer. This allows you to connect to the panel using a standard
computer modem.
4.2.1 Configure Modem Options
Use the Modem tab to configure Remote Link to connect to a panel that has a modem installed or when
connecting to an XR150/XR550 Series panel for programming at 2400 baud through the panel dialer.
To access the Modem tab, go to System > Configure > Remote Link > Modem. After configuring the tab,
select OK to save your settings.
Go to the Communication Options section.
In COM Port, select the COM Port that is connected to your local computer modem.
In Baud Rate, select the baud rate for Remote Link to communicate with the computer modem.
Default setting is 9600 Baud.
In Flow Control, select the flow control option recommended by your modem manufacturer. The
default setting is Hardware. If the modem does not operate correctly with the default Hardware
setting, select Xon/ Xoff for software flow control. If neither setting operates correctly, select None.
For more information refer to your modem documentation.
To tone dial, select Tone Dial. To pulse dial, clear Tone Dial.
Go to the General Options section.
In Dial Timeout, enter the length of time Remote Link will wait for the XR150/XR550 Series panel to
pick up. Enter a range from 1 to 255 seconds. The default is 60 seconds.
If an initialization string is required for a standard modem connection, enter the string in Modem
Initialization String. The string can be up to 32 characters.
If an initialization string is required for Modem Special connection, enter the string in Special
Initialization String. The string can be up to 32 characters long.

Remote Link Help – Remote Link Helpfile
Configure Remote Link Options– 21
1.
2.
1.
2.
3.
4.
5.
4.3 Database Tab
The Database tab allows you to change the location where Remote Link stores data on your computer's hard
drive. It also allows you to backup and purge your database, merge another database into the existing one, or
import your Remote Access database into Remote Link. You may move your database to a folder on your
computer hard drive, or to any connected network drive.
4.3.1 Configure a Database
To access the Database tab, go to System > Configure > Remote Link > Database. After configuring the
options in the following steps, select OK to save your settings.
Select a Database Location
To change the default database location, complete the following steps.
To require operators to have Administrator privileges to update the database location, select Require
Admin Login for Database Update.
To select a new location for the database, go to Database Location, then select More. Select a folder
for the database, then select OK. The default database location is C:\Link\Db.
Backup the Database
To avoid potential data loss, backup your Remote Link database regularly.
Go to Backup Options and select Options.
In Backup Location, select More and double-click the directory to select it. To create a new folder,
append the folder name on the end of the path. For example, C:\Link\backup_db.
Select OK. If creating a new folder, a dialog pops up to confirm that you want to create the directory.
Select Yes.
4. To set a backup reminder, select Remind me to backup after, then enter a number of days in the
days field.
To immediately backup the database, select Backup. When the backup has completed, select OK.
Merge Databases
Merge allows you to combine another Remote Link database with an existing database.
Note: Only one initialization string can be used. Select the correct one for your operation. Refer to
Panel Information in the appropriate panel programming guide.
Note: Before performing any database maintenance function, it is recommended that you backup
the Remote Link database folder to prevent possible data loss.
Note: When using Remote Link with Microsoft SQL Server, all backup and repair operations must be
performed by the database administrator using SQL Server management tools. Remote Link does
not perform these operations.
Note: Only a Remote Link Admin operator can backup the database.
/