Page is loading ...

XTLplus™ QUICK START GUIDE
LT-1497 © 2018 Digital Monitoring Products, Inc. 18202 Search dmpalarms
SET UP THE NETWORK CONNECTION
Are you using a DMP SecureCom Wireless Access Point (WAP)?
YES: Power the WAP and then continue to Step 3 to power the
panel.
NO: Continue to Step 3: Power the Panel and then press the
WPS button on the customer’s router within 2 minutes of
powering the panel.
If the customer’s router does not have a WPS button, continue to
Steps 3 and 4 to power the panel and the keypad. Then, follow
the directions on the keypad to choose a network. Refer to the
XTLplus Installation and Programming Guide (LT-1434) as needed.
RESETLOAD
BAT
PROG
R B
+ DC -
S
N
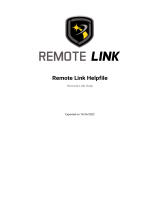
INSTALL THE 265 (OPTIONAL)
Are you installing a 265LTE-V or 265H Cellular
Communicator? If you are, follow these steps. If you are not,
continue to Step 2: Set Up the Network Connection.
1. Place the antenna onto the SMA connector and twist
the antenna until it is securely tightened on the 265.
2. Keep the 265 parallel to the XTLplus PCB and
slide it into the eight-pin CELL MODULE connector.
3. Fully seat the 265 and snap its stando hole
onto the stando pin on the XTLplus.
STEP 1
1
265 Cellular Communicator Installation
1
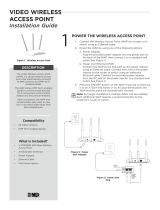
WPS/RESETEthernet
WAP Power Supply and WPS
Wire Exits for DC
Power Supply
+
Model 372-500-W
DC Plug-in
Power Supply
Use 22 AWG for
Power Supply connection
_
BAT
PROG
R B
+ DC -
S
N
INSTALL GUIDE
LT-1434
CELL
MODULE
XTLplus Power Supply
POWER THE PANEL
Caution: Observe polarity when powering the panel.
1. Use a 22 AWG wire to connect the panel’s positive (+)
DC terminal to the positive (+) terminal on the power
supply.
2. Connect the panel’s negative (-) DC terminal to the
negative (-) terminal on the power supply.
3. Plug the power supply into a 120 Volt AC, 60Hz
dedicated outlet not controlled by a switch.
STEP 2
2
2
STEP 3
3
3
Antenna
SMA
Connector
Eight-Pin CELL
MODULE Connector
Stando
Hole

Digital Monitoring Products 2
DMP.com
XTLplus™ Quick Start Guide
INSTALL AND PAIR THE 9800 SERIES KEYPAD(S)
Power the Keypad(s)
1. Plug the micro USB into the back of the keypad.
2. Plug the power supply into an outlet.
3. Complete Steps 1 and 2 for up to seven keypads.
Note: All keypads must be powered within 10 minutes of
powering the panel for auto pairing to be successful. If
the pairing timer expires, press the RESET button on the
panel to restart the 10 minute period.
Keypad Auto Pairing
Auto pairing begins when you power the keypad(s). The keypad
displays Pairing Keypad With System. If the panel acquires the
keypad(s) the keypad returns to the home screen, signaling that
pairing is complete.
STEP 4
4.1
4.2
ACTIVATE THE 265 (OPTIONAL)
Dealer Admin (DMPDealerAdmin.com)
1. Navigate to the Dealer Admin site.
2. Click Customers in the right-side menu and select a
customer.
3. Click Add System.
4. Enter a System Name.
5. Select XTLplus from the System Type drop-down menu.
6. Select either Cellular or EASYconnect + Cell Backup in
the Connection Type eld.
7. Enter the MEID/SIM number found on the 265 label.
8. Click Get Status.
9. Enter the Account Number.
10. Select a Rate Plan and an SMS Package for the 265.
11. Click Activate Cellular Device.
Remote Link™
1. Navigate to Remote Link and select a control panel.
2. Select Program in the top menu and select
Communications from the drop-down menu.
3. Select Cellular Network as the Communication Type
and click Activate.
4. Enter the MEID/SIM number found on the 265 label and
click Activate.
5. Select a Rate Plan and a Text Plan for the 265.
6. Click Activate at the bottom of the window.
Tech APP™
1. Navigate to the Tech APP.
2. Tap Find a Customer and search for a customer.
3. Tap Add a System.
4. Enter a System Name.
5. Scan or enter the Serial #.
6. Select XTLplus from the System Type drop-down menu.
7. Select either Cellular or EASYconnect + Cell Backup in
the Connection Type eld.
8. Enter the Account Number.
9. Enter the MEID/SIM number found on the 265 label.
10. Tap Get SIM Status.
11. Select a Rate Plan and an SMS Package for the 265.
12. Tap Activate Cellular Device.
STEP 5
PROGRAM ZONES
Program XTLplus panel zones by using the Dealer Admin website,
Remote Link™ software, or a wireless keypad.
Dealer Admin (DMPDealerAdmin.com)
1. Click Customers in the right-side menu and select a
customer’s account number.
2. Click Fast Programming in the right-side menu.
3. Click the blue check icon next to the zone you want to
program and enter the Serial Number.
4. Click Send Programming to System to send the
programming to the panel.
Remote Link™
1. Within the selected system, open the Program menu and
click Zone Information.
2. Click New and ll in the zone information.
3. Click Apply.
Wireless Keypad
1. Press the RESET button on the panel for two seconds.
2. Enter 6653 (PROG) in the keypad. The keypad displays
PROGRAMMER.
3. Press CMD until FAST PROGRAM displays and press a top
row select area.
4. Press CMD until ZONE NO:? displays. Enter the zone
information until all zones are programmed.
5. Press the back arrow to display FAST PROGRAM.
6. Press CMD to display STOP and press any top row select
area to exit the programming menu and to save panel
programming.
STEP 6
MON 5:35 PM
TODAY
WEDNESDAY
82
98 77
HI LO
CURRENT
98 77
HI LO
Pairing Keypad With Sysytem...
Keypad Auto Pairing in Progress
TOD AY
WEDNESDAY
82
98 77
CURRENT
HI LO
85 68
HI LO
98 77
Panic
Chime
Reset
Favorites
MON 5:35 PM
Keypad Auto Pairing Successful
4.1
4.2
/