Page is loading ...

1 of 4 Workrite Ergonomics | 800.959.9675 | www.workriteergo.com
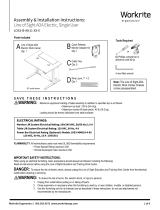
Power System Components, CPU Holders,
Keyboard Drawers
A Chassis, Le Side
Qty: 1 B Chassis, Right Side
Qty: 1 C Rear Panel
Qty: 1
G #10-¾" Phillips
Pan Head Screws
Qty: 10
L #10-¾" Phillips
Pan Head Screws
Qty: 2
F Worksurface
Qty: 1 F Worksurface
Qty: 1
Optional, Sold Separately
Parts Included:
Recessed Worksurface & Shelf Hardware
Basic Worksurface
Basic, Recessed Hardware Kit
Assembly Instructions: Basic or Recessed Workstation
Chassis: LOS3-B-NS1-36-XX, LOS3-B-NS1-48-XX
LOS3-B-NS2-60-XX, LOS3-B-NS2-72-XX
✓
Verify That You Have All The Tools Needed For The Assembly
You will need the following tools:
Drill/driver or Phillips screwdriver with #2 tip
4 mm & 5 mm Allen wrenches
E Joint Bolt
Qty: 4D Joint Nut
Qty: 4
J
Shelf Support
Qty: 1
K
¼"-20 Low Profile
Socket Head Screw
Qty: 6
H Recessed Shelf
Qty: 1 I Shelf Bracket
Qty: 1
60" version shown
60" version shown
Basic Worksurface Recessed Worksurface
or
or

2 of 4 Workrite Ergonomics | 800.959.9675 | www.workriteergo.com
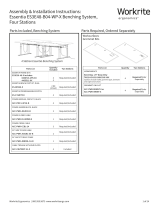
1 Attach Rear Panel to Chassis Side
Note: Build Assembly in a large, clean area on carpeting or
moving blankets to avoid damaging Worksurface and Chassis.
Attach the Le Side (A) and Right Side (B) to the Rear Panel (C)
with four Joint Nuts (D) and Joint Bolts (E). Tighten securely with
the 5 mm Allen wrench on the Clamp Bolt (E) and 4 mm Allen
Wrench on the Clamp Nut (D).
2 Place Chassis Onto Worksurface
2.1 Place the Worksurface (F)
upside down on the floor.
2.2 Place the Chassis assembly
onto the Worksurface.
We suggest you use two
people to move and position
the Chassis on the top.
3 Attach Chassis to Worksurface
Attach Chassis with ten #10-¾" Phillips Head Screws (G), and tighten securely.
2.3 Align Chassis assembly so holes
in Top Brackets line up with pre-
drilled holes in Worksurface.
A
B
FF
C
D
E
GG
2.1 2.1
2.2 2.2
2.3 2.3
Basic Worksurface
Basic Worksurface
or
or
Recessed Worksurface
Recessed Worksurface

3 of 4 Workrite Ergonomics | 800.959.9675 | www.workriteergo.com
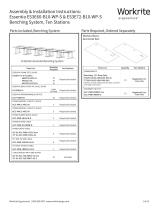
4 Flip Work Center Over
We recomment you flip over the
assembled work center with two people.
5 Attach Shelf to Recessed Chassis
Note: Recessed Chassis' require a monitor shelf to be installed.
5.1 Choose a height from 5" below the worksurface to 8"
below for the Recessed Shelf assembly (H, I, J & K). Install
so the monitor will low enough to see the presenter
yet the bottom of the monitor is not hidden behind the
worksurface. Use the monitor stand height adjustment
for minor adjustments.
5.2 Attach the Shelf Bracket (I) to the Recessed Shelf (H)
from front with two Low Profile Socket Head Screws
(K).
5.3 Attach the Shelf Support (J) in the center at the same
height with one Low Profile Socket Head Screw (K).
5.4 Insert the Shelf assembly between the two side panels
and attach the Recessed Shelf assembly through the
Chassis front with two Joint Nuts (D) and two Joint
Bolts (E).
5.5 Attach the Recessed Shelf assembly to the Chassis
back with three Low Profile Socket Head Screws (K).
5.6 Install the Shelf Support (J). Fasten the Support to the
Worksurface with two #10-¾" Phillips Head Screws (G).
If you are assembling a Basic Work
Center Skip to Step 6.Basic Workstation Recessed Workstation
K
E
J
E
H
IJ
G
5.1
5.2
D
D
K
K
5.6
5.5
5.3
5.4

4 of 4 Workrite Ergonomics | 800.959.9675 | www.workriteergo.com
1500396 Rev B
7 Install Optional Accessories for Your Configuration
With the monitors and power components installed, you will now need to add your optional accessories
like Worksurface Grommets, Remote Controls and CPU Holders. Follow the instructions with the Optional
Accessories to complete this step.
8 Install Technology for Your Configuration
With all Line of Sight components installed, you will now need to install all the technology components to
complete your system. Install all computers, peripherals like keyboards and mice, and network cabling to
complete your installation according to the manufacturers specifications and your specific application.
6 Install Power Distribution Options for Your Configuration
With the Work center built, you will now need to add your power options for your specific configuration. Follow
the instructions that came with the Power System Options to complete your configuration.
If you did not purchase the Power Track or Power Bar, skip to Step 7.
9 Assemble Final Room Configuration
With all individual Work center Built and electrical installed, arrange Work centers
according to your final room configuration. You will need at least two people to move a
Work center.
Adjust the Glides on the bottom of the Feet to assure each Work center is level and stable in its final location.
Note: It is critical that you follow all warnings and cautions when you get to final assembly. Consult the
instructions that came with your electrical components and follow all cautions and warnings carefully!
Configurations with shared power must conform to code and include use of Ganging Brackets for Side to Side
configurations or Back to Back Filler Plates for Back to Back configurations.
Final assembly will include testing of electrical components and functioning of all Monitor Lis.
✓ Cleaning Instructions
Laminate Worksurfaces:
For everyday cleaning, wipe the surface with a damp cloth or sponge. Use a spray cleaning agent sparingly
if necessary (suggested spray cleaning agents are indicated below). Do not pour water directly onto the
worksurface. Wipe completely dry with a so rag using a straight line motion.
• Worksurfaces may need occasional dusting. To keep the surface in ideal condition, use a non-oily furniture
spray.
• Diicult stains such as coee can be removed using a mild cleaning detergent and a so bristled (non-metallic)
brush. Do not scrub surfaces with too much force, otherwise the surface could lose its finish.
• Stubborn stains that resist any of the above cleaning methods may require the use of undiluted household
bleach. Apply a very small amount of bleach (approximately ¼-capful) to the stain and let stand no longer than
two minutes. Rinse thoroughly with warm water and wipe dry. WARNING: Prolonged exposure of the laminate
surface with bleach will cause discoloration.
• Ensure to always rinse laminate surfaces aer cleaning. Even a small amount of cleaning residue can result in
permanent discolorations.
• Recommended Laminate Worksurface cleaning agents:
· Non-abrasive spray cleaning agents: Dawn, Fantastik, Windex, Lysol
· Furniture spray: Pledge
· Stain removers: Lestoil, Clorox
/