Page is loading ...

Workrite Ergonomics | 800.959.9675 www.workriteergo.com 1 of 8
M Rear Locking Strip
Qty: 1
Q Track Glides
Qty: 2
S #8 × " Phillips
Flathead Screw
Qty: 2
E #10 × ¾" Wood
Screw
Qty: 6
T #10 × ¾" Wood
Screw
Qty: 6
H Screwing Lock
Qty: 2 I Key
Qty: 2
N Front Locking Strip
Qty: 1
F Star Lock Washer
Qty: 2
D 6 mm × 1.0P ×10 mm
Screw
Qty: 2
Locking Kit (models 920-FL and 920-TL)
J #10 × ¾" T25 Tamper Proof
Torx Screw
Qty: 2 K T25 Tamper Proof Bit
Qty: 1
Hardware Kit (all models)
B Interior Housing
Qty: 1 C CPU Supporting Plate
Qty: 1
A Exterior Housing
Qty: 1
O Track
Qty: 1
Track Kit (models 920-T and 920-TL)
P Swivel Disk
Qty: 1
R Track Stop
Qty: 1
L M5 × 0.8p × 6 mm Phillips
Head Screw
Qty: 1
G M5 × 0.8p × 6 mm
Screw
Qty: 2
Follow the instructions below specific to your product (920-F / Fixed Mount CPU Holder, 920-FL / Fixed Mount CPU Holder w/Lock,
920-T / Slide & Swivel Track mounted CPU Holder, or 920-TL / Slide & Swivel Track mounted CPU Holder w/Lock).
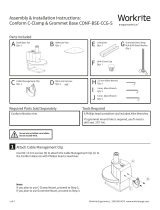
Part Included, CPU Holder (all models)
Assembly & Installation Instructions:
920 CPU Holder, 920-X
Verify that you have all the hardware and tools needed for the assembly
Check your cartons against the list above to verify that you have all the parts needed.
You will need the following tools:
#2 tip Phillips screwdriver or drill/driver
Drill with ⅛" diameter drill bit
✓
82° 0.164"
3/8"
0.100"
#8-32 Thread
0.312"
#2 Drive

2 of 8 Workrite Ergonomics | 800.959.9675 www.workriteergo.com
Attach Exterior Housing to Worksurface or Wall
Remove the screw and washers holding the CPU Clamp in place.
Slide out CPU Clamp and set aside.
Position Exterior Housing on underside of worksurface. The
distance from the center of the Exterior Housing to the front of
the worksurface should be at least half the depth of the CPU.
Mark location of screws and drill ⅛" pilot holes . You may wish
to mark your drill bit so you do not drill more than " deep and
damage your worksurface. Do not to drill through the top of
the worksurface!
Under Desk Mount:
Attach with four #10×¾ Phillips head screws (E) as shown.
Under Desk & Wall Mount:
If mounting to a wall, remove plastic side cover by removing 3
Phillips screws from the interior of the Exterior Housing.
Position Exterior Housing on underside of worksurface and
against wall. Mark location of screws and drill ⅛" pilot holes .
You may wish to mark your drill bit so you do not drill more than
" deep and damage your worksurface. Do not to drill through
the top of the worksurface!
Attach to side of desk or wall with four #10 × ¾" Phillips head
screws (E) and optionally use 2 remaining screws to attach to
underside of desk as shown.
920-F: Fixed Mount Models
1
c
c
d
g
g
g
f
f
e
e
e
d
a
a
b
b
CPU Clamp
Screw & washers
Under Desk Mount
Front Side Under Desk &
Wall Mount
A
E
E
E
Remove

Workrite Ergonomics | 800.959.9675 www.workriteergo.com 3 of 8
Adjust Brackets for Your Computer Size
Attach CPU Supporting Plate (C) to Interior Housing (B) in wide or narrow size based on CPU width. Use the
narrow position if your CPU is 5½" wide or less. For larger CPUs use the wide position.
Adjust the CPU Clamp if necessary. To adjust the Clamp, remove the two Phillips head screws and move the
angle bracket, then reinstall the screws.
The CPU Clamp is pre-configured in the middle position for CPUs from 2½" wide to 5½" wide.
For CPUs from 1" to 2½" wide, use the narrow position.
For CPUs from 5½" to 9" wide, use the wide position.
Hang the Interior Housing (B) onto Exterior Housing (A) as high as possible to fit CPU and secure with
M5×0.8p6mm Screw (G).
Loosely attach CPU Clamp with screw and washers from CPU Clamp as shown. For CPUs 8" to 9" wide, use the
hole to the le.
Insert CPU and Secure CPU Clamp
Place CPU onto holder making sure to
balance on the CPU Support Plate (C).
Slide CPU Clamp firmly against the CPU
to hold in place and then tighten screw.
Confirm that CPU is firmly held in place.
Adjust clamp if necessary.
Narrow
5½" or less
Wide
5½"–9"
Wide CPUs
5½"–9"
Average CPUs
2½"–5½"
Narrow CPUs
1"–2½"
CPU Clamp
For CPUs 8" to 9" wide
For CPUs 1" to 8" wide
G
G
B
B
A
A
C
a b
c
Push CPU Clamp in firmly
then tighten screw
d
d
a
a
a
b
bb
c
2
3

4 of 8 Workrite Ergonomics | 800.959.9675 www.workriteergo.com
920-FL: Fixed Mount CPU Holder With Lock
Insert rear locking mechanism
Install the Rear Locking Strip (M) into the CPU Supporting Plate (C).
Measure from the center of the shelf to ½ the depth of the CPU to the
inside of the lock bar and install one M5 × 0.8p × 6 mm (L).
Attach Brackets and Adjust for computer size
Follow Step 1 and 2 on the previous pages for 920-F / Fixed Mount CPU Holder, then continue to Step 2 below.
1
2
Attach Front Locking Strip and Lock CPU in Place
Insert Front Locking Strip (N) into slot in the front slot of the CPU Support Plate (C) and secure with Screwing
Lock (H) using Key (I).
Secure CPU Clamp on the opposite side with the other Screwing Lock (H) using Key (I) by inserting Screwing
Lock into the secure side hole that aligns with the screw receptacle.
Confirm that CPU is securely locked in place. Adjust clamps or locks if necessary.
4
Insert CPU and Secure CPU Clamp
Place CPU onto the CPU Holder and
against the Rear Locking Strip (M)making
sure to balance on the CPU Support
Plate (C).
Slide CPU Clamp firmly against the CPU
to hold in place and then tighten screw.
a
b
a
b
N
H
H
I
I
M
L
Push CPU Clamp in firmly
then tighten screw
a
a
b
b
3
C
C
CPU Clamp

Workrite Ergonomics | 800.959.9675 www.workriteergo.com 5 of 8
920-T / Slide & Swivel Track Mount CPU Holder
1Position and Mount Track
Front to Back Slide
If there is enough room to swivel the CPU, align the track
perpendicular to the front of the desk or parallel to the side as
shown, or...
Side to Side Slide
The sideways mount is recommended for workcenter
installations so the CPU holder cannot slide back into a position
where it can be damaged between a cross bar and the top or
interfere with below desk accessories. This is a safety concern
and one of the key reasons to use a sideways track mount.
Mark location of screws and drill pilot holes no larger than
⅛" diameter, being careful not to drill through the top of
the worksurface. Do not to drill through the top of the
worksurface!
With the Track (O) aligned so that the extended center "Tab" is
either closest to the wall or the rear of the desk, aix Track to
under surface of desk in parallel or perpendicular orientation
using four #10×¾" Wood Screw (T).
MINIMUM for Front to Back Slide: CPU width ÷ 2 - 3"
To prevent the CPU protruding from the front of the desk
aer the track is positioned, the distance from the front
edge of the track to the front edge of the desk should be
at least ½ the depth of the CPU minus 3".
For example, for a 16" deep CPU, the front of the track
edge should be at least 5" set back from the front edge
of the desk:
16"/2 = 8"; 8" - 3" = 5"
MINIMUM for Side to Side Slide: CPU width ÷ 2 - 1"
To prevent the CPU protruding from the front of the desk aer
the track is positioned, the distance from the side edge of the
track to the front edge of the desk should be at least ½ the
width of the CPU minus 1".
Note: in some applications, you may wish to mount track
further back on desk.
For example, for a 6" wide CPU, the front of the track edge
should be at least 2" set back from the front edge of the desk:
6"/2 = 3"; 3" - 1" = 2"
Allow space for
CPU to swivel
Allow space for
CPU to swivel
1" minimum
Allow space for
CPU to swivel
1" minimum
Allow space for
CPU to swivel
1" minimum
Allow space for
CPU to swivel
1" minimum
a
b
c
cc
a
a
b
TT
Side to SideFront to Back
O
O
O
Tab
Tab
Tab
5" in example below 2" in example below

6 of 8 Workrite Ergonomics | 800.959.9675 www.workriteergo.com
Insert CPU and Housing Into Track
Slide Swivel Disk with Track Glides into Track.
Attach Track Stop (R) to front of Track using the
two #8 × "Phillips Flathead Screws (S).
Insert CPU and Secure CPU Clamp
Place CPU onto the CPU Holder and against the
Rear Locking Strip (M)making sure to balance on
the CPU Support Plate (C).
Slide CPU Clamp firmly against the CPU to hold
in place and then tighten screw.
Assemble Swivel Disk
Attach Swivel Disk (P) to top of Exterior Housing
with two 6 mm × 1.0P ×10 mm Screw (D) and Star
Lock Washers (F) as shown.
Attach Track Glides (Q) onto Swivel Disk with the
word "TOP" facing up.
a
b
4
Push CPU Clamp
in firmly then
tighten screw
Shown without
worksurface for clarity
a
a
b
b
"Top"
"Top"
Smaller holes
Center b
b
a
b
a
ab
Q
O
S
P
F
D
Q
2
3

Workrite Ergonomics | 800.959.9675 www.workriteergo.com 7 of 8
920-TL / Slide & Swivel Track Mount CPU Holder w/Lock
Attach Track, adjust brackets and assemble Swivel Disk
Follow Steps 1–3 for 920-T / Slide & Swivel Track Mount CPU Holder on pages 5-7.
Insert rear locking mechanism
Follow Step 2-4 for 920-FL / Fixed Mount CPU Holder w/Lock on page 4.
Insert CPU and Housing Into Track (locking version)
Follow Step 4 for 920-T / Slide & Swivel Track Mount CPU Holder on page 6. Use the T25 Tamper Proof Torx Bit
(K) to attach the two T25 Tamper Proof Torx Screws (J) to secure the Track Stop instead of the #8 × " Phillips
Flathead Screws (S).
1
2
3

#1500153 Rev C
8 of 8 Workrite Ergonomics | 800.959.9675 www.workriteergo.com
/