Page is loading ...

Workrite Ergonomics | 800.959.9675 www.workriteergo.com 1 of 6
Disassembly Instructions:
Adjustable Work Centers

2 of 6 Workrite Ergonomics | 800.959.9675 www.workriteergo.com
Cordless Drill
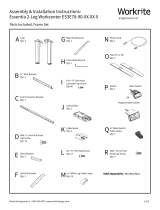
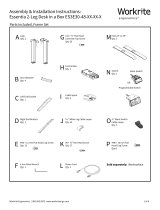
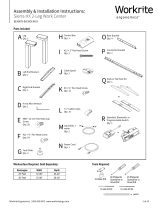
Tools Required:
7/16” Wrench 3mm Allen Wrench 4mm Allen Wrench 5mm Allen Wrench#2 Phillips Bit
Screwdriver or
Driver/Drill
1a
1
a
Disconnect the Power Supply from Workcenter.
Turn the Work Center upside down.
NOTE:
• Example shown is for 3-leg table, the same steps can be followed for 2 or 4-leg tables.
• Not all images are representative of all Workrite Adjustable Work Centers.

Workrite Ergonomics | 800.959.9675 www.workriteergo.com 3 of 6
2a
2d
2c
2a
2b
2
a
b
c
d
e
f
g
Remove
Power Cable from Power Port
Remove
Switch Cable
from Switch
Port “HS"
Remove
Leg Cable or
Extension from
Leg Ports “M1",
“M2" & M3
2e
2e
Steps to remove Cables and Cable Loops.
Remove the Leg Cables from ports on the Control Box.
Remove Extension Cable from port on the Control Box.
Remove the Control Cable from the switch port on the Control Box.
Remove the Power Cable from the power port on the Control Box.
Unscrew Pan Head Screw from Cable Loops and remove them from underside of worksurface.
Dispose of Cables in Electronic Waste per Local Ordinance.
Save Screws for recycling.

4 of 6 Workrite Ergonomics | 800.959.9675 www.workriteergo.com
4
3
a
a
b
c
d
b
c
Programmable Switch shown
4a
4b
4b
4b
3a
4a
Steps to remove Control Box & Cable Spool from Worksurface.
Unscrew two Pan Head Screws and remove Control Box.
Unscrew Pan Head Screw and remove Cable Spool.
Dispose of Control Box in Electronic Waste
per Local Ordinance.
Save Screws for recycling.
Steps to remove Workrite Switch.
Unscrew two Pan Head Screws and remove the switch from underside of worksurface.
Dispose of Switch in Electronic Waste per Local Ordinance.
Save Screws for recycling.

Workrite Ergonomics | 800.959.9675 www.workriteergo.com 5 of 6
1500476 Rev A
REMOVE
5
6
a
a
b
b
c
d
c
d
5a
5b
6a 6a
6b
6b
Steps to remove Feet.
Using Allen Wrench, unscrew Flat Head Cap Screws and
remove Center Foot from bottom of Center Leg.
Using Allen Wrench, unscrew Flat Head Cap Screws and
remove Feet from bottom of Center Leg.
Dispose of Feet in Metal Recycling per Local Ordinance.
Save Screws for recycling.
Steps to remove Base from Worksurface.
Remove all Pan Head Laminate Top Screws that secure the base to the laminate surface.
Save Screws for recycling.
Remove Splice Bracket & Draw Bolt
from Table Top, and save for recycling.
Dispose of laminate per local ordinance.

6 of 6 Workrite Ergonomics | 800.959.9675 www.workriteergo.com
1500476 Rev A
8
7
a
a
b
c
b
c
d
7c
7b
7a 7a
7b
7c
8a
8a
Right Leg Le Leg
Connected Rear Bracket Floating Rear Bracket
Right End Bracket Le End Bracket
Steps to remove Rear Bracket from Connector Bracket.
Unscrew Flat Head Cap Screws, then removeRear Bracket from
Connector Bracket.
Dispose of Base (three Legs, End Brackets, Short Brackets,
Connector Bracket and Rear Brackets) in Metal Recycling.
Save Screws for recycling.
Steps to remove Short and Medium Brackets.
Unscrew Flat Head Cap Screws then remove Connected Rear Bracket and Floating Rear Bracket.
Unscrew Flat Head Cap Screws then remove Right End Bracket from Right Leg, remove Left End Bracket from Left
Leg, and remove Corner End Bracket from Center Leg.
Unscrew Flat Head Cap Screws then remove Short Brackets from all there Legs.
Save Screws for recycling.
/