
1 of 2 Workrite Ergonomics | (800) 959–9675 www.workriteergo.com
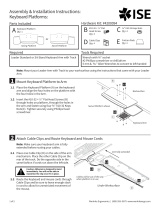
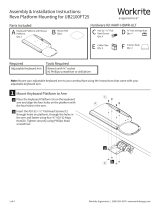
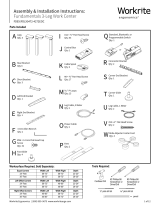
Parts Included
Tools RequiredRequired
Assembly & Installation Instructions:
Swap MT-ULTRA Mouse Platform:
No tools are required to mount the MT-ULTRA to the
Swap Keyboard Platform
Swap Keyboard Platform
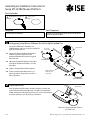
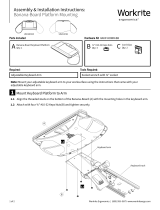
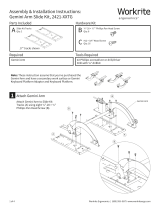
1 Configuring Swap Mouse Platform for Le or Right Handed Use
Swap MT-ULTRA Mouse Platforms are
ambidexterous and can easily be installed for
right or le handed use.
1.1 Loosen the Clamp Knob to allow Mouse
Platform (A) to be slipped over the
Keyboard Platform on either the right or
le hand side.
1.2 Mount to Keyboard Platform on the front
third of the Keyboard Platform, near the
Wrist Rest.
1.3 Tighten Clamp Knob to lock into place.
1.4 If you've mounted for le hand use, re-
locate the Mouse Trap to the rear of the
Mouse Platform.
B
Mouse Pad
Qty: 1
A
MY-ULTRA Mouse Platform
Qty: 1
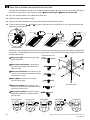
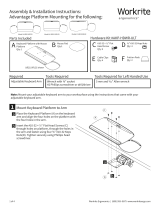
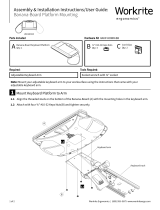
2 Place Mouse Pad
Peel the backing o the Mouse Pad (B) and place in either the
right handed or le handed location. The Mouse Pad provides
improved traction and pointing accuracy. It can be repositioned
by simply peeling it up and placing it elsewhere.
1.4
1.3
1.3
1.1
1.1
1.2
1.2
Worksurface
Re-locate
Mouse Trap
Clamp Knob
Swap Keyboard
Platform sold
separately
Le Handed
Right Handed
Shown with Swap Keyboard Platform
on Leader Arm
A
A
A
Tighten
Tighten
Loosen
Loosen
B

2 of 2 Workrite Ergonomics | (800) 959–9675 www.workriteergo.com
1500375 Rev A
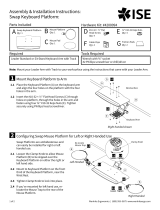
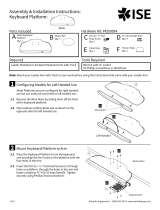
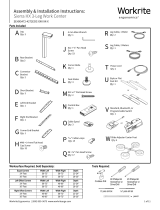
3 Adjust Mouse Platform Position With the Pivot Arm
The Swap MT-ULTRA Mouse Platform has six dierent Mouse Platform position settings accessed by rotating the
Pivot Arm. For this step, we will simply move from Mouse-Over High to Mouse In-Line Forward.
3.1 Press the Position Button in the middle of the Pivot Arm.
3.2 Rotate to the desired position (height.)
3.3 Re-orient the Mouse Platform face up then swivel into position (forward or back.)
3.4 In Mouse-Over positions , and the mouse platform can be swiveled into an "over" position to cover the
10-keys on your keyboard.
Position the mouse platform so that you hand can hover over the mousing area while your elbow is comfortably
at your side. The best position for your mouse platform will vary for each individual depending on their furniture
and body dimensions.
Mouse-Over High - for mousing over high
profile keyboards
Mouse-Over Low Forward - for mousing
over low profile keyboards and for those
with less reach
Mouse In-Line Forward - for mousing at the
same level as the keyboard platform and for
those with less reach
Mouse Below - ideal for vertical input
devices like joysticks
Mouse In-Line Back - for mousing at the
same level as the keyboard platform and for
those with greater reach
Mouse-Over Low Back - for mousing over
low profile keyboards and for those with
greater reach
1
2
3
5
6
4
1
2
3
5
6
4
1
2
3
5
6
4
1
2
3
5
6
4
Sandy
5'0"
Chris
5'8"
Pat
6'4"
Sandy
5'0"
Chris
5'8"
Pat
6'4"
3.1
3.1
3.2
3.3
3.2
3.4
3.4
3.3
Position
Position
Button
Position Button
Position
Swivel to Mouse
In-Line Forward
Position
Pivot Arm Detail
Pivot Arm Side View
Pivot Arm Detail
Mouse-Forward Mouse In-Line Mouse-Back Mouse-Over Le Handed
-
 1
1
-
 2
2


Workrite Swap MT-ULTRA Mouse Platform Installation guide
- Type
- Installation guide
- This manual is also suitable for
Ask a question and I''ll find the answer in the document
Finding information in a document is now easier with AI
Related papers
-
 Workrite Ergonomics Fundamentals AKP01 Installation guide
-
 Workrite Ergonomics Swap Keyboard Platform Installation guide
-
 Workrite Ergonomics Swivel, Swing Keyboard Platform Installation guide
-
 Workrite Ergonomics Banana Board Installation guide
-
 Workrite Ergonomics Banana Board Installation guide
-
 Workrite Ergonomics Advantage Installation guide
-
 Workrite Ergonomics Skate Keyboard Platform Installation guide
-
 Workrite Ergonomics Revo Installation guide
-
Workrite Sierra HX 3-Leg Installation guide
-
 Workrite Ergonomics Gemini Arm Track Kit Installation guide


Other documents
-
 Workrite Ergonomics Banana Board User guide
-
 Workrite Ergonomics Sierra HX 3-Leg Installation guide
-
Acco 62384 Datasheet
-
 Workrite Ergonomics Fundamentals EX/LX 3-Leg 54-72″, 42-72″ Installation guide
-
Acco 62399 Datasheet
-
 Workrite Ergonomics CONF-2SDA-WOB-S Assembly/Installation Instructions
-
 Workrite Ergonomics Gemini Arm Platform Adaptor Installation guide
-
Cooler Master R8-PEA-DUAK-GP Datasheet
-
Evoluent BNEEMP Datasheet
-
3M MA220MB Datasheet


