Page is loading ...

1 of 2 Workrite Ergonomics | (800) 959–9675 www.workriteergo.com
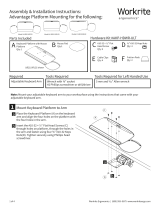
A Skate Keyboard
Platform
Qty: 1
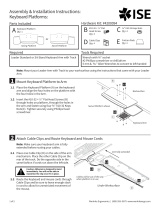
Parts Included
Assembly & Installation Instructions:
Keyboard Platform:
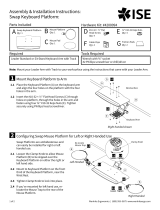
2 Mount Keyboard Platform to Arm
2.1 Place the Keyboard Platform (A) on the keyboard
arm and align the four holes on the platform with the
four holes in the Arm.
2.2 Insert the #10-32 × ½" Flat Head Screws (C) through
holes on platform, through the holes in the arm and
fasten using four ⅜" #10-32 Keps Nuts(D). Tighten
securely using Phillips head screwdriver.
1 Configuring Models for Le Handed Use
Skate Platforms are pre-configured for right handed
use but can easily be converted to le handed use.
1.1 Remove the Wrist Rests by sliding them o the front
of the keyboard platform.
1.2 Flip locations of Wrist Rests and re-attach on the
opposite sides for le handed use.
Note: Mount your Leader Arm with Track to your worksurface using the instructions that came with your Leader Arm.
Tools RequiredRequired
Wrench with ⅜" socket
#2 Phillips screwdriver or drill/driver
Leader Standard or Sit-Stand Keyboard Arm with Track
D ⅜" #10-32 Keps Nuts
Qty: 4
E Cable Clips
Qty: 4 F Friction Pads
Qty: 2
C #10-32 × ½" Flat
Head Screw
Qty: 4
B Mouse Pad
Qty: 1
Hardware Kit: #4200094
Skate
A
A
C
1.1
2.2
1.2
2.1
Keyboard Arm
Worksurface
Wrist Rests
Le Handed

2 of 2 Workrite Ergonomics | (800) 959–9675 www.workriteergo.com
1500370 Rev A
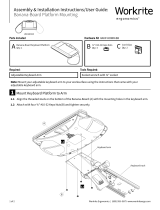
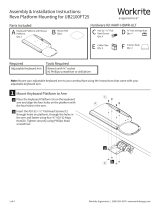
3 Place Mouse Pad
Peel the backing o the Mouse Pad (B) and place in
either the right handed or le handed location. The
Mouse Pad provides improved traction and pointing
accuracy. It can be repositioned by simply peeling it up
and placing it elsewhere.
4 Attach Cable Clips and Route Keyboard and Mouse Cords
Note: Make sure your keyboard arm is fully
extended before routing your cables.
4.1 Place one Cable Clip (E) on the side of the arm
mechanism. Place the other Cable Clip on the
rear of the track. Do the opposite side in the
same fashion if cords run down the le side.
4.2 Route the Keyboard and mouse cords through
Cable Clips and be sure to leave enough slack
in cord to allow for unrestricted movement of
the mouse.
5 Apply Friction Pads or Hook & Loop Squares
Place Friction Pads (F) on the bottom surface of
your keyboard to keep it in place, if necessary.
The Friction Pads will keep your keyboard from
sliding when the platform is angled.
Caution: Adhesion is designed to bond
immediately. You will not be able to
reposition the clip once it's in place.
6 Consult the User Guide for your Leader Arm
Go to www.workriteergo.com/instructions to find
the Leader Arm User Guide for instructions on
how to set up this product for ideal ergonomic
benefit.
B
4.1
4.1
4.2
F
F
E
E
Under Worksurface
Arm fully extended
Cables will be out of the way
when platform is in use
Consult the Leader
Arm User Guide for
complete instructions
/