Page is loading ...

PowerFlex 700S High Performance AC Drive - Phase II Control
Firmware Versions 1.xxx…7.xxx
Programming Manual
Original Instructions

Important User Information
Read this document and the documents listed in the additional resources section about installation, configuration, and
operation of this equipment before you install, configure, operate, or maintain this product. Users are required to
familiarize themselves with installation and wiring instructions in addition to requirements of all applicable codes, laws,
and standards.
Activities including installation, adjustments, putting into service, use, assembly, disassembly, and maintenance are required
to be carried out by suitably trained personnel in accordance with applicable code of practice.
If this equipment is used in a manner not specified by the manufacturer, the protection provided by the equipment may be
impaired.
In no event will Rockwell Automation, Inc. be responsible or liable for indirect or consequential damages resulting from the
use or application of this equipment.
The examples and diagrams in this manual are included solely for illustrative purposes. Because of the many variables and
requirements associated with any particular installation, Rockwell Automation, Inc. cannot assume responsibility or
liability for actual use based on the examples and diagrams.
No patent liability is assumed by Rockwell Automation, Inc. with respect to use of information, circuits, equipment, or
software described in this manual.
Reproduction of the contents of this manual, in whole or in part, without written permission of Rockwell Automation,
Inc., is prohibited.
Throughout this manual, when necessary, we use notes to make you aware of safety considerations.
Labels may also be on or inside the equipment to provide specific precautions.
WARNING: Identifies information about practices or circumstances that can cause an explosion in a hazardous environment,
which may lead to personal injury or death, property damage, or economic loss.
ATTENTION: Identifies information about practices or circumstances that can lead to personal injury or death, property
damage, or economic loss. Attentions help you identify a hazard, avoid a hazard, and recognize the consequence.
IMPORTANT
Identifies information that is critical for successful application and understanding of the product.
SHOCK HAZARD: Labels may be on or inside the equipment, for example, a drive or motor, to alert people that dangerous
voltage may be present.
BURN HAZARD: Labels may be on or inside the equipment, for example, a drive or motor, to alert people that surfaces may
reach dangerous temperatures.
ARC FLASH HAZARD: Labels may be on or inside the equipment, for example, a motor control center, to alert people to
potential Arc Flash. Arc Flash will cause severe injury or death. Wear proper Personal Protective Equipment (PPE). Follow ALL
Regulatory requirements for safe work practices and for Personal Protective Equipment (PPE).

Rockwell Automation Publication 20D-PM001D-EN-P - March 2019 3
Table of Contents
Preface
Summary of Changes . . . . . . . . . . . . . . . . . . . . . . . . . . . . . . . . . . . . . . . . . . . . . . . 7
General Precautions . . . . . . . . . . . . . . . . . . . . . . . . . . . . . . . . . . . . . . . . . . . . . . . . 8
Qualified Personnel . . . . . . . . . . . . . . . . . . . . . . . . . . . . . . . . . . . . . . . . . . . . 8
Personal Safety . . . . . . . . . . . . . . . . . . . . . . . . . . . . . . . . . . . . . . . . . . . . . . . . . 8
Product Safety . . . . . . . . . . . . . . . . . . . . . . . . . . . . . . . . . . . . . . . . . . . . . . . . . 9
Class 1 LED Product . . . . . . . . . . . . . . . . . . . . . . . . . . . . . . . . . . . . . . . . . . . 9
Additional Resources . . . . . . . . . . . . . . . . . . . . . . . . . . . . . . . . . . . . . . . . . . . . . . . 9
Chapter 1
Drive Start-Up
Drive Start-Up Checklist . . . . . . . . . . . . . . . . . . . . . . . . . . . . . . . . . . . . . . . . . 11
Prepare for Initial Drive Start-Up . . . . . . . . . . . . . . . . . . . . . . . . . . . . . . . . . 12
Start Up the Drive . . . . . . . . . . . . . . . . . . . . . . . . . . . . . . . . . . . . . . . . . . . . . . . 13
Chapter 2
Programming and Parameters
Firmware Compatibility . . . . . . . . . . . . . . . . . . . . . . . . . . . . . . . . . . . . . . . . . . 17
About Parameters . . . . . . . . . . . . . . . . . . . . . . . . . . . . . . . . . . . . . . . . . . . . . . . . 18
How Parameters are Organized. . . . . . . . . . . . . . . . . . . . . . . . . . . . . . . . . . . . 20
Parameter Data in Linear List Format. . . . . . . . . . . . . . . . . . . . . . . . . . . . . . 32
Parameter Cross Reference By Name . . . . . . . . . . . . . . . . . . . . . . . . . . . . . 130
Chapter 3
Troubleshooting
Status Indicators . . . . . . . . . . . . . . . . . . . . . . . . . . . . . . . . . . . . . . . . . . . . . . . . 137
Drive Status Indicators . . . . . . . . . . . . . . . . . . . . . . . . . . . . . . . . . . . . . . 138
DriveLogix5730 Controller Status Indicators. . . . . . . . . . . . . . . . . . 139
Precharge Board Status Indicators . . . . . . . . . . . . . . . . . . . . . . . . . . . . 141
HIM Indication of a Fault . . . . . . . . . . . . . . . . . . . . . . . . . . . . . . . . . . . . . . . 142
Manually Clearing Faults . . . . . . . . . . . . . . . . . . . . . . . . . . . . . . . . . . . . . . . . 142
Fault and Alarm Types . . . . . . . . . . . . . . . . . . . . . . . . . . . . . . . . . . . . . . . . . . 142
Fault/Alarm Descriptions. . . . . . . . . . . . . . . . . . . . . . . . . . . . . . . . . . . . . . . . 143
Appendix A
Human Interface Module Overview
External and Internal Connections . . . . . . . . . . . . . . . . . . . . . . . . . . . . . . . 151
LCD Display Elements . . . . . . . . . . . . . . . . . . . . . . . . . . . . . . . . . . . . . . . . . . 152
HIM Key Functions. . . . . . . . . . . . . . . . . . . . . . . . . . . . . . . . . . . . . . . . . . . . . 152
Alternate (ALT) Functions . . . . . . . . . . . . . . . . . . . . . . . . . . . . . . . . . . . . . . 153
Access the Start-Up Routine . . . . . . . . . . . . . . . . . . . . . . . . . . . . . . . . . . . . . 153
Menu Structure . . . . . . . . . . . . . . . . . . . . . . . . . . . . . . . . . . . . . . . . . . . . . . . . . 154
Diagnostics Menu . . . . . . . . . . . . . . . . . . . . . . . . . . . . . . . . . . . . . . . . . . . 155
Parameter Menu . . . . . . . . . . . . . . . . . . . . . . . . . . . . . . . . . . . . . . . . . . . . 155
Device Select Menu. . . . . . . . . . . . . . . . . . . . . . . . . . . . . . . . . . . . . . . . . . 155
Memory Storage Menu . . . . . . . . . . . . . . . . . . . . . . . . . . . . . . . . . . . . . . 155
Start Up Menu. . . . . . . . . . . . . . . . . . . . . . . . . . . . . . . . . . . . . . . . . . . . . . 155
Preferences Menu . . . . . . . . . . . . . . . . . . . . . . . . . . . . . . . . . . . . . . . . . . . 156

4 Rockwell Automation Publication 20D-PM001D-EN-P - March 2019
Table of Contents
View and Edit Parameters . . . . . . . . . . . . . . . . . . . . . . . . . . . . . . . . . . . . . . . . 156
LCD HIM . . . . . . . . . . . . . . . . . . . . . . . . . . . . . . . . . . . . . . . . . . . . . . . . . . 156
Numeric Keypad Shortcut. . . . . . . . . . . . . . . . . . . . . . . . . . . . . . . . . . . . 156
Parameter Links. . . . . . . . . . . . . . . . . . . . . . . . . . . . . . . . . . . . . . . . . . . . . . . . . 157
Establishing A Link . . . . . . . . . . . . . . . . . . . . . . . . . . . . . . . . . . . . . . . . . 157
Remove/Install the HIM. . . . . . . . . . . . . . . . . . . . . . . . . . . . . . . . . . . . . . . . . 158
Appendix B
Application Notes
DPI Communication Configurations . . . . . . . . . . . . . . . . . . . . . . . . . . . . . 160
Typical Programmable Controller Configurations . . . . . . . . . . . . . 160
Logic Command Word . . . . . . . . . . . . . . . . . . . . . . . . . . . . . . . . . . . . . . 160
Logic Status Word. . . . . . . . . . . . . . . . . . . . . . . . . . . . . . . . . . . . . . . . . . . 161
DPI Device Limitations . . . . . . . . . . . . . . . . . . . . . . . . . . . . . . . . . . . . . . 161
Motor Control Mode. . . . . . . . . . . . . . . . . . . . . . . . . . . . . . . . . . . . . . . . . . . . 162
Field Oriented Control . . . . . . . . . . . . . . . . . . . . . . . . . . . . . . . . . . . . . . 162
Permanent Magnet Control . . . . . . . . . . . . . . . . . . . . . . . . . . . . . . . . . . 163
Volts/Hertz Control - v2.003 and Later . . . . . . . . . . . . . . . . . . . . . . . 163
Motor Overload. . . . . . . . . . . . . . . . . . . . . . . . . . . . . . . . . . . . . . . . . . . . . . . . . 164
Setting Parameter 338 [Mtr I2T Spd Min]. . . . . . . . . . . . . . . . . . . . . 164
Motor Overload Memory Retention Per 2005 NEC . . . . . . . . . . . . 165
Motors with Compatible Thermistor Ratings. . . . . . . . . . . . . . . . . . . . . . 166
Setpt 1 Data . . . . . . . . . . . . . . . . . . . . . . . . . . . . . . . . . . . . . . . . . . . . . . . . . . . . 167
Setpt 2 Data . . . . . . . . . . . . . . . . . . . . . . . . . . . . . . . . . . . . . . . . . . . . . . . . . . . . 167
Stop Dwell Time . . . . . . . . . . . . . . . . . . . . . . . . . . . . . . . . . . . . . . . . . . . . . . . . 168
Sleep-Wake Mode . . . . . . . . . . . . . . . . . . . . . . . . . . . . . . . . . . . . . . . . . . . . . . . 169
Definitions. . . . . . . . . . . . . . . . . . . . . . . . . . . . . . . . . . . . . . . . . . . . . . . . . . 169
Appendix C
Control Block Diagrams
List of Control Block Diagrams. . . . . . . . . . . . . . . . . . . . . . . . . . . . . . . . . . . 171
Diagram Conventions and Definitions . . . . . . . . . . . . . . . . . . . . . . . . . . . . 172
Appendix D
PowerFlex 700S Permanent Magnet
Motor Specifications
Compatible Permanent Magnet Motors . . . . . . . . . . . . . . . . . . . . . . . . . . . 199

Rockwell Automation Publication 20D-PM001D-EN-P - March 2019 5
Table of Contents
Appendix E
ATEX Approved PowerFlex 700S,
Phase II Drives in Group II Category
(2) Applications with ATEX Approved
Motors
General Information . . . . . . . . . . . . . . . . . . . . . . . . . . . . . . . . . . . . . . . . . . . . 203
Motor Requirements . . . . . . . . . . . . . . . . . . . . . . . . . . . . . . . . . . . . . . . . . . . . 204
Drive Wiring . . . . . . . . . . . . . . . . . . . . . . . . . . . . . . . . . . . . . . . . . . . . . . . . . . . 204
Safe-Off Terminal Descriptions . . . . . . . . . . . . . . . . . . . . . . . . . . . . . . 205
Wiring Example. . . . . . . . . . . . . . . . . . . . . . . . . . . . . . . . . . . . . . . . . . . . . 205
Drive Hardware Configuration . . . . . . . . . . . . . . . . . . . . . . . . . . . . . . . . . . 206
Operation Verification . . . . . . . . . . . . . . . . . . . . . . . . . . . . . . . . . . . . . . . . . . 206
Appendix F
History of Changes
20D-PM001C-EN-P July 2013 . . . . . . . . . . . . . . . . . . . . . . . . . . . . . . . . . . 207
20D-PM001B-EN-P, July 2011 . . . . . . . . . . . . . . . . . . . . . . . . . . . . . . . . . . 207
20D-PM001A-EN-P, June 2010 . . . . . . . . . . . . . . . . . . . . . . . . . . . . . . . . . 208
Index
. . . . . . . . . . . . . . . . . . . . . . . . . . . . . . . . . . . . . . . . . . . . . . . . . . . . . . . . . . . .209

6 Rockwell Automation Publication 20D-PM001D-EN-P - March 2019
Table of Contents
Notes:

Rockwell Automation Publication 20D-PM001D-EN-P - March 2019 7
Preface
The purpose of this manual is to provide you with the information needed to
start-up, program and troubleshoot PowerFlex 700S Phase II Adjustable
Frequency AC drives.
This manual is intended for qualified personnel. You must be able to program
and operate adjustable frequency AC drives. In addition, you must have an
understanding of the parameter settings and functions of this drive and
programmable controllers for PowerFlex 700S Phase II drives with DriveLogix.
Summary of Changes
This manual contains new and updated information. This table contains the
changes made to this revision.
Changes to this manual for previous revisions are included inAppendix
F History
of Changes on page 207.
Topic Page
Update front cover with firmware version and original instructions 1
Added safety publications to the Additional Resources table. 9
Added firmware compatibility information.
17
Added and/or updated parameters 455, 363, 364, 1168, 1169, and 510. All

8 Rockwell Automation Publication 20D-PM001D-EN-P - March 2019
Preface
General Precautions
Qualified Personnel
Personal Safety
ATTENTION: Only qualified personnel familiar with the PowerFlex 700S Drive
and associated machinery should plan or implement the installation, start-up
and subsequent maintenance of the system. Failure to comply may result in
personal injury and/or equipment damage.
ATTENTION: To avoid an electric shock hazard, verify that the voltage on the bus
capacitors has discharged before performing any work on the drive. Measure the
DC bus voltage at the Power Terminal Block by measuring between the +DC and
–DC terminals, between the +DC terminal and the chassis, and between the -DC
terminal and the chassis. The voltage must be zero for all three measurements.
ATTENTION: Hazard of personal injury or equipment damage exists when using
bipolar input sources. Noise and drift in sensitive input circuits can cause
unpredictable changes in motor speed and direction. Use speed command
parameters to help reduce input source sensitivity.
ATTENTION: Risk of injury or equipment damage exists. DPI or SCANport host
products must not be directly connected together via 1202 cables.
Unpredictable behavior can result if two or more devices are connected in this
manner.
ATTENTION: Risk of injury or equipment damage exists. Parameters 365 [Fdbk
LsCnfg Pri]…394 [VoltFdbkLossCnfg] let you determine the action of the drive
in response to operating anomalies. Precautions should be taken to ensure that
the settings of the parameters do not create hazards of injury or equipment
damage.
ATTENTION: Risk of injury or equipment damage exists. Parameters 383 [SL
CommLoss Data]…392 [NetLoss DPI Cnfg] let you determine the action of the
drive if communications are disrupted. You can set the parameters so that the
drive continues to run. Precautions should be taken to ensure that the settings of
the parameters do not create hazards of injury or equipment damage.

Rockwell Automation Publication 20D-PM001D-EN-P - March 2019 9
Preface
Product Safety
Class 1 LED Product
Additional Resources
These documents contain additional information concerning related products
from Rockwell Automation.
ATTENTION: An incorrectly applied or installed drive can result in component
damage or a reduction in product life. Wiring or application errors such as under
sizing the motor, incorrect or inadequate AC supply, or excessive surrounding air
temperatures may result in malfunction of the system.
ATTENTION: This drive contains ESD (Electrostatic Discharge) sensitive parts and
assemblies. Static control precautions are required when installing, testing,
servicing or repairing drive assemblies. Component damage may result if ESD
control procedures are not followed. If you are not familiar with static control
procedures, reference Guarding Against Electrostatic Damage, publication 8000-
4.5.2 or any other applicable ESD protection handbook.
ATTENTION: A contactor or other device that routinely disconnects and
reapplies the AC line to the drive to start and stop the motor can cause drive
hardware damage. The drive is designed to use control input signals that will
start and stop the motor. If an input device is used, operation must not exceed
one cycle per minute or drive damage will occur.
ATTENTION: Hazard of permanent eye damage exists when using optical
transmission equipment. This product emits intense light and invisible radiation.
Do not look into module ports or fiber optic cable connectors.
Resource Description
PowerFlex 700S Phase II Drive, Frames 1…6 Installation
Instructions, publication 20D-IN024
Provides you with the information needed to install and
wire PowerFlex 700S Phase II frame 1…6 drives.
PowerFlex 700H and 700S Drives, Frames 9…14 Installation
Instructions, publication PFLEX-IN006
Provides you with the information needed to install and
wire PowerFlex 700S Phase II frame 9…14 drives.
PowerFlex 700S Phase II Reference Manual, publication
PFLEX-RM003
Provides detailed explanations and examples of
PowerFlex 700S Phase II drive control functions and
application programming.
Drives in Common Bus Configurations, publication DRIVES-
AT00 2
This publication to provide the necessary guidelines,
considerations, and limitations for the proper
application of PowerFlex drives used in common bus
configurations.
Stegmann Feedback Option for PowerFlex 700S Drives
Installation Instructions, publication 20D-IN001
Provides instructions for installing the Stegmann
feedback option board for PowerFlex 700S drives.
Resolver Feedback Option for PowerFlex 700S Drives
Installation Instructions, publication 20D-IN002
Provides instructions for installing the resolver
feedback option board for PowerFlex 700S drives.
Multi-Device Interface for PowerFlex 700S Drives Installation
Instructions, publication 20D-IN004
Provides instructions for installing the multi-device
interface option board for PowerFlex 700S drives.

10 Rockwell Automation Publication 20D-PM001D-EN-P - March 2019
Preface
You can view or download publications at
http:/www.rockwellautomation.com/literature/
. To order paper copies of
technical documentation, contact your local Allen-Bradley distributor or
Rockwell Automation sales representative.
Second Encoder Option for PowerFlex 700S Drives with
Phase II Control Installation Instructions,
publication 20D-IN009
Provides instructions for installing the second encoder
option board for PowerFlex 700S drives.
SynchLink™ Board for PowerFlex 700S Drives with Phase II
Control Installation Instructions, publication 20D-IN010
Provides instructions for installing the SynchLink option
board for PowerFlex 700S drives.
DriveLogix 5730 Controller User Manual, publication
20D-UM003
Provides information to help you develop projects for
DriveLogix controllers and establish communications
with PowerFlex 700S Phase II drives.
Safe Torque Off Option for PowerFlex 700S Phase II AC Drives
and PowerFlex 700L Liquid-Cooled AC Drives, publication
20D-UM007
The DriveGuard Safe Torque Off option, when used with
other safety components, helps provide protection to
meet the requirements for SIL CL2 and Category 3 or PL
d class applications. Safety requirements are based on
the standards current at the time of certification.
Logix5000 Controllers Common Procedures Programming
Manual, publication 1756-PM001
This publication links to a collection of programming
manuals that describe how you can use procedures that
are common to all Logix5000 controller projects.
Logix5000 Controllers General Instructions Reference
Manual, publication 1756-RM003
Provides a programmer with details about each
available instruction for a Logix-based controller.
Logix5000 Controllers Process Control and Drives
Instructions Reference Manual, publication 1756-RM006
Provides a programmer with details about each
available instruction for a Logix-based controller.
SynchLink System Design Guide, publication 1756-TD008 Provides a detailed description of SynchLink and the
products that operate on it, including:
• ControlLogix SynchLink module (1756-SYNCH)
• ControlLogix Drive modules (1756-DMxxx Series)
• PowerFlex 700S drives
Wiring and Grounding for Pulse Width Modulated (PWM) AC
Drives, publication DRIVES-IN001
Provides basic information needed to properly wire and
ground Pulse Width Modulated (PWM) AC drives.
Safety Guidelines for the Application, Installation and
Maintenance of Solid State Control, publication SGI-1.1
Provides general guidelines for the application,
installation, and maintenance of solid-state control in
the form of individual devices or packaged assemblies
incorporating solid state components.
Industrial Automation Wiring and Grounding Guidelines,
publication 1770-4.1
Provides general guidelines for installing a Rockwell
Automation industrial system.
Product Certifications website
https://compatibility.rockwellautomation.com/Pages/
home.aspx
Provides declarations of conformity, certificates, and
other certification details.
Resource Description

Rockwell Automation Publication 20D-PM001D-EN-P - March 2019 11
Chapter 1
Drive Start-Up
This chapter provides the information necessary to start up the PowerFlex® 700S
Phase II drive.
Drive Start-Up Checklist
❏ A Human Interface Module (HIM) is required to complete this Start-Up
procedure, which uses the Assisted Start routine. The Assisted Start routine
prompts you for information that is needed to start up a drive for most
applications, such as line and motor data, commonly adjusted parameters and
I/O settings. The Assisted Start routine also performs autotuning procedures.
See Figure 1
on page 14 for a flow chart of the Assisted Start routine.
❏ A HIM must be installed in Drive Peripheral
Interface (DPI) Port 1 or 2. If a HIM is not
installed, a remote device should be used to
start-up the drive. Refer to Human Interface
Module Overview on page 151 for more
information on using the PowerFlex 7-Class
(DPI) HIM. Refer to the Enhanced PowerFlex
7-Class HIM User Manual, publication
20HIM-UM001, for information on using the
Enhanced HIM (if installed).
❏ 3-wire control is the default (and
recommended) mode of use for the Assisted
Start routine. In this case, the drive will start
when the HIM “Start” key is pressed and stop
when the HIM “Stop” key is pressed. If the drive
is configured for 2-wire control, the HIM
installed on the drive will also act as a 2-wire device. In 2-wire mode, the drive
will start when the HIM “Start” key is pressed and stop when the HIM “Start”
key is released.
❏ Analog and Digital I/O parameter values may be modified when using the
Assisted Start routine.
Topic Page
Drive Start-Up Checklist Below
Prepare for Initial Drive Start-Up 12
Start Up the Drive 13
IMPORTANT
If you have a DriveLogix™ application, you must first connect the battery before
starting this section. Refer to the DriveLogix™ 5730 Controller for PowerFlex
700S Drives with Phase II Control, publication 20D-UM003
, for details.
DPI Ports 1 and 2
1
2

12 Rockwell Automation Publication 20D-PM001D-EN-P - March 2019
Chapter 1 Drive Start-Up
Prepare for Initial Drive
Start-Up
1. Confirm that all inputs are connected to the correct terminals and are
secure.
2. Verify that AC line power at the disconnect device is within the rated value
of the drive.
3. Verify that control power voltage is correct.
4. Apply AC power and control voltages to the drive. The drive and HIM
will power up.
• If the STS (status) LED is NOT
flashing green, refer to Status
Indicators on page 137or more information.
• If any digital input is configured to “Stop - CF” (CF=Clear Faults) or
“Enable”, verify that signals are present or the drive will not start. See
Tab l e 1
on page 15 for other causes of a start inhibit.
5. When prompted on the HIM, select a display language and press Enter
().
The PowerFlex 700S Start-Up screen displays for drives that have not
been previously configured.
ATTENTION: Power must be applied to the drive to perform the following
start-up procedure. Some of the voltages present are at incoming line potential.
To avoid electric shock hazard or damage to equipment, only qualified service
personnel should perform the following procedure. Thoroughly read and
understand the procedure before beginning.
IMPORTANT
When power is first applied, the HIM may require approximately five
seconds until commands are recognized (including the Stop key).
TIP
If the Assisted Start routine has already been accessed and started, you
can return to and continue with the Start-Up routine. See Access the
Start-Up Routine on page 153 for more information.

Rockwell Automation Publication 20D-PM001D-EN-P - March 2019 13
Drive Start-Up Chapter 1
Start Up the Drive
6. Press Enter ( ) on the HIM.
The Assisted Start routine will prompt you for the required information
needed to start-up the drive and complete the autotuning procedures. See
Figure 1
on page 14 for a flow chart of the Assisted Start routine.
Note: When starting up some high impedance motor applications, the
“Power Circuit Test” may fail. If this test fails, the HIM displays the
following fault description text:
• Power Circuit Diagnostic Test Detected Error: XX_XX no gate, open
circuit, bad I sensor, press Enter.
If this failure occurs, do the following:
• Verify the connections between the motor and the drive; make sure that
a disconnect device or contactor is not interfering with the signal.
• Press Enter to continue and perform the Direction Test. If the
Direction Test is successful, continue with the Start-Up routine -
ignoring the failure. If the Direction Test fails, check for an open
connection or bad current sensor.
7. When the Assisted Start routine is finished and Done/Exit displays on the
HIM, press Enter ( ) to save any changed and/or updated data.
IMPORTANT
Always exit the Assisted Start routine before cycling power to the drive.

14 Rockwell Automation Publication 20D-PM001D-EN-P - March 2019
Chapter 1 Drive Start-Up
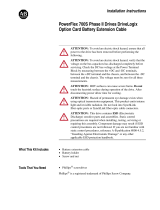
Figure 1 - PowerFlex 700S Assisted Start Routine Flow Chart
PowerFlex 700S
Start-Up
Motor Control Motor Data
Feedback
Configuration
Power Circuit
Test
Direction Test
Motor Tests Inertia Measure Speed Limits Speed Control Start / Stop / I/O
Select:
Motor Control Mode,
DB Resistor
Enter:
Motor NP Data,
Power & Units, FLA,
Volts, Hertz, RPM, Poles
Setup / Select:
Encoder, Resolver,
Hi-Res Encoder,
Linear Sensor
Diagnostic Check for:
Drive Power Circuit
Verify Direction
Field Oriented Control:
Measure: Stator
Resistance, Leakage
Inductance, Magnetizing
Inductance,
Slip Frequency
PMag Motor:
Measure: Encoder Offset,
Stator Resistance, Stator
Inductance, Back EMF
Measure:
System Inertia
Setup / Select:
Direction Control,
FWD, REV and
Absolute Speed Limits
Select:
Speed Reference
Sources
Done / Exit
Esc
Select a menu option or move down one level
Go back one selection or one level
Scroll through all choices
Configure: Digital Inputs,
Digital Outputs, Analog
Inputs, Analog Outputs

Rockwell Automation Publication 20D-PM001D-EN-P - March 2019 15
Drive Start-Up Chapter 1
Table 1 - Common Causes of a Start Inhibit
Examine Parameter 156 [Start Inhibits]
Bit Description Action
1 No power is present at the Enable Terminal; TB2-16 Apply the enable
2, 3, 4 A stop command is being issued Close all stop inputs
5 Power loss event is in progress, indicating a loss of the AC input voltage Restore AC power
6 Data supplied by the power structure EEprom is invalid or corrupt Cycle the power - if problem persists, replace the power structure
7 Flash Update in Progress Complete Flash Procedures
8 Drive is expecting a Start Edge and is receiving a continuous signal Open all start buttons and remove all start commands
9 Drive is expecting a Jog Edge and is receiving a continuous signal Open all jog buttons and remove all jog commands
10 A conflict exists between the Encoder PPR programming (Par 232 or 242) and the
encoder configuration for edge counts (Par 233, bits 4 & 5)
Verify encoder data and reprogram
11 The drive cannot precharge because a precharge input is programmed and no
signal is present
Reprogram the input or close the precharge control contact
12
Digital Configuration
Start input configured but stop not configured Program Par 825…830 to include a stop button, rewire the drive
Run input configured but control options do not match Program Par 153, Bit 8 to “0” (2 wire control)
Start input configured but control options do not match Program Par 153, Bit 8 to “1” (3 wire control)
Multiple inputs configured as Start or Run Reprogram Par 825…830 so multiple starts, multiple runs or any combination do
not exist
Multiple inputs configured as Jog1 Reprogram Par 825…830 so only (1) is set to Jog1
Multiple inputs configured as Jog2 Reprogram Par 825…830 so only (1) is set to Jog2
Multiple inputs configured as Fwd/Rev Reprogram Par 825…830 so only (1) is set to Fwd/Rev
14 Invalid Feedback Device for Permanent Magnet Motor Control Set Par 222 to Value 5 (FB Opt Port0)

16 Rockwell Automation Publication 20D-PM001D-EN-P - March 2019
Chapter 1 Drive Start-Up
Notes:

Rockwell Automation Publication 20D-PM001D-EN-P - March 2019 17
Chapter 2
Programming and Parameters
This chapter provides a complete listing of the PowerFlex® 700S Phase II drive
parameters. The parameters can be programmed (viewed/edited) using a Human
Interface Module (HIM). Refer to Human Interface Module Overview
on page
151
for information on using the HIM to view and edit parameters. As an
alternative, programming can also be performed using DriveTools™ software and a
personal computer.
Firmware Compatibility
PowerFlex 700S firmware revision 6.xxx and earlier can only be used with control
boards that were designed to operate with 6.xxx or earlier firmware, series A con-
trol boards. PowerFlex 700S firmware revision firmware 7.xxx and greater can
only be used with control boards that were designed to operate with 7.xxx or
greater, series B control boards.
If you attempt to download a firmware revision that is not compatible with the
control board on the drive, a series of error messages appear. If these error
messages appear, confirm the revision of the control board, and select a firmware
revision download that is compatible with the control board version.
Topic Page
Firmware Compatibility 17
If you attempt to download a firmware revision that is not compatible with the control
board on the drive, a series of error messages appear. If these error messages appear,
confirm the revision of the control board, and select a firmware revision download that is
compatible with the control board version.
17
How Parameters are Organized 20
Parameter Data in Linear List Format 32
Parameter Cross Reference By Name 130
Table 2 - Compatible Revisions
Control Board Version Compatible Firmware Revisions
Series A 6.xxx and previous
Series B 7.xxx and later

18 Rockwell Automation Publication 20D-PM001D-EN-P - March 2019
Chapter 2 Programming and Parameters
About Parameters
To configure a drive module to operate in a specific way, certain drive parameters
may have to be configured appropriately. Three types of parameters exist:
•ENUM Parameters
These parameters allow a selection from two or more items. The LCD
HIM will display a text message for each item.
•Bit Parameters
These parameters have individual bits associated with features or
conditions. If the bit is 0, the feature is off or the condition is false. If the
bit is 1, the feature is on or the condition is true.
•Numeric Parameters
These parameters have a single numeric value, for example, “0.1 Volts”.
The example tables on the following page illustrate how each parameter type is
presented in this manual.

Rockwell Automation Publication 20D-PM001D-EN-P - March 2019 19
Programming and Parameters Chapter 2
Table 3 - Table Explanation
12 3
No.
Name
Description Values
Linkable
Read-Write
Data Type
4 Motor NP RPM
Set to the motor nameplate rated rpm.
Default:
Min/Max:
Units:
Scale:
Calculated
1/30000
rpm
Par 4 [Motor NP RPM] = 1.0 P.U.
RW 16-bit
Integer
110 Speed/TorqueMode
Selects the source for the drive torque reference.
Default:
Options:
1 =
0 =
1 =
2 =
3 =
“Speed Reg”
“Zero Torque” 4 = “Max Spd/Torq”
“Speed Reg” 5 = “Sum Spd/Torq”
“Torque Ref” 6 = “AbsMn Spd/Tq”
“Min Spd/Torq”
151 Logic Command
The controller-drive interface (as defined by the Controller Communication Format) sets bits to enable and disable various functions and algorithms. Bits that are changed here are reflected in Par
152 [Applied LogicCmd].
Note: Bits 4 through 9 in Logic Command are NOT recalled from Control EEprom. They will be cleared upon drive powerup or following an EEprom recall operation.
Options
PI Trim Rst
PI Trim Hold
Position En
PI Trim En
Frict Comp
Inertia Comp
Ext Flt/Alm
Reserved
Reserved
SReg IntgRst
SReg IntgHld
SpdRamp Hold
Time Axis En
TachLoss Rst
Spd S Crv En
SpdRamp Dsbl
Default 0000000000000000
Bit 1514131211109876543210
0 = False
1 = True
Column(s) Explanation
1
No. - Parameter Number
= Parameter value cannot be changed until the drive is stopped.
= Parameter is displayed on the HIM only when Par 196 [ParamAccessLvl] is set to 1 “Advanced”.
2
Name - Parameter name as it appears in the DriveExecutive software.
Description - Brief description of parameter function.
3
Values - Define the various operating characteristics of the parameter.
There are 3 types of Values:
Numeric Default: Lists the value assigned at the factory.
Min/Max. Displays lowest possible setting/Displays highest possible setting.
Units: Unit of measure and resolution as shown on the LCD HIM.
Important: Analog inputs can be set for current or voltage with parameter 821 [Analog I/O Units].
Scale: Value sent from Controller or Comm Device = Drive Parameter Value x Comm Scale
ENUM Default: Lists the value assigned at the factory.
Options: Displays the selections available.
Bit Options: Displays the bit selections available.
Default: Lists the value assigned at the factory.
Bit: Bit number.
Linkable - “Y” indicates that the parameter is linkable.
Read-Write - Identifies if the parameter is read-write or read-only.
RW = Read-Write
RO = Read Only
Data Type - Identifies the parameter data type (i.e. integer, floating point, boolean).
A

20 Rockwell Automation Publication 20D-PM001D-EN-P - March 2019
Chapter 2 Programming and Parameters
How Parameters are
Organized
DriveExecutive™ programming software displays parameters in “Linear List” or
“File - Group - Parameter” format. Viewing the parameters in “File - Group -
Parameter” format simplifies programming by grouping parameters that are used
for similar functions. There are twelve files. Each file is divided into multiple
groups of parameters. Each illustration below contains a list of the Parameters
contained in each Group for each File.
User Function
s
Inputs & O
utputs
Communication
Utility
Speed/Po
sit Fd
bk
Pos
ition Control
Proce
ss Control
Torque Control
Speed Control
Dyn
amic Control
Motor Control
Monitor
Metering
310
49
50
40
43
301
319
300
72
297
499
309
312
307
311
762
299
298
306
313
345
824
801
807
813
837
844
Output Freq
Selected SpdRefA
Selected SpdRefB
Selected Spd Ref
Ramped Spd Ref
Motor Speed Ref
Selected Trq Ref
Motor Spd Fdbk
Scaled Spd Fdbk
Output Curr Disp
Trq CurFdbk (Iq)
% Motor Flux
MotorFluxCurr FB
Output Voltage
Output Power
Position Fdbk
Elapsed MWHrs
Elapsed Run Time
DC Bus Voltage
Heatsink Temp
Drive OL JnctTmp
Local I/O Status
Anlg In1 Value
Anlg In2 Value
Anlg In3 Volts
Anlg Out1 Value
Anlg Out2 Value
Control Status
150
155
157
156
166
167
555
346
159
165
317
554
Logic State Mach
Logic Status
Logic Ctrl State
Start Inhibits
Motor Ctrl Cmmd
Motor Ctrl Ackn
MC Status
Drive OL Status
DigIn ConfigStat
Tune Test Status
SL System Time
LED Status
Drive Data
400
401
420
404
314
315
455
457
456
900
901
Rated Amps
Rated Volts
Pwr Strct Mode
Dead Time
VPL Firmware Rev
VPL Build Number
LID Version Number
MC Firmware Rev
MC Build Number
SynchLink Rev
SL System Rev
/