Page is loading ...

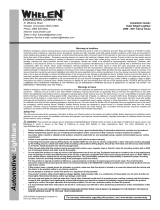
WIRING & FUNCTIONS (S1)
RED
BLACK
to +VDC with rated fuse
(for correct rating, refer to the Lightbar Specification)
to Chassis Ground
BROWN
Warning Mode
Brake (Stop) Light
WHITE
Illuminated Center Section
ORANGE
Right Turn Light
BLUE
Flash Pattern Change
YELLOW
Front and Rear Take Down/Work Light
GREEN
GRAY
Tail Light
Left Turn Light
PURPLE
Proper installation of the product requires the installer to have a good understanding of automotive
electronics, systems and procedures. Different applications may require different functions. For optimum
efficiency, it is highly recommended to determine, configure and test the required functions prior to
Installation.
LIGHTBAR WIRING
Operation Manual
LKPR
■ DO NOT USE THE POWER WIRE(S) AS THE LIGHTBAR ACTIVATION SWITCH. USE ONLY THE FUNCTION WIRE(S) TO
SWITCH AND ACTIVATE.
■ FAULTY CONNECTIONS MAY CAUSE THE LIGHTBAR TO MALFUNCTION AND / OR RESET TO ITS DEFAULT SETTINGS.
■ DO NOT USE A HIGH PRESSURE POWER WASHER TO CLEAN YOUR LIGHTBAR; THIS MAY DAMAGE YOUR LIGHTBAR
AND VOID ITS WARRANTY.
WARNING
WIRING:
1. Route power cable’s red wire to a fused Install a fuse (user-supplied) on the end of
power cable’s RED wire and route that wire to vehicle battery. Connect the BLACK
wire to the vehicle chassis ground.
NOTE: Follow factory wiring harness through the firewall. It may be necessary to drill a
hole in the firewall. Ensure that there is no component that could be damaged from
the drilling.
2. Route control wires towards the dash area to a switch panel (user-supplied). Connect
the required wires to the switch panel.
NOTE: Make sure that all wires of power cable are securely connected to power source.
STT STT
v.1.0
- 1 -- 4 -
v.1.0 Rev.220808

FUNCTIONS:
WARNING MODE
Activate Warning Mode by applying
+VDC
to
BROWN
wire for warning mode.
NOTE: Default flash pattern FP#1
YELLOW WIRE (Flash Pattern Change / DIM MODE)
There are 3 type of functions for YELLOW wire,
1. Flash Pattern Change only. [DEFAULT function]
To change flash pattern , tap +VDC to YELLOW wire while
in a warning mode,
■ Quick once to the next pattern.
■ Quick 3 times to reset to default flash pattern.
2. DIM MODE only.
Activate Low Power function by apply +VDC to YELLOW
wire while in a warning mode.
NOTE: flash pattern change function is disabled.
3. Flash Pattern Change & DIM MODE.
To change flash pattern , tap +VDC to YELLOW wire
(<1 second) while in a warning mode,
■ Quick once to the next pattern.
■ Quick 3 times to reset to default flash pattern.
Activate Low Power function by apply +VDC to YELLOW
wire (>1 second) while in a warning mode.
Programming YELLOW wire function,
a. Activate warning mode by applying +VDC to BROWN wire.
b. Quick 3 times to tap +VDC to GREEN wire, the lightbar will
enter into programming mode.
c. The Front Side of lightheads will show the function by
flashing:
■ Single Flash : Flash Pattern Change only. [DEFAULT]
■ Double Flash : DIM MODE only.
■ Triple Flash : Flash Pattern Change & DIM MODE.
d. Tap +VDC to YELLOW wire will change to next function.
e. Save and leave programming mode by disconnecting
power.
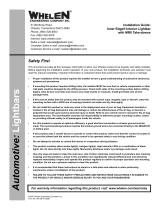
1
Double [2Hz] All
2
Quad [2Hz] All
3
Single [2Hz] All
4
Double (Corners) [2Hz] All
5
Quad (Corners) [2Hz] All
6
Single (Corners) [2Hz] All
7
Random All
8
Single All
9
Double All
10
Quad All
11
Quint All
12
Mega All
13
Ultra All
14
Cruise (Corners) All
15
Cruise All
16
Single-Quad All
17
Single H/L All
18
Side-by-Side Single NA
19
Side-by-Side Ultra NA
20
Rotator1(fast) NA
21
Rotator2(slow) NA
22
Double [2Hz] Split
23
Quad [2Hz] Split
24
Single [2Hz] Split
25
Double (Corners) [2Hz] Split
26
Quad (Corners) [2Hz] Split
27
Single (Corners) [2Hz] Split
28
Random Split
29
Single Split
30
Double Split
31
Quad Split
32
Quint Split
33
Mega Split
34
Ultra Split
35
Single-Quad Split
36
Single H/L Split
FLASH PATTERN
v.1.0
- 2 -
v.1.0
- 3 -
ILLUMINATED CENTER SECTION
Activate Illuminated Center Section (ICS Lights) by applying +VDC to ORANGE wire.
FRONT AND REAR TAKE DOWN/WORK LIGHT
Activate Front and Rear Take Down/Work Light by applying +VDC to GREEN wire.
BRAKE (STOP) / TAIL / TURN INDICATOR LIGHTHEAD
Activate rear facing Break (stop) / Tail / Turn Indicator Lighthead by applying +VDC to
■ WHITE wire for Brake (Stop) Lightheads.
■ GRAY wire for Tail Lightheads.
■ PURPLE wire for Left Turn Signal Lighthead.
■ BLUE wire for Right Turn Signal Lighthead.
CAUTION: The Brake (stop) / Tail / Turn Indicator Lighthead(s) in the lightbar can only be
used as an auxiliary Brake (stop) / Tail / Turn Indicator lamp(s) and must not used
to replace the original Brake (stop) / Tail / Turn Indicator lamp(s) of the vehicle.
/