Page is loading ...

Thank you for choosing Rough Country.
Rough Country recommends a certified technician install this system. In addition to these instructions, professional
knowledge of disassemble/reassembly procedures as well as post installation checks must be known. Attempts to install
this system without this knowledge and expertise may jeopardize the integrity and/or operating safety of the vehicle.
Please read instructions before beginning installation. Check the kit hardware against the parts list. Be sure you have all
needed parts and know where they go. Also please review tools needed list and make sure you have needed tools.
NOTICE TO DEALER AND VEHICLE OWNER
Any vehicle equipped with any Rough Country product should have a “Warning to Driver” decal installed on the inside of
the windshield or on the vehicle’s dash. The decal should act as a constant reminder for whoever is operating the vehi-
cle of its unique handling characteristics.
JEEP 84-01 XJ Rear Quarter Panel Armor
921105710
*10571BAG*
10571BAG
Tools Needed:
6mm Allen
10mm Socket & Wrench
1/4” Deep Well Socket
7/16” Wrench
1/2” Wrench
Heat Gun
3/16” Drill
Painters Tape
25/64” or W size Drill
Drill Motor
5/32” Allen
Torque Wrench

10571, 10572, & 10573
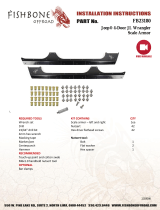
Qty Description
1 Dr RR Qtr Panel Armor
1 Pass RR Qtr Panel Armor
1 10571Bag (Instructions)
1 10571Bag1
10571BAG1
Qty Description
12 1/4” Nutserts
12 1/4” x 5/8” Button Head Bolts
13 1/4” Flat Washers
1 1/4” x 1” Bolt
1 5/16” Nut
10571
10572 & 10573

FRONT INSTALLATION INSTRUCTIONS
1. Place vehicle in park on a level surface and chock the wheels.
2. 1997-2001 Cherokees must remove rear bumper caps using a 10mm wrench and socket in the rear and a 1/4 inch
deep wall socket for the front self-tapping screw.
3. 1984-1996 Cherokees will need to remove the plastic trim on the lower quarter panel. This may require the use of a
heat gun to melt the glue underneath.
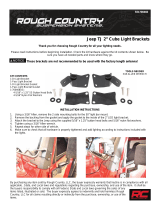
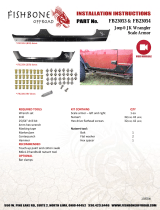
4. Once the bumper cap/trim is removed, use a 3/16” drill to drill out rivets holding the bracket. See Photos 1 & 2.
5. Apply a layer of painters tape along the Jeep’s body where the armor panel will come into contact. This will prevent
scratching your paint and allowing rust to form during your install process.
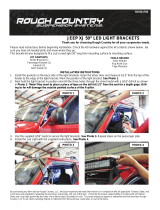
6. Align the panel with the Jeep using the bend lines along with the front and back edges. Once the panel is in the de-
sired location mark one of the top holes with a pen or marker. See Photo 3.
7. Remove the panel and drill the marked hole using a “W” or 25/64” sized drill, which measures 0.386 inches in diame-
ter. See Photo 4.
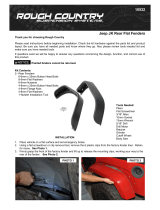
8. Install a supplied nutsert in this hole. See Photo 5.
9. Using the supplied 1/4” x 1” bolt, 1/4” washer and 5/16” nut hold the 5/16” nut using a 1/2” wrench, tighten the bolt
using a 7/16” wrench to crimp the nutsert until it firmly grabs the sheet metal of the Jeep body. See Photo 6.
PHOTO 3 PHOTO 4
PHOTO 5
PHOTO 2 PHOTO 1
PHOTO 6
Remove the bumper cap bracket. Remove the bumper cap bracket.
Mark the upper center hole. Drill using a W drill.
Install a nutsert. Crimp the nutsert.

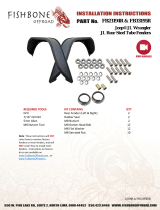
10. Using a provided 1/4-20 x 5/8” bolt, align the armor panel with the nutsert and tighten the bolt slightly.
11. Pivot the panel around this bolt until it is aligned properly again. Mark the other top hole and drill this one out as well.
Install the nutserts like in step 9 and replace the panel again. See Photo 7.
12. Fold the panel until it completely touches the body of the Jeep and mark the final two holes. Drill these holes out and
install two more nutserts. See Photo 8.
13. Remove the panel and tape and clean up any metal shavings produced from drilling. It is recommended to paint any
exposed metal and to apply RTV around the perimeter of the panel and around bolt holes. This will prevent rust from
forming under your new armor. It is recommended to ap-
ply a lubricant to the threads of the bolts to prevent them
from galling. See Photo 9.
14. Repeat process on the opposite side of the vehicle.
PHOTO 8 PHOTO 7
PHOTO 9
By purchasing any item sold by Rough Country, LLC, the buyer expressly warrants that he/she is in compliance with all
applicable , State, and Local laws and regulations regarding the purchase, ownership, and use of the item. It shall be
the buyers responsibility to comply with all Federal, State and Local laws governing the sales of any
items listed, illustrated or sold. The buyer expressly agrees to indemnify and hold harmless Rough
Country, LLC for all claims resulting directly or indirectly from the purchase, ownership, or use of the
items.
Install & tighten the upper bolts. Install & tighten the lower bolts.
/