Page is loading ...

Thank you for choosing Rough Country.
Rough Country recommends a certified technician install this system. In addition to these instructions, professional
knowledge of disassemble/reassembly procedures as well as post installation checks must be known. Attempts to install
this system without this knowledge and expertise may jeopardize the integrity and/or operating safety of the vehicle.
Please read instructions before beginning installation. Check the kit hardware against the parts list. Be sure you have all
needed parts and know where they go. Also please review tools needed list and make sure you have needed tools.
NOTICE TO DEALER AND VEHICLE OWNER
Any vehicle equipped with any Rough Country product should have a “Warning to Driver” decal installed on the inside of
the windshield or on the vehicle’s dash. The decal should act as a constant reminder for whoever is operating the vehi-
cle of its unique handling characteristics.
JEEP 84-01 XJ Rear Fender Armor
921105750
*10574BA5*
10575BAG
Tools Needed:
6mm Allen
10mm Socket & Wrench
1/4” Deep Well Socket
7/16” Wrench
1/2” Wrench
Heat Gun
3/16” Drill
Painters Tape
1/4” size Drill
Drill Motor
5/32” Allen
Torque Wrench

10575
Qty Description
1 Dr Rear Fender Armor
1 Pass Rear Fender Armor
1 Fuel Door Armor
1 10575Bag (Instructions)
1 10575Bag1
10575BAG1
Qty Description
32 1/4” x 3/4” Button Head Bolts
34 1/4” Nylock Nuts
34 1/4” Flat Washers
2 1/4” x 5/8” Button Head Bolts

FRONT INSTALLATION INSTRUCTIONS
1. 1997-2001 Cherokees must remove rear bumper caps using a 10MM wrench and 10MM socket in the rear and a 1/4
inch deep wall socket for the front lower self-tapping screw.
2. Once bumper caps are removed, use a 3/16” drill bit to drill out rivets holding the bracket.
3. Remove inner wheel well liner to expose bolts to fender flares by pulling the push-in clips.
4. Remove fender flares and brackets by using 10 mm wrench or socket on inside fender bolts and an 8mm for the two
rear lower self-tapping bolts.
5. Open rear hatch and use a 10mm socket to remove the four bolts holding on the factory spare tire mount.
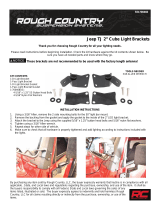
6. Use a Phillips head screw driver to remove 5 screws from the interior fender panels on each side. You may also
have a plastic clip to drill out. See Photo 1
7. Once the panels are unbolted, swing them towards the rear seats and rest them out of your way. See Photo 2.
8. Remove any molding, decals, and/or adhesive from the rear fender area. See Photo 3.
9. It is recommended that you place painters tape along the edges of your body where the armor will contact. This will
help prevent scratching the paint and allowing rust to form after the armor is installed. . See Photo 4.
10. Start with the rear driver side panel. This will be the hardest to install because of the spare tire bracing and fuel filler
neck.
11. Have somebody help you hold the armor panel while you properly align it. Check fitment by resting the bend lines on
the taped off body lines, then aligning front to back. On the driver’s side, you can also align the panel using the gas
cap cutout. Once it is in the desired location, use a pen or marker to mark two of the upper holes. See Photos 5 &
6.
PHOTO 3 PHOTO 4
PHOTO 5
PHOTO 2 PHOTO 1
PHOTO 6
Remove interior panel screws . Pull back interior panel.
Remove decals from fender. Use painters tape to protect the paint.
Mark upper hole to drill. Align panel with body lines and tail light.

12. Remove the panel and drill ONE of the holes using a 1/4” drill bit. Realign the panel by placing a provided 1/4-20 x
3/4” through the hole and threading the nylock nut and washer onto the back. See Photo 7.
13. Place the armor panel back up against the body of your Jeep and install the supplied 1/4-20 x 3/4” bolts, 1/4” flat
washer, and 1/4-20 nylock nut and tighten until snug. It is recommended to apply a lubricant to the threads of the
bolts to prevent them from galling.
14. Mark and drill the remaining holes while making sure the armor panels is held firmly against the body.
15. Remove the panel and clean any metal shavings produced from drilling. It is also recommended to paint any ex-
posed metal to prevent rust. See Photo 8.
16. After all holes are drilled and the panel is cleaned up, remove the tape and begin installing and tightening all bolts to
14 lb-ft using an 11mm wrench for the inside nuts, and a 4mm Allen wrench on the outside bolts. It is recommended
to install the top corners followed by the bottom corners to ensure the armor is pulled to the contour of the Jeep
properly. It is also recommended to use RTV around the perimeter and around bolt holes to prevent rust from form-
ing. See Photos 9 & 10.
17. Install the fuel door armor using the same process as in previous steps. You will use the (2) supplied 1/4” x 5/8”
bolts, washers and nuts on the fuel door.
10. Repeat this process on the passenger side.
PHOTO 8 PHOTO 7
PHOTO 9
By purchasing any item sold by Rough Country, LLC, the buyer expressly warrants that he/she is in compliance with all
applicable , State, and Local laws and regulations regarding the purchase, ownership, and use of the item. It shall be
the buyers responsibility to comply with all Federal, State and Local laws governing the sales of any
items listed, illustrated or sold. The buyer expressly agrees to indemnify and hold harmless Rough
Country, LLC for all claims resulting directly or indirectly from the purchase, ownership, or use of the
items.
Drill using 1/4” drill. Mark 2nd hole to be drilled.
Drill remaining holes using a 1/4” drill.
PHOTO 10
Drill remaining holes using a 1/4” drill.
/