Page is loading ...

INSTALL INSTRUCTIONS
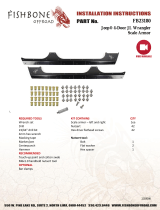
Jeep JKU Rocker Guards
Product : 507ARG4
Applicaon : 2007+ Jeep Wrangler JK
( 4 Door ONLY )

www.ROADARMOR.com
INSTALL INSTRUCTIONS
2007+ JKU Jeep Wrangler Rocker Armor Page ( 2 of 5)
SAFETY FIRST!
• FOLLOW ALL INSTRUCTIONS, YOUR SAFETY AND THE SAFETY OF OTHERS IS MOST IMPORTANT.
• WEAR APPROPRIATE EYE PROTECTION AND EXERCISE CAUTION WHEN DRILLING / CUTTING
REQUIRED TOOLS
INCLUDED HARDWARE
I WARNING
Read the instrucons completely before beginning installaon. Before ghtening bolts,
drilling or cung where required, check to make sure there are no obstrucons such as
brake, fuel or electrical lines which may be damaged. Also keep in mind this is an aer-
market product and MAY require minor shimming and/or trimming, reaming, etc. for
proper t. Road Armor is not responsible for any damages to vehicle.
IMPORTANT NOTICE
• Be sure to inspect and test t your product to ensure proper tment before having it coated, painted, bed
lined, etc.
• Road Armor will not be responsible for the cost of coang your unit if any problems with t or nish are not
noted and addressed beforehand.
Metric and SAE Socket Sets and Wrenches Floor Jack and Block of Wood
Welding Clamps (recommended) Nutsert Installaon Tool
17/32” Drill Bit & Step Bits Rust Inhibing Paint or RTV Silicone
507ARG4 (JKU)
(6) 5/16”-18 x 3/4” Buon Head Bolts
(34) 5/16”-18 x 1-1/4” Buon Head Bolts
(26) 5/16”-18 Nutsert Rivets
(14) 5/16”-18 U-Nuts
(40) 5/16” Washers
(2) M8-1.25 x 8mm Bolts

www.ROADARMOR.com
INSTALL INSTRUCTIONS
2007+ JKU Jeep Wrangler Rocker Armor Page ( 3 of 5)
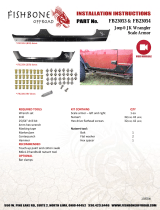
1 Remove Factory Running Boards
Skip this step if not equipped.
2 Tape o where the Road Armor Rocker Armor may come into contact with the body to prevent
scratching the paint. You may choose to either put tape on the body, or against the back edge of the
skins.
3 Align and secure rocker armor along lower door jams; mark all holes for drilling. Use C-Clamp or
strong tape to hold Rocker Armor in place. Once marked, remove rocker guard. (Circles)
6 Drill with either a step bit or by graduang to larger drill bits manually; drill body holes to 17/32-in or
0.531-in **ONLY** (9/16” is too large a hole and will likely result in a nutsert which is loose and may
spin. This is an important step. Be paent and take your me while drilling to not exceed hole size.)
Step Bits
6

www.ROADARMOR.com
INSTALL INSTRUCTIONS
2007+ JKU Jeep Wrangler Rocker Armor Page ( 4 of 5)
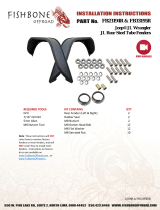
7 Now begin installing the nutsert rivets.
There are several means for this which we will discuss here.
1) A professional nutsert tool similar to the one shown.
This tool was acquired from Fastenal and has
swappable mandrel ps for dierent applicaons.
TOOL : # 0126106 | TIP : # 0128345 ( 3/8-16 )
2) Another specic tool for nutserts which works with
wrenches.
3) DIY Makeshi tool using a bolt, oversized nut, a couple
washers and a pair of wrenches as in #2.
For all methods, rst thread the nutsert onto tool of choice.
With methods 2 and 3 you should use an-seize on the tool
threads. Place the nutsert ush to the body and while
holding the base steady simply ghten the bolt. It will have
some resistance at rst but once it begins crushing it will
become easier unl fully compressed. Get it good and ght
being careful not to spin it! With skill and experience an
impact will make light work of this step.
To prevent rust, apply a bead of RTV silicone behind the
ange of the nutsert, or paint the raw steel around each
hole with a brush.
Method 2
Method 3

www.ROADARMOR.com
INSTALL INSTRUCTIONS
2007+ JKU Jeep Wrangler Rocker Armor Page ( 5 of 5)
8 Install Rocker Armor using 5/16” Hardware. (5/16 x 1 –1/4” RED) & (5/16 x 3/4” - ORANGE)
9 Install 5/16” C-Clip Hardware onto rocker guard lower tabs as provided. (BLUE Arrows)
10 Remove three center OEM 12mm body bolts
from cab.
(GREEN Arrows.)
11 ‘07-’10 Only Install one - 5/16” C-Clips onto
center of body channel (RED Arrows.)
9
8
11
12 Loosely install Rocker Guard using 6 - 5/16 x 1-1/4” hardware provided. 6 along Rocker Armor Tabs
and 1 - 5/16” along body channel for ‘07-’10. (Floor Jack may be required to align center hole) (BLUE)
13 ‘11-’18 on install M8-1.25x30mm bolt and washer through rocker bracket & center body seam. (RED)
14 Reinstall three center OEM 12mm body bolts through Rocker Armor. (GREEN Arrows.)
15 Once all 5/16 x 1-1/4” hardware and Rocker Guard has been aligned and install, TIGHTEN hardware.
10
12-15
/