Page is loading ...

` FB23053 & FB23054
Jeep® JK Wrangler
Scale Armor
2305300
REQUIRED TOOLS
Wrench set
Drill
25/64” drill bit
4mm hex wrench
Masking tape
Marker/pen
Centerpunch
Hammer
RECOMMENDED
Touch-up paint and cotton swab
M6x1.0 handheld nutsert tool
OPTIONAL
Bar clamps
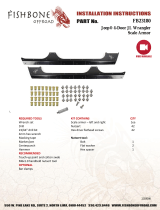
KIT CONTAINS
Scale armor – left and right
Nutsert
Hex drive flathead screws
Nutsert tool:
Bolt
Flat washer
Hex spacer
QTY
1 ea
32(2DR) 42 (4DR)
32(2DR) 42 (4DR)
1
2
1
* FB23053 (4DR) shown
* FB23054 (2DR) shown
* FB23054 HW shown

` FB23053 & FB23054
Jeep® JK Wrangler
Scale Armor
1 2305300
1) REMOVE SIDE STEPS OR SLIDERS
To have full access to drill and install the scale armor,
it is recommended any side steps, rock sliders, etc.
are removed prior to installation.
2) MASK INSTALLATION AREA
To keep your paint free from scratches during
installation and drilling, we recommend covering the
entire area with masking tape. This will also make
marking hole locations easier with a marker if
working with a dark colored vehicle.
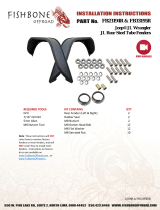
3) MARK CENTER HOLE LOCATIONS
With the help from a friend, or with a set of bar
clamps and the door(s) open, hold the scale armor to
the vehicle. Ensure the gaps around the door are
even front to back and the armor is level with the
bottom of the door.
For the 2DR version, mark the three (3) holes under
the door using a marker. See below image.
For 4DR, mark the two (2) upper holes between the
doors.
Remove the scale armor from the vehicle.
Gently tap the center of each mark with a
centerpunch. Take care to not hit the punch too hard
as you can dent the body. A small drill bit may be
used for a pilot hole instead of a punch.
4) DRILL HOLES
Drill the centerpunched or pilot hole locations using
the 25/64” drill bit. Take care not to drill through the
inner panel.
Remove the tape from around the holes, if
necessary. This will prevent the tape from being
caught behind the nutserts.
Clean the drilled holes to remove any burrs or chips.
Using a cotton swab and paint, touch in any bare
metal from the drilling process to prevent rust. Any
paint color will work as the nutsert will cover it.
4DR shown
2DR shown

` FB23053 & FB23054
Jeep® JK Wrangler
Scale Armor
2 2305300
5) INSTALL NUTSERTS
Using the supplied nutsert tool, or the
recommended handheld tool, install a nutsert into
each drilled and painted hole.
For installation procedures for the supplied nutsert
tool, see the “NUTSERT INSTRUCTIONS” section.
Follow the manufacturer’s instructions for the
handheld tool if applicable.
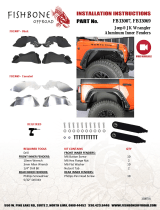
6) MARK REMAINING UPPER HOLES
With the nutserts in place, bolt the armor back on
the body. Double check alignment around the
door(s) and fenders and begin marking the
remaining upper bolt hole locations. Do not mark the
hole locations below the bend at this time.
CAUTION:
Ensure the part is flat against the body and does not
move while marking the holes. Constantly check
previously marked holes for alignment to ensure all
holes are exactly where they need to be.
With the part on or off, carefully centerpunch or
predrill the hole locations.
NOTE:
On the fenders where there isn’t much support
behind the panel, it is better to drill a pilot hole
instead of using a centerpunch.
Remove the armor from the body. Drill all hole
locations and install nutserts per steps 4) and 5).
7) MARK LOWER HOLES
Once again, place the armor on the body and bolt it
in place using all currently installed nutsert locations.
Mark and centerpunch all remaining lower holes
using the scale armor as a template. Be sure to firmly
press the part against the body to ensure the hole
will be centered on the nutsert when it is bolted in
place.
Again, remove the part from the body. Drill all hole
locations and install nutserts per steps 4) and 5).

` FB23053 & FB23054
Jeep® JK Wrangler
Scale Armor
3 2305300
8) FINAL ASSEMBLY
Remove any remaining tape if necessary and install
the scale armor to the body using the supplied
hardware. Loosely install all hardware at first to
ensure everything is straight and lined up.
9) TIGHTEN ALL HARDWARE
Take care not to overtighten any bolts to avoid
spinning a nutsert.
10) REPEAT ON OPPOSITE SIDE
Repeat all procedures on the opposite side of the
vehicle.
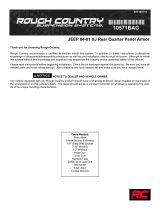
11) NUTSERT INSTRUCTIONS
To use the supplied nutsert tool, prepare the tool as
shown in the image. A washer on either side of the
hex spacer, and a nutsert installed at the end of the
bolt.
Insert the nutsert into a prepared 23/64” hole.
While using a wrench to hold the hex spacer
stationary, begin tightening the bolt with a ratchet
and socket. As you tighten, the bolt will draw the
nutsert together crimping it in place. Continue to
ratchet until the nutsert is fully seated. Take care not
to over tighten. This can damage the nutsert and
cause it to lose grip.
Once seated, remove the bolt, hex spacer and
washers from the nutsert for reuse. Inspect your
work to ensure the nutsert was seated correctly.
NOTE:
When installing the part, take care to not cross-
thread the bolt into the nutsert. Doing so can cause
the nutsert to spin and make it very difficult to
remove the bolt. Always start threading bolts by
hand, then use a tool for final tightening to avoid
cross-threading.
12) ENJOY YOUR NEW FISHBONE OFFROAD SCALE
ARMOR!
/