Page is loading ...

1 of 4 Workrite Ergonomics | 800.959.9675 www.workriteergo.com
Phillips head screwdriver, 2.5 mm Allen Wrench, 5 mm
Allen Wrench
Conform Monitor Arm
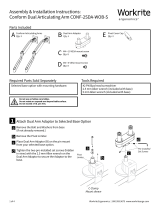
A Tool Bar/Slatwall
Assembly
Qty: 1
Parts Included Parts Included, Hardware kit
Tools Required
Assembly & Installation Instructions:
Conform Base, Tool Bar/Slatwall
CONF-BSE-TSB-S
Attach the Base to Tool Bar
Using a Phillips head screwdriver, open or close the jaws so the
metal clips can grip both the top and bottom of the Tool Bar/
Slatwall.
Required Parts Sold Separately
B 5 mm Allen Wrench
Qty: 1 E 30 × 7 mm Static Arm Spacer
Qty: 1
F Sticker
Qty: 1
G Interchangeable
alternate clip
Qty: 1
C 4 mm Allen Wrench
Qty: 1
D 2.5 mm Allen Wrench
Qty: 1
Do not exceed 48 lb. on Workrite Tool Bar
Do not exceed weight limit for other manufacturers’ Slatwalls.
1

2 of 4 Workrite Ergonomics | 800.959.9675 www.workriteergo.com
Secure the Base
Using a Phillips head screwdriver, rotate the screw clockwise to
tighten the grip to the Tool Bar/Slatwall. Once the metal clips are
tightened, the Base will not be able to move along the rail unless
it is loosened again.
Top Clip
Bottom
Clip
BACK VIEW
FRONT VIEW
Continued
Once metal clips grip both the top and bottom of the Tool Bar/
Slatwall, slide it to your desired position .
1
2

3 of 4 Workrite Ergonomics | 800.959.9675 www.workriteergo.com
Ready for Arm Installation
You are now ready to attach your selected Conform Monitor Arm (sold separately). Follow Arm installation
instructions.
Articulating Arm
Shown
4
Aer M8 x 90 mm bolt has been
installed and set screw has been
tightened with 2.5 mm Allen
Wrench (D), apply the sticker (F) to
cover the set screw.
Note:
F
D

4 of 4 Workrite Ergonomics | 800.959.9675 www.workriteergo.com
Haworth® Slatwall
Before installing Base, loosen the vertical Phillips head screw until the lower clip can be removed.
Replace lower clip with the alternate clip (G) with lip up, as shown below
Using a Phillips head screwdriver, rotate the screw clockwise until the two clips are roughly positioned for
placement on Slatwall.
Return to step 2.
If the installed metal clips do not work with your Slatwall, we provide an alternate clip.
Follow the steps below:
Remove Lower Clip
Alternate Clip (G)
(Lip up)
5
b
b
c
c
dd
a
a
1500253 Rev B
/