Page is loading ...

1 of 4 Workrite Ergonomics | 800.959.9675 www.workriteergo.com
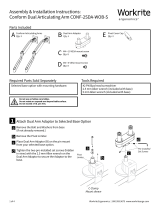
A Conform Articulating Arm
Qty: 1 B M4 × 10 mm VESA
mount screw
Qty: 4
D Pivot Cover Cap
Qty: 1
C M4 × 6 mm VESA
mount screw
Qty: 4
Parts Included
Required Parts Sold Separately Tools Required
Assembly & Installation Instructions:
Conform Articulating Arm CONF-1SDA-WOB-S
Attach Conform Articulating Arm to Selected Base Option
Remove Bolt and Washers from base (if not already removed.)
Place the Conform Arm (A) on the Base Pin.
Assemble Bolt with Washers as shown. Insert through the
bottom of the arm assembly and into the base. Tighten with
5mm Allen wrench. Be sure the arm is tight but rotates freely.
Snap Pivot Cover Cap (D) into top of arm assembly.
#2 Phillips head screwdriver
2.5 mm Allen wrench included with base
5 mm Allen wrench included with base
Selected base option with mounting hardware
Do not use on hollow core tables.
Do not rotate or suspend arm beyond table surface.
Do not exceed 17 lb.
M8 Flat Head Cap Screw M4 8mm Screw M4 12mm Screw M4 16mm Screw Spacer
Plastic Cap 7/32” Allen Wrench 1/8” Allen Wrench
Button Head Allen Cap ScrewPivot Pin
Steel WasherPlastic Pivot Washer
1
a
a
b
b
c
d
d
c
D
A
C-Clamp Mount shown
Remove
Replace
Bse Pin

2 of 4 Workrite Ergonomics | 800.959.9675 www.workriteergo.com
Attach the Monitor to the Monitor Arm VESA Plate
Remove the monitor from its stand. Keep the original screws
to mount to Conform Arm.
Attach the VESA plate to the VESA holes on your monitor. Use
the screws from your monitor if possible.
Monitor Capacity Adjustment (Silver Bolts)
If your monitor is too light or too heavy for the factory-
set capacity, the arm will raise, lower or tilt too easily. If
this is the case, you need to adjust the tension.
Adjusting Arm Capacity
To increase capacity(+) turn counter-clockwise using a
5 mm Allen Wrench (included with base) until the arm
reaches a balanced adjustment.
To decrease capacity(-) turn clockwise until the arm
reaches a balanced adjustment.
Adjusting Tilt Capacity
To increase capacity(+) turn clockwise using a 5 mm
Allen Wrench (included with base) until the monitor
reaches a balanced adjustment.
To decrease capacity(-) turn counter-clockwise until
the monitor reaches a balanced adjustment.
2
a
a
b
b
3
b
a
Remove
a
b
Tilt capacity
Arm capacity
Important Note: It is strongly recommended to use the mounting
screws provided by the monitor manufacturer if possible. If longer screws are
required, use either part (B) 10 mm, or (C) 6 mm screws supplied. Always use
the shortest screws possible to avoid damage to the monitor.
100 mm VESA standard, use
4 outer corner holes.
75 mm VESA standard, use
4 inner corner holes.

3 of 4 Workrite Ergonomics | 800.959.9675 www.workriteergo.com
Adjusting Pivot Tension (Black Bolts)
Carefully remove Pivot Cover Cap (D) at joint.
Setting Tension
If the arm is loose, turn the black adjustment
screw clockwise using a 5 mm Allen Wrench
(included with base) until the arm is tight and
pivots smoothly.
If the arm is tight and does not pivot, turn the
black adjustment screw counter-clockwise until
the arm pivots smoothly.
Locking Tension
Tighten the set screw with 2.5 mm Allen wrench
(included with base) to lock in the tension
level and prevent the joints from loosening or
tightening with use.
Replace Pivot Cover Cap (D) by snapping into top
of arm assembly.
Tighten
Loosen
c
c
4
b
a
Front
b
Shown on
C-Clamp Base
a
d
d
D
Remove
Replace

4 of 4 Workrite Ergonomics | 800.959.9675 www.workriteergo.com
Parts & Support
C-Clamp & Grommet Base ....................................................CONF-BSE-CCG-S
Two Piece C-Clamp & Grommet Base ...................................CONF-BSE-TPCCG-S
Tool Bar & Slatwall Base .......................................................CONF-BSE-TSB-S
Wall Plate Base ......................................................................CONF-BSE-WP-S
Dual Arm Adaptor .................................................................. CONF-ADPT-DA-S
Knoll® Antenna® Adaptor ..................................................... CONF-ADPT-KA-S
14" Pole Base with C-Clamp & Grommet .............................CONF-PB-14CCG-S
28" Pole Base with Heavy Duty C-Clamp & Grommet ......... CONF-PB-28HDCCG-S
Single Pole Mount Adaptor ...................................................CONF-ADPT-SPM-S
Dual Pole Mount Adaptor ......................................................CONF-ADPT-DPM-S
Quick Release Adaptor .......................................................... MON-ADPTVQR-W-B
Technical Support: Please call Workrite Technical Support while at the Workrite product. (800) 959-9675 option 2.
Cable Management
Upper Arm: Insert cables into the recessed area under the upper arm
by pushing the cables through the clips.
Lower Arm: Remove the cover by sliding it up, then o. Secure cables
with Hook & Loop strips. Slide cover down to secure.
Desk Base: Run the cable from lower arm to the back of
the base. Put cables into the cable clip.
Note: Leave suicient slack in the cables to allow
free movement of arm.
1500245 Rev G
Hook & Loop
Strip
Hook
& Loop
Strip
High
point
O
On
5
b
b
c
c
a
a
✓
/