Page is loading ...

1 of 2 Workrite Ergonomics | 800.959.9675 www.workriteergo.com
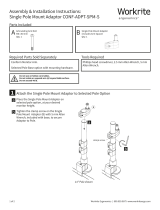
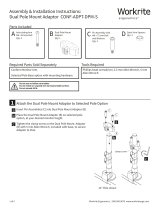
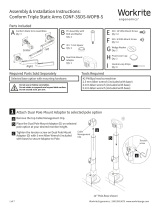
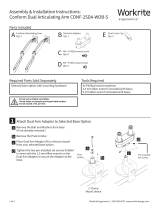
Phillips head screwdriver, 2.5 mm Allen Wrench, 5 mm
Allen Wrench, Drill, Drill Bit, Fasteners (not included).
Conform Monitor Arm
A
Wall Plate Assembly
Qty: 1
Parts Included Parts Included, Hardware kit
Tools Required
Assembly & Installation Instructions:
Conform Base, Wall Plate
CONF-BSE-WP-S
Attach the Wall Plate Base to the wall
Remove Bolt & Washers.
Fasten Wall Plate Base with ¼/6 mm diameter bolts or screws
appropriate to the construction of the wall.
Required Parts Sold Separately
B
5 mm Allen Wrench
Qty: 1 E
Static Arm Spacer
Qty: 1
F
Sticker
Qty: 1C
4 mm Allen Wrench
Qty: 1
D
2.5 mm Allen Wrench
Qty: 1
Do not exceed 48 lb.
Mounting Surface requirement. Do not mount to drywall only!
(drywall/stud mount)
• Drywall: ⁄” sheetrock with screws
into stud backing, using 2 centered
holes.
• Use ¼”/6 mm diameter fasteners.
•
Concrete: Use appropriate concrete anchors using
4 outer holes.
•
Wood/steel/other solid surface: bolt or screw using
4 outer holes.
• Use ¼”/6 mm diameter fasteners.
(all other surfaces)
1
b
b
b
a
a

2 of 2 Workrite Ergonomics | 800.959.9675 www.workriteergo.com
Insert Spacer and Bolt
Choose the appropriate spacer and re-assemble pin with
selected spacer.
Ready for Arm Installation
You are now ready to attach your selected Conform Monitor Arm (sold separately). Follow Arm installation
instructions.
Articulating Arm
Shown
1500254 Rev A
F
2
E
Static Arm
Spacer.
Articulating Arm
Spacer
3
D
Aer M8 x 90 mm bolt has been
installed and set screw has been
tightened with 2.5 mm Allen
Wrench (D), apply the sticker (F) to
cover the set screw.
Note:
/
