Page is loading ...

1 of 1 Workrite Ergonomics | (800) 959–9675 www.workriteergo.com
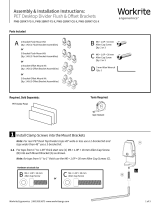
Workrite Acrylic or Phenolic Divider
Worksurface .625"-1.25" Thick
A2 Bracket Flush Mount Kit
ACC-2BRKT-FS -X
2 Bracket Offset Mount Kit
ACC-2BRKT-OS-X
3 Bracket Flush Mount Kit
ACC-3BRKT-FS-X
3 Bracket Offset Mount Kit
ACC-3BRKT-OS-X
Corner Joining Kit
ACC-BRKT-CJK-C
B5mm Allen Key
Qty: 1
Required, Sold Separately
Hardware Kit
Place Divider and Secure
Once all brackets are securely clamped to the
worksurface, place the divider into all bracket
openings.
Using 5mm Allen Key, rotate the bolt clockwise to
tighten the bracket onto the divider. Repeat for
all brackets included in the kit.
Ensure all brackets are tight and firmly gripping
divider.
Secure Bracket Clamp to Edge of Worksurface
Secure bracket clamp to the edge of the worksurface using
5mm Allen Key, rotate clockwise to tighten.
Repeat for all brackets included in the kit. Brackets should be
spaced out evenly along edge of worksurface to provide
maximum stability.
¾"
1
2
3Attach Corner Joining Kit (If applicable)
Once all dividers are attached to the desk, use
4mm Allen Key, rotate corner joining kit bolt
clockwise to tighten corner joining clamp onto
rear and side dividers.
Repeat for the other corner joining clamp.
Assembly & Installation Instructions:
Acrylic / Phenolic Divider Series
1500507 Rev. A
Standard Parts
4mm Allen Key
Qty: 1
** 4mm Allen Key only provided in Corner Joining Kit
/
