Page is loading ...

Pattern Perfect Installation for All Dual Wheel Carriages
Step 1: Set up your Pattern Perfect Bracket as shown in Fig. 1.1.
Step 2: Gently tip your sewing machine onto its side.
Step 3: Place the Pattern Perfect Bracket between the Dual Wheels as shown in Fig. 1.2.
Step 4: Insert the screws through the holes on the Pattern Perfect Bracket and screw into the
bottom of the wheel blocks on your sewing machine.
Fig. 1.1
Fig. 1.2
M6 x 22mm
SBHCS
M6 x 40mm
SBHCS
M6 x Hex
Nut
Pattern Perfect
Bracket
Page 1

Fig. 2.3
Step 2: Gently tip your sewing machine onto its side.
Step 3: Place the Pattern Perfect Bracket on the wheel blocks, against the Heads of the Screws, and
with the center hole on each wheel block aligned to be center with the slot on the Pattern Perfect
Bracket as shown in Fig. 2.3.
Step 4: Insert the screws through the holes on the Pattern Perfect Bracket and screw into the
bottom of the wheel blocks on your sewing machine.
M6 x 22mm
SBHCS
Wheel Block
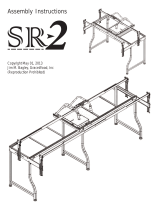
Pattern Perfect Installation for V.1 SR2 Carriages
Step 1: Check that your carriage matches the one shown in Fig. 2.1.
Step 2: Set up your Pattern Perfect Bracket as shown in Fig. 2.2.
M6 x 40mm
SBHCS
Fig. 2.2
M6 x Hex
Nut
Pattern Perfect
Bracket
Fig. 2.1
V.1 SR2 Carriage
Page 2

Fig. 3.4Fig. 3.3
Set Screw
Set Screw
11 in
Fig. 3.5
Pattern Perfect Installation for Pro Carriages
Step 1: Check that your carriage matches the one shown in Fig. 3.1.
Step 2: Set up your Pattern Perfect Bracket as shown in Fig. 3.2.
Fig. 3.2
Fig. 3.1
Step 3: Gently tip your sewing machine onto its side. Using a 4mm Allen Wrench, unfasten the 2
screws that attach the vertical wheel brackets to one side of your sewing machine as shown in Fig.
3.3.
Step 4: Re-attach each vertical wheel bracket so that the wheel on each faces towards the other
wheels on the machine using the same screws that were previously removed as shown in Fig. 3.4.
Step 5: Loosen the set screws on the Wheel Blocks using a 3mm Allen Wrench. Then re-position
the outside face of the wheels to be 11 in (~28mm) apart as shown in Fig. 3.5. Finally, tighten the
set screws back in place.
Page 3

Fig. 3.6
Step 6: Place the Pattern Perfect Bracket on the wheel blocks with the center hole on each wheel
block aligned to be center with the hole on the Pattern Perfect Bracket as shown in Fig. 3.6. Insert
the screws through the holes on the Pattern Perfect Bracket and screw into the bottom of the wheel
blocks on your sewing machine. Leave the screws loose, they will be tightened in a later step.
Step 7: Have a friend help you set your machine onto your carriage. The encoder will be springing
down so make sure one of you holds it up and towards the front wheels. Align the wheels and
encoder onto the center of each track.
Step 8: Loosen the set screws on the wheel blocks using a 3mm Allen Wrench. Roll the machine
back and forth to reposition itself on the track. When the wheels all turn freely without coming off of
the track, tighten the set screws again. Then tighten the screws holding the Pattern Perfect Bracket
to the wheel blocks. You are now ready to sew.
M6 x 22mm
SBHCS
Page 4
/