Page is loading ...

1
Machine Quilng Frame
assembly, and instruction manual
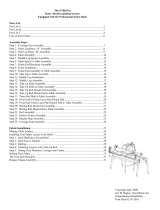
Table of Contents
Parts List . . . . . . . . . . . . . . . . . Pg. 2
Step 1 - Legs . . . . . . . . . . . . . . . Pg. 4
Step 2 - Lower Leg Brace . . . . . . . Pg. 5
Step 3 - Frame Ends . . . . . . . . . . Pg. 6
Step 4 - Pole Brackets . . . . . . . . . Pg. 6
Step 5 - Poles . . . . . . . . . . . . . . Pg. 7
Step 6 - Carriage. . . . . . . . . . . . Pg. 8
Step 7 - Placing the Carriage. . . . Pg. 9
Fabric Installation . . . . . . . . . . Pg. 10-11

2
(
1
)
L
e
f
t
F
r
a
m
e
E
n
d
(
1
)
R
i
g
h
t
F
r
a
m
e
E
n
d
(
1
)
L
o
w
e
r
B
r
a
c
e
*
(
3
)
P
o
l
e
*
3
6
”
D
i
s
p
l
a
y
M
o
d
e
l
6
0
”
C
r
i
b
9
6
”
Q
u
e
e
n
(
1
)
S
t
a
r
t
-
R
i
g
h
t
Q
u
i
l
t
i
n
g
F
r
a
m
e
*
* Size will vary depending
on model
Parts List
(
1
)
C
a
r
r
i
a
g
e
T
o
p
P
l
a
t
e
(
1
)
C
a
r
r
i
a
g
e
H
a
n
d
l
e
L
e
f
t
/
R
i
g
h
t
(
1
)
C
a
r
r
i
a
g
e
B
o
t
t
o
m
P
l
a
t
e
(
1
)
C
a
r
r
i
a
g
e
C
r
o
s
s
B
r
a
c
e
(
1
)
L
e
f
t
T
a
k
e
-
U
p
P
o
l
e
B
r
a
c
k
e
t
(
1
)
R
i
g
h
t
T
a
k
e
-
U
p
P
o
l
e
B
r
a
c
k
e
t
(
1
)
L
e
f
t
F
a
b
r
i
c
L
a
y
e
r
s
P
o
l
e
B
r
a
c
k
e
t
(
1
)
R
i
g
h
t
F
a
b
r
i
c
L
a
y
e
r
s
P
o
l
e
B
r
a
c
k
e
t

3
(
3
)
L
e
f
t
P
o
l
e
E
n
d
(
3
)
R
i
g
h
t
P
o
l
e
E
n
d
(
8
)
M
6
X
1
2
m
m
S
B
H
C
S
c
r
e
w
(
6
)
M
5
X
1
0
m
m
S
B
H
C
S
c
r
e
w
(
2
)
M
8
X
5
0
m
m
S
B
H
C
S
c
r
e
w
(
2
)
M
8
H
e
x
N
u
t
(
2
)
M
8
W
a
s
h
e
r
(
2
)
M
6
H
e
x
N
u
t
(
2
)
M
6
X
4
0
m
m
S
B
H
C
S
c
r
e
w
(
3
)
R
a
t
c
h
e
t
H
o
u
s
i
n
g
C
a
p
(
3
)
A
l
l
e
n
W
r
e
n
c
h
M
3
M
4
M
5
(
1
)
F
a
b
r
i
-
F
a
s
t
t
o
o
l
(
1
)
O
p
e
n
E
n
d
e
d
W
r
e
n
c
h
(
3
)
F
a
b
r
i
-
f
a
s
t
T
u
b
i
n
g
Hardware

4
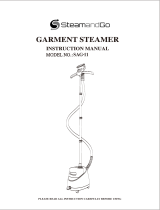
Step 1-1: Place your quilting
frame on the oor upside down.
Step 1-2: Pivot each leg up, and
while holding the leg upright,
pivot up the leg brace.
Step 1-3: Insert a M8 X 50mm
SBHC Screw through both holes
in the leg, the washers, and
also the holes in the leg brace.
Secure the assembly parts
together with a M8 Hex nut.
Notes: Follow these steps for
the legs at each end of your
quilting frame.
***For 56’ and Demo Size
Frame Leg Setup, please see the
Addendum on pg. 12.***
Step 1: Legs
Parts Needed:
(1) Start Right Quilting Frame
(2) M8 X 50mm SBHC Screw
(2) M8 Hex Nut
(2) M8 Washer
Fig. 1-1
Fig. 1-2
Fig. 1-3
Fig. 1-4

5
Step 2-1: Secure the lower brace to each leg
using four (4) M6 X 12mm SBHC Screws.
Note: After completly tightening the bolts on
this step turn the quilting frame over to it’s
upright position.
Step 2: Lower Leg Brace
Parts Needed:
(1) Frame Assembly
(4) M6 X 12mm SBHC Screw
(1) Lower Brace

6
Step 3-1: To install the frame
ends onto the quilting frame you
must rst loosen the bolts that
are holding on the track support
brackets.
Step 3-2: Slide each frame end
onto the track supports until the
track supports are completely
seated inside the track support
brackets. Then tighten the
bolts securing the track support
brackets.
Step 3: Frame Ends
Parts Needed:
(1) Frame Assembly
(1) Frame End Left
(1) Frame End Right
Loosen
Track support
brackets
Fig. 3-1
Fig. 3-2
Step 4-1: Remove the 3 wing knobs
from the inside of each of the pole
brackets.
Step 4-2: Attach the pole brackets to
the frame ends using the previously
removed knobs.
Note: The fabric layer pole brackets go
on the outer ends of the frame ends.
The take-up pole brackets attach near
the middle of the frame ends.
Step 4: Pole Brackets
Parts Needed:
(1) Frame Assembly
(1) Left Take-Up Pole Bracket
(1) Right Take-Up Pole Bracket
(1) Left Fabric Layers Pole Bracket
(1) Right Fabric Layers Pole Bracket
Fig. 4-1
Bracket Bottom
Frame end left
(Inside View)
Frame end Right
(Outside View)

7
Step 5-1: Insert the left pole end of the pole into a pole
cap.
Note: The notch on the Right Pole End needs to line up
with the slot in the pole cap before it can be inserted.
Step 5-2: Insert the other end of the pole into the
appropriate ratchet base on the opposite end of the
frame.
Note: Attach the take-up pole to the frame after completing Step 7-3 (Sewing machine placement).
Step 5-3: Finally secure the pole in place by sliding the ratchet caps onto each ratchet base.
Step 5: Poles
Parts Needed:
(1) Frame assembly
(3) Poles
(3) Left Pole End
(3) Right Pole End
(6) M5 x 10mm SBHC screws
Fig. 5-1
Frame End Left
Right Pole End
Left Pole End
M5 x 10mm SBHC screws
Step 5-1:
Insert the left pole end
into the end of each pole and secure
using three (3) M5 x 10mm SBHC Screws as shown in
Fig. 5-1. Repeat this step with the right pole end on the
opposite side of the pole.
Frame End Right
Right pole end
Right pole
cap

8
Step 6: Assembling The Carriage
Parts Needed:
(1) Carriage Top Plate
(1) Left Handle
(1) Right Handle
(1) Handle Cross Brace
(4) M6 x 12MM SBHC Screw
(2) M6 x 40MM SBHC Screw
(2) M6 Hex Nuts
6-1: Start by attaching your left and
right handles to the carriage top
plate using two (2) M6 x 12mm SBHC
Screws on each handle, as shown in
Fig. 6-1.
6-2: After your handles are attached
place the handle cross brace on the
top of the handles and secure it with
two (2) M6 x 40mm SBHC Screws and
two (2) M6 Hex Nuts as shown in Fig.
6-2.
Fig. 6-1
Fig. 6-2
M6 x 40mm SBHC Screws

9
Step 7-1: First place the bottom plate onto the quilting frame. The sets of double wheels should be
placed toward the front of the frame. The front is the side of the frame with all of the poles attached
to it.
Step 7-2: Next place the top plate on top of the bottom plate. The foam handles on the top plate
also face toward the front of the frame.
Step 7: Placing The Carriage
Parts Needed:
(1) Frame Assembly
(1) Top Plate
(1) Bottom Plate
(1) Sewing Machine
Step 7-3: Finally, place your sewing machine
onto the carriage as shown in Fig. 7-2.
Step 7-4: After your sewing machine is in
place install the take-up pole. The take-
up pole will go through the throat of your
sewing machine, and attaches exactly as
done previously in Step 5 with the other
poles.
Fig. 7-1
Fig. 7-2

10
Congratulations! You have completed the assembly of your Start-Right Quilting Frame.
All that remains is to install your fabric and begin quilting!
With the specially designed Fabri-Fast poles, installing your fabric is easier on the Start-Right than on
any other frame. Each pole has a Fabri-Fast slot and accompanying tubing. These work together to
make your fabric installation much easier and faster than using tape, tacks or Velcro®.
Before you begin, please locate the plastic Fabri-Fast tool (blue) included in your shipment.
We recommend you begin with practice material allowing you to experiment with machine settings
and stroke techniques.
NOTE: As you cut your fabric layers, we recommend making the quilt backing about 6-8” longer and
2-4” wider than your top. This will allow for a little give in the backing, especially if using thicker
batting
Start-Right fabric installation
Methods of Installation
• The recommended method for installing fabric onto the poles is to make and use Cloth
Leaders (instructions to follow). You may also apply your fabric layers directly to the poles.
In this instance you would follow the same procedures as outlined, omitting the cloth
leaders.
• With either method it is very important to cut all your fabric square. This will make all the
following steps much easier! A rotary cutter helps achieve more precise results.
This following is a brief overview to show which fabric layer goes to each pole
OVERVIEW:
Step 1: Install Quilt Backing to 2nd pole and roll up.
Step 2: Install Quilt Top to 3rd pole and roll up.
Step 3: Attach Quilt Backing to Take Up Pole
Step 4: Place Batting on oor underneath Quilt Top Pole, pull end of batting up between
3rd and 2nd pole, and lay over Quilt Backing.
Step 5: Attach Quilt Top to Take Up Pole.
Making cloth leaders
• First, select your cloth leader material. We recommend using a good quality muslin or similar fabric
that has a good thread count. Be aware, however, that if the fabric is too thick, it may prove more
difcult getting it installed into the pole slot.
• Surge or hem your cloth leaders on all sides.
• Make a cloth leader with the following lengths (these may need to be slightly longer if spreading Pole
mount ends).
• Mark a dashed line along the length of your leader about ½” in from the edge. You will use this as a
guide to help you insert your leader into the slot in straight line.
(OPTIONAL: For a straighter cloth leader installation, some may consider it easier to make a casing
and push the tubing into the casing before installing it into the slot. If you wish to do this, create a
casing on one end of each leader by folding over the fabric one inch (1”), and, using your foot pedal as

11
Installing your fabric layers to the Poles
Step 1: Quilt backing to second Pole
• To begin, determine which will the front and
back edges of your quilt BACKING (be sure it
will t within the width of your frame set-up).
• NOTE: If your backing is made up of more
than one piece of fabric, cut your selvedges
a guide, stitching the fabric together 3/4” from the fold. This will leave about ¼” of fabric beyond the
stitching. Leave the edges open on both ends. You may then slide your tubing into the casing).
• Mark each cloth leader at the center (length-wise).
• Mark (or baste) a straight line about ½” in from the opposite (non-casing, or non-dashed) end of the
leader. This will be the line to which you attach your fabric layer.
• Center your cloth leader lengthwise along the pole. Using Grace’s new Fabri-Fast
TM
System, take a
piece of plastic tubing (cut to the appropriate length), and, holding your cloth leader to the slot (lining
up the dashed line), press the tubing over the leader and into the slot. Use the Fabri-Fast tool to press
the rest of the tube and fabric in quickly and easily. (If you have made a casing, line up this casing w/
tubing over the slot and press it into the slot using the Fabri-Fast tool.
• This illustration show the cloth leaders installed on each pole prior to your quilt layers being installed.
Step 2: Quilt top to 3
rd
Pole
• Determine which will the front and back edges of your quilt.
• Line up the center of your fabric layer with the center of the cloth leader on the 3
rd
Pole. Pin the
back edge of your top to the leader cloth. This is to be done with the nished side of the fabric
facing up.
• Do not stretch or pull the fabric during this process. Let it lay as naturally possibly.
• Roll your leader and top onto the 3
rd
pole completely. Again, be sure the fabrics stay lined
up. Smooth out any wrinkles as you roll by brushing the fabric from the center out, being very
careful not to stretch or pull the fabric excessively.
STEP 3: Batting
• A light, bonded batting is recommended.
Take-Up Pole
Quilt Back Pole
Quilt Top Pole
Leader Cloth
off and atten them out to allow the backing the proper give it needs.
• Line up the center of your fabric layer with the center of the cloth leader on the
2
nd
Pole. Pin the back edge of your backing to the leader cloth. This is to be done
with the nished side of the fabric facing up.
• Do not stretch or pull the fabric during this process. Let it lay as naturally possibly.
• Roll your leader and backing onto the 2
nd
pole completely. Watch to make sure
the fabrics stay lined up. Smooth out any wrinkles as you roll by brushing the
fabric from the center out. However, be very careful not to stretch or pull the
fabric excessively.
• NOTE! It is important that you roll the pole the proper direction so the fabric rolls
over and onto the 2nd pole (see picture).
• Note! It is important that you roll the pole
the proper direction so the fabric rolls onto
the 3
rd
pole the right way (when fabric
rolls off the pole toward the take-up pole,
it should roll under and off the pole. (See
picture).

12
Step 4: Attaching layers to take-up Pole
Take the edge of the quilt backing and pin it along the straight line of the take up pole leader.
• Once your fabric is in place, it is time to put your Top and Bottom Plates (with sewing machine)
onto the frame.
• Lift the 1st pole up out of its slot and place the left end through the throat of the machine. Then
place it back in the slot.
• Set the Top Plate onto the Bottom Plate making sure the wheels line up in the tracks of the Bottom
Plate.
Take-Up Pole
Quilt Back Pole
Quilt Top Pole
Quilt Top
Batting
Take-Up Pole
Quilt Back Pole
Quilt Top Pole
Quilt Back
Take-Up Pole
Quilt Back Pole
Quilt Top Pole
Batting
1-Backing
2-Batting
3-Top

13
• You will want to thread the end of one your bungee cord
through the little hole on your left Take Up Pole Mount End, as
pictured.
• You will then want to attach the clamp to your fabric.
• With the clamp attached and your cord through the hole you
will want to pull the excess cord and when you get your fabric
tight you will pull the cord through the slot next to where you
threaded your cord.
• You will follow the above steps for the rest of the left side,
except your bungie cord will go through the Left Fabric Layer
Pole Mount End.
• Follow the above steps to complete the right side.
Rolling your fabric
• When you have completed your work area and are ready to roll to the next, simply take the stops
off the 2
nd
and 3
rd
poles, allowing them to roll freely. Then, with one or both hands, roll the 1
st
pole
forward, rolling the completed work area onto that pole.
• TIP! As you roll forward, the quilt will accumulate on the 1st pole. Be sure to raise the Pole Mount
Ends slightly as needed, so that the bottom of the rolled up fabric stays about 1/8” above the throat
place of the sewing machine base. Failing to do so will cause your Carriage Assembly to roll less
smoothly.
The Four-Inch Principle
• If you are using a sewing machine with a smaller size throat (3” to 7”), you will want to follow the four-
inch principle: Limit any quilting pattern to four inches or less from front to back.
If you have the 4
th
Pole option: Install Batting to 4
th
Pole and roll up.
• The Start-Right gives you close to 16” of reach, but because of a limited throat size of your machine,
and because the fabric will eventually roll up on the 1st pole, further decreasing space, you will want to
keep patterns to a 4” limit.

14
56” and Demo Size Frame Addendum
Fig. A-2
Step A-1: Insert legs between the leg mounts as shown in
step A-1
Step A-2: Insert a M8 X 50mm SCHC Screw through
both holes in the leg and also the holes in the leg brace.
Then place a washer onto the end of the screw. Secure
the assembly parts together with a M8 Hex nut as shown
in Fig A-2.
Fig. A-1
Fig. A-3
Leg Brace
Step A-3: While holding the leg
upright, insert the leg Brace
inbetween between the leg
mounts as shown in Fig. A-3
Step A-4: Insert a M8 X 50mm
SCHC Screw through both end
holes in the leg brace. Then
place a washer onto the end of
the screw. Secure the assembly
parts together with a M8 Hex
nut as shown in Fig A-2.
Once Step A-4 is completed
return to Step 2: Lower Leg Brace
/