Page is loading ...

TOOLS NEEDED:
Drill Motor
11/32” Drill bit
1/2” Socket / Wrench
9/16” Socket / Wrench
KIT CONTENTS:
2– Shock Brackets
1-Center Hood Bracket
2-Gas Strut Shocks
1-Bag Containing:
2-Clamps
4-3/8” Lock Washers
4-5/16” Lock Nuts
2-5/16” x 3/4” Bolts
2-5/16” Flat Washers
92115100
JEEP TJ HOOD LIFT ASSIST KIT
Thank you for choosing Rough Country for your suspension needs.
Please read all the instructions before beginning the installation. Check the kit hardware against the kit contents. Be
sure you have all the needed parts and understand where they go. Also please review the tools needed list and
make sure you have needed tools. If you have any questions please call us at 800-222-7023.
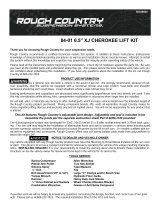
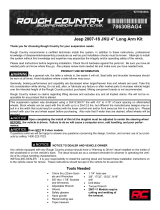
1. Drill the hole as shown using a 11/32” drill bit using caution to drill through the brace only. DO NOT drill through
the exterior of the hood. See Photo 1.
2. Install the mounting studs with the supplied 5/16” lock nuts as shown in Photo 2 with the passenger side stud in
the lower hole and the driver side in the 2nd hole from the bottom. Tighten using a 1/2” wrench.
3. Install the supplied flag nut and secure the hood bracket in the lower hole as shown with the supplied 5/16” x 3/4”
bolts, washers. See Photo 3 & 4. Tighten using a 1/2” wrench.
INSTALLATION INSTRUCTIONS
Photo 1 Photo 2
Photo 3 Photo 4
DRILL USING 5/16” BIT INSTALL MOUNTING STUDS
HOLD FLAG NUT IN PLACE INSTALL BRACKET AND CENTER

POST INSTALLATION
• All components must be retightened after 500 miles, and checked periodically after installation.
Thank You for using Rough Country for your off road vehicle needs
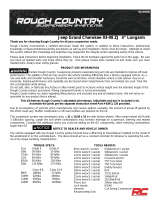
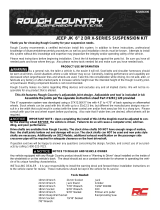
4. Using the bracket as a guide, center the bracket and drill directly above the lower hole using a 5/16” bit. See
Photo 5.
5. Install the supplied flag nut as shown in Photo 6 with the supplied 5/16” x 3/4” bolt and washer. Tighten using a
1/2” wrench.
6. On the driver side, measure back 5 1/2” from fire wall to center of the u-bolts as shown and install the u-bolt
clamp and bracket. See Photo 7. Tighten clamps using a 9/16” wrench.
7. Install the studs in the bracket as shown in Photo 8 with the supplied 5/16” lock nut and tighten using a 1/2”
wrench.
8. On the passenger side, measure back 6 3/4” from fire wall to center of the u-bolts as shown and install the u-bolt
clamp and bracket. See Photo 9.
9. Install the mounting stud with the supplied 5/16” lock nut and tighten using a 1/2” wrench.
10. Install the shock struts on the mounting studs as shown in Photo 10. Adjust mounting studs as necessary to
even lift on Jeep hood.
Photo 5 Photo 6
Photo 7 Photo 8
Photo 9 Photo10
DRILL USING BRACKET AS A GUIDE INSTALL USING SUPPLED FLAG NUT
INSTALL DRIVER LOWER BRACKET INSTALL MOUNTING STUDS
INSTALL PASSENGER LOWER BRACKET INSTALL SHOCK STRUTS
/