Page is loading ...

Installation Instructions for:
2018+ Jeep JL and JT (Not For eTorque)
Step-by-step instructions for installation of
the supercharger system.
89-89-61-037 Rev J
Magnuson Superchargers
1990 Knoll Drive, Bldg A, Ventura, CA 93003
(805) 642-8833 phone
magnusonsuperchargers.com
ATTENTION!
Your MAGNUSON SUPERCHARGER kit
is sensitive to corrosion!
Use only the vehicle manufacturer
recommended coolant for your engine in
the intercooler system as well.
* PREMIUM 91 OCTANE GASOLINE FUEL REQUIRED *
* PREMIUM 91 OCTANE GASOLINE FUEL REQUIRED *

INSTALLATION MANUAL
Magnuson Supercharger Kit: 2018+ Jeep JL and JT (Not For eTorque)
Please take a few moments to review this manual thoroughly before you begin work: Make a quick parts
check to be certain your kit is complete (see Bill of Material (BOM) parts list inside the accessory box). If you
discover shipping damage or shortage, please call our offi ce immediately. Take a look at exactly what you are
going to need in terms of tools, time, and experience. Review our limited warranty with care.
Use only premium gasoline fuel, 91 octane or better.
Use only premium gasoline fuel, 91 octane or better.
The use of non-premium fuel can
The use of non-premium fuel can
cause engine failure and will void your warranty.
cause engine failure and will void your warranty.
Magnuson Products recommend that you run a minimum of one tank of premium 91 octane or better fuel
through your vehicle prior to installation of the system to prevent any possible damage that may occur due to
running the supercharged engine on lower octane fuel.
DO NOT RUN E85 FUEL WITH THE SUPERCHARGER.
DO NOT RUN E85 FUEL WITH THE SUPERCHARGER.
DO NOT USE OCTANE BOOSTERS.
DO NOT USE OCTANE BOOSTERS.
If you have used octane boosters in the past you will have to replace
If you have used octane boosters in the past you will have to replace
your spark plugs and the O2 sensors.
your spark plugs and the O2 sensors.
Magnuson Superchargers systems are designed for engines and vehicles in “GOOD” mechanical condition.
Magnuson Superchargers recommend that a basic engine system “Health Check” be performed prior to the
installation of this supercharger system. Be sure to check for any pending or actual OBDII codes and fi x/repair
any of the stock systems/components causing these codes. If there are codes prior to the installation they will
be there after the installation.
Magnuson Superchargers also recommend the following services to be performed on your vehicle while
installing the supercharger system:
• Fuel Filter change
• Engine oil and fi lter change using brand name oil (organic or synthetic) and fi lter
Note: It is VERY IMPORTANT to use the factory specifi ed oil viscosity. The original equipment
manufacturer has selected this grade of oil to work with your other engine systems such as hydraulic
chain tensioner and variable cam controls. Deviation from this specifi cation may cause these systems
to fail or not function properly. Please refer to your owner’s manual for the recommended oil viscosity
or your engine and application.
•
Unless an engine has less than 5000 miles, it is HIGHLY recommended that new spark plugs are used
Unless an engine has less than 5000 miles, it is HIGHLY recommended that new spark plugs are used
for this installation. Replace with: NGK #6706. It is also important that the new spark plugs be gapped
for this installation. Replace with: NGK #6706. It is also important that the new spark plugs be gapped
to 0.035” prior to installation. If re-using stock spark plugs, they must be removed and re-gapped to
to 0.035” prior to installation. If re-using stock spark plugs, they must be removed and re-gapped to
0.035” prior to re-installation.
0.035” prior to re-installation.
On older vehicles Magnuson Superchargers recommend these additional services to be performed:
•
New spark plugs with the air gap set at 0.035”.
New spark plugs with the air gap set at 0.035”.
• Coolant system pressure test and fl ush.
NOTE: YOU MUST USE JEEP SPECIFIED COOLANT MIXTURE!
NOTE: YOU MUST USE JEEP SPECIFIED COOLANT MIXTURE!
Non “Magnuson Superchargers Approved” calibrations or “tuning” will Void ALL warranties and CARB
certifi cation.
Our supplied calibration is designed for use with the components provided in this kit. Any adjustment to the
intake, or exhaust systems or other engine components may adversely aff ect engine performance and may
trigger your check engine light.

Tools Required
Metric wrench set
Metric 3/8” and 1/2” drive metric socket set (standard & deep)
3/8” and 1/2” drive ft-lbs and in-lbs torque wrenches
Metric Allen socket set 3/8 drive
Metric Allen wrenches
Phillips and fl at head screwdrivers
Serpentine belt tool
Funnel
Drain pan
Hose cutters
Hose clamp pliers
Safety glasses
Nut driver
Compressed air
Air gun
Heat gun
Torx socket set 3/8 drive
Contact Information:
Magnuson Superchargers
1990 Knoll Drive, Bldg A
Ventura, CA 93003
Sales/Technical Support Line (805) 642-8833
Websites www.magnusonsuperchargers.com
Email [email protected]
2018+ Jeep JL and JT (Not For eTorque)
12/22
3
www.magnusonsuperchargers.com

Table of Contents
Section 1: Initial Preparation 5
Section 2: Front Grill, and Engine Cover Removal 7
Section 3: Air Inlet, Vacuum Pump and Alternator Removal 10
Section 4: Intake Manifold Removal 15
Section 5: Heater Line and Fuel Line Removal 23
Section 6: Pump Install 35
Section 7: Wiring 36
Section 8: Horn And Ambient Air Temp Relocation 40
Section 9: I/C Hose Installation 44
Section 10: Install Low Temperature Radiator (LTR) 48
Section 11: Lower and Upper Intake Preparation 50
Section 12: Main Installation 56
NOTE TO CUSTOMERS WITH MODIFIED VEHICLES:
NOTE TO CUSTOMERS WITH MODIFIED VEHICLES:
The Magnuson calibration included with this kit is intended to work
The Magnuson calibration included with this kit is intended to work
on stock vehicle confi gurations, including stock trim levels and stock
on stock vehicle confi gurations, including stock trim levels and stock
OEM vehicle options. Modifi cations to your stock vehicle including,
OEM vehicle options. Modifi cations to your stock vehicle including,
but not limited to, engine, fl ywheel, clutch, torque converter,
but not limited to, engine, fl ywheel, clutch, torque converter,
transmission, wheels, tires, axles, gears, driveshafts, induction
transmission, wheels, tires, axles, gears, driveshafts, induction
system, exhaust system and additional weight (ie. bumpers, racks,
system, exhaust system and additional weight (ie. bumpers, racks,
etc.) can have a signifi cant impact on your vehicle’s calibration and
etc.) can have a signifi cant impact on your vehicle’s calibration and
may require modifi cations to our calibration as supplied.
may require modifi cations to our calibration as supplied.
While we attempt to minimize the need for modifi cations during our
While we attempt to minimize the need for modifi cations during our
development process, it is impossible for our team to account for all
development process, it is impossible for our team to account for all
possible build variations/combinations, and in some cases it may be
possible build variations/combinations, and in some cases it may be
necessary for you to supply an additional element of customization
necessary for you to supply an additional element of customization
for your vehicle—custom calibration—and to work, at your own
for your vehicle—custom calibration—and to work, at your own
direction and expense, with a local service facility to address your
direction and expense, with a local service facility to address your
unique combination of hardware and make calibration adjustments as
unique combination of hardware and make calibration adjustments as
necessary.
necessary.
Please be aware that standard product warranties and
Please be aware that standard product warranties and
governmental emissions certifi cations are predicated on stock
governmental emissions certifi cations are predicated on stock
vehicle confi gurations, and vehicle modifi cations and calibration
vehicle confi gurations, and vehicle modifi cations and calibration
changes may affect or even void powertrain warranty and emissions
changes may affect or even void powertrain warranty and emissions
certifi cation status (such as CARB emissions certifi cation). It is
certifi cation status (such as CARB emissions certifi cation). It is
the sole responsibility of the customer making a warranty claim to
the sole responsibility of the customer making a warranty claim to
prove that any vehicle modifi cations and calibration changes were
prove that any vehicle modifi cations and calibration changes were
within warranty. It also is the sole responsibility of the customer to
within warranty. It also is the sole responsibility of the customer to
determine if the modifi cations and changes comply with all local,
determine if the modifi cations and changes comply with all local,
state and federal emissions standards.
state and federal emissions standards.
2018+ Jeep JL and JT (Not For eTorque)
12/22
4
www.magnusonsuperchargers.com

Section 1: Initial Preparation
1.
Before beginning the installation run a full tank
Before beginning the installation run a full tank
of premium 91 octane or higher fuel through
of premium 91 octane or higher fuel through
your engine.
your engine.
DO NOT USE E85 FUEL OR
DO NOT USE E85 FUEL OR
OCTANE BOOSTER!
OCTANE BOOSTER!
The vehicle must have
The vehicle must have
premium fuel prior to starting the install.
premium fuel prior to starting the install.
2.
If you purchased the kit without calibration you
If you purchased the kit without calibration you
can disregard this step. If your kit has an ECM
can disregard this step. If your kit has an ECM
shipper box and HP Tuners RTD device you
shipper box and HP Tuners RTD device you
will mail in your PCM for unlock to the
will mail in your PCM for unlock to the
address
address
shown in the RTD Flash Tool Instructions
shown in the RTD Flash Tool Instructions
.
.
Detailed instructions will be provided in a later
Detailed instructions will be provided in a later
step for removing the PCM from your vehicle.
step for removing the PCM from your vehicle.
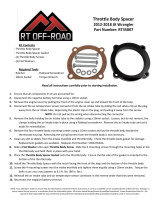
4. Remove the fuel pump relay from the under
hood fuse panel shown here with the green
arrow. Start the vehicle to release pressure
from the fuel rail/line prior to disassembly.
Once you have purged the fuel pressure you
can replace the fuel pump relay.
Any reference to the left or right side of
Any reference to the left or right side of
the vehicle is given from the driver’s seat
the vehicle is given from the driver’s seat
perspective.
perspective.
3.
3.
Detailed instructions of the calibration process
Detailed instructions of the calibration process
are included in the provided RTD Flash Tool
are included in the provided RTD Flash Tool
Instructions. The pictures shown may be
Instructions. The pictures shown may be
slightly diff erent from the items you receive.
slightly diff erent from the items you receive.
2018+ Jeep JL and JT (Not For eTorque)
12/22
5
www.magnusonsuperchargers.com

6. Insulate the ends of each wire that were
disconnected in the last step using thick tape
to prevent unintentional grounding.
7. Unplug the wire connection shown from the
negative battery terminal.
8.
If you are not providing your own calibration
If you are not providing your own calibration
you will need to send in your PCM for unlock.
you will need to send in your PCM for unlock.
There is a box provided for sending in your
There is a box provided for sending in your
PCM with instructions included.
PCM with instructions included. Release the
two PCM locks at the arrow locations. Then
unplug the connections.
5. Remove the two nuts shown here with arrows
on the battery.
2018+ Jeep JL and JT (Not For eTorque)
12/22
6
www.magnusonsuperchargers.com

9. Remove the two bolts holding the PCM in the
locations shown with arrows.
10. Using proper push pin removal tools, carefully
remove 6 push pins along the top core support/
horse collar.
11. Use push pin pliers to remove the 6 push pins.
Section 2: Front Grill, and Engine
Cover Removal
12. Pry the top core support/horse collars out with
a trim removal tool.
2018+ Jeep JL and JT (Not For eTorque)
12/22
7
www.magnusonsuperchargers.com

13. Pry up on both ends to release the front grille
locating pins.
14. Pull the top portion of the grill slightly away as
shown here to access the lower retainer clips.
15. Once all push pins have been removed, use an
18” pry bar to carefully release 6 lower retainer
clips. This pry bar has been highlighted in
green here. The location of one lower clip is
shown with an arrow.
16. The arrows show 4 of the lower grill retainer
clips, and once again the pry bar is highlighted
in green.
2018+ Jeep JL and JT (Not For eTorque)
12/22
8
www.magnusonsuperchargers.com

17. Remove front grille from vehicle to prevent
damage during install and allow for installation
of front radiator in a later step.
18. Remove 4 push pins shown with arrows which
retain the upper closeout panel to the cooling
module.
19. Remove the closeout panel from the vehicle.
20. Use a T-30 Torx socket to remove the two
bolts at the front of the engine cover. Pull back
at the cover to release it from the two rubber
grommets. The cover will not be reused.
2018+ Jeep JL and JT (Not For eTorque)
12/22
9
www.magnusonsuperchargers.com

21. Remove the 3 bolts shown with arrows holding
the top engine cover bracket using a 10mm
socket. Disconnect PCV line from the bracket
before removing bracket from vehicle (not
shown in picture).
22. Remove three M6 x 15mm bolts shown with
arrows using a 10mm socket wrench. Remove
the passenger side engine support bracket.
This will not be reused. Re-install these bolts
in position and
torque to 71 in-lbs
torque to 71 in-lbs.
23. Remove 3 wiring harness retention push pins
from OE air induction tube shown with green
arrows and disconnect IAT sensor shown with
the red arrow.
Note: You may want to put tape
Note: You may want to put tape
on the IAT connection and set it to the side to
on the IAT connection and set it to the side to
prevent damage as it will not be reconnected
prevent damage as it will not be reconnected
until later.
until later.
Section 3: Air Inlet, Vacuum Pump
and Alternator Removal
24. Unplug the PCV breather port from the clean
air tube shown at the green arrow location
by pressing the gray button and pull at the
connection.
2018+ Jeep JL and JT (Not For eTorque)
12/22
10
www.magnusonsuperchargers.com

25. Remove the two bolts at the red arrow locations,
and loosen the two hose clamps at the green
arrow locations. Disengage the couplers at the
airbox and throttle body so the air duct can be
completely removed.
Note: The OE air duct
Note: The OE air duct
will not be reused. The IAT sensor needs to
will not be reused. The IAT sensor needs to
be removed from the duct at this time. (It will
be removed from the duct at this time. (It will
be installed into the Magnuson upper intake
be installed into the Magnuson upper intake
manifold.
manifold.
26. To remove IAT sensor from the OE air take
duct, gently pry up on the locking tab and rotate
counterclockwise. When it is fully disengaged
it should pull straight out.
NOTE: You may
NOTE: You may
need to look inside the duct to confi rm that the
need to look inside the duct to confi rm that the
sensor is unlocked.
sensor is unlocked.
27. Remove the bolt shown at the arrow location
with a 10mm socket wrench. This bolt secures
the airbox.
28. Pull up to remove the airbox assembly.
2018+ Jeep JL and JT (Not For eTorque)
12/22
11
www.magnusonsuperchargers.com

29. Remove rubber grommets from airbox lower
and reinstall into sheet metal.
30. Here are the two rubber grommets from the
last step reinstalled in the sheet metal below.
31. Unplug the vacuum fi tting to the electric
vacuum pump shown here with an arrow.
32. Unplug the wiring harness for the electric
vacuum pump shown here with an arrow.
2018+ Jeep JL and JT (Not For eTorque)
12/22
12
www.magnusonsuperchargers.com

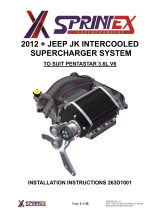
33. Remove the two bolts securing the electric
vacuum pump bracket shown here with the
two arrows using a 13mm socket wrench.
34. Remove the vacuum pump assembly from the
vehicle.
35. Locate the 1/2” square location on the belt
tensioner shown with an arrow.
36. Insert ½” x 24” ratchet into the tensioner
(yellow arrow) and rotate clockwise.
Note:
Note:
This vehicle uses a hydraulic tensioner and
This vehicle uses a hydraulic tensioner and
requires a good deal of force to rotate.
requires a good deal of force to rotate.
2018+ Jeep JL and JT (Not For eTorque)
12/22
13
www.magnusonsuperchargers.com

37. With tension removed from belt, slip the belt
off the idler located on passenger side as seen
here.
39. Remove power cable from alternator. Wrap
cable to insolate end and prevent unintentional
circuit grounding.
40. Remove two 13mm inner bolts retaining
alternator to engine. Remove two 15mm bolts
and slowly remove alternator from vehicle.
38. Unplug the electrical connector from alternator.
2018+ Jeep JL and JT (Not For eTorque)
12/22
14
www.magnusonsuperchargers.com

41. Remove two bolts retaining the alternator
support bracket to engine (One 13mm and one
16mm). Remove alternator support bracket
from vehicle and remove factory serpentine
belt as well.
42. Remove 2 push pins from the electrical
harness (One to throttle body and one to the
throttle body support bracket).
Section 4: Intake Manifold
Removal
43. To unplug the throttle body electrical connector,
fi rst pull out the red locking tab then depress
the tab and gently pull to release.
NOTE: Set
NOTE: Set
this part of the harness to the side.
this part of the harness to the side.
44. To remove the throttle body loosen and remove
the 4 bolts with an 8mm socket.
NOTE: Be
NOTE: Be
sure to hold the Throttle Body as this is being
sure to hold the Throttle Body as this is being
performed to prevent damage. The throttle
performed to prevent damage. The throttle
body needs to be reused in a later step.
body needs to be reused in a later step.
2018+ Jeep JL and JT (Not For eTorque)
12/22
15
www.magnusonsuperchargers.com

45. Remove the 3/8” vacuum hose from intake
manifold located between throttle fl ange and
EGR valve shown at the yellow arrow.
46. Remove the 3/8” VMV (fuel vapor) hose from
intake manifold.
47. Disconnect VMV jumper hose from VMV
valve (remove red locking clip and depress to
release SAE connection).
48. Disconnect VMV jumper hose from the
port on the tube bundle located behind the
passenger side cylinder head near the dash
panel. (remove red locking clip and depress to
release SAE connection) Remove the jumper
hose from the vehicle. The connectors will be
needed in a later step.
2018+ Jeep JL and JT (Not For eTorque)
12/22
16
www.magnusonsuperchargers.com

49. Unplug the electrical connector from VMV
valve.
50. Remove VMV valve and hose assembly from
the intake manifold. Note: Keep the hose
shown with the arrow to drain coolant.
51. Pull transmission vent line/hose from intake
manifold and tuck away near battery to allow
for removal of intake.
52. Disconnect PCV (dirty side) from the intake
manifold. Disconnect PCV fi tting from rear of
passenger side cam cover.
2018+ Jeep JL and JT (Not For eTorque)
12/22
17
www.magnusonsuperchargers.com

53. Remove PCV line from vehicle.
54. Disconnect engine harness from MAP sensor.
55. Disconnect engine harness from EGR valve.
Pull out on the white locking tab then depress
and pull to unplug connector.
56. Remove two 10mm nuts at the arrow locations
retaining the OE coolant reservoir to the cowl.
Pull reservoir up to release lower grommet and
to get up over the studs. Temporarily move
reservoir forward and toward booster. Use a
bungee cord or zip tie to hold it out of the way
as shown highlighted in green.
2018+ Jeep JL and JT (Not For eTorque)
12/22
18
www.magnusonsuperchargers.com

57. Remove the two brown push pins from driver
side harness bundle to intake manifold.
58. Remove the 2 bolts with 10mm heads retaining
the tube to EGR valve using ratcheting wrench.
Note: Save the bolts for reinstallation.
Note: Save the bolts for reinstallation.
59. Remove EGR rubber coated metal gasket and
save for reinstallation
save for reinstallation.
60. Remove 2 nuts retaining EGR tube brackets to
intake manifold (only forward location shown in
picture) with a 10mm socket wrench.
2018+ Jeep JL and JT (Not For eTorque)
12/22
19
www.magnusonsuperchargers.com

61. Remove the 2 bolts securing the intake to
throttle body support bracket with a 10mm
socket wrench.
62. Remove eight upper to lower intake manifold
mounting bolts with 8mm heads. NOTE: You
may want to use a swivel on the rear most bolt
for easier tool access during bolt removal.
63. Gently pry up on the locking mechanism at the
rear of the oil fi lter adaptor to the cam cover (at
12 o’clock position when looking down on oil
fi ll) while slowly rotating counterclockwise until
it makes contact with the intake manifold. At
this point, you will need to “wiggle” the intake
manifold to provide some additional clearance
to allow for removal of the oil fi ll cap adaptor.
64. Once removed, install the supplied oil cap on
cam cover at arrow location to prevent debris
from contaminating the engine.
2018+ Jeep JL and JT (Not For eTorque)
12/22
20
www.magnusonsuperchargers.com
/