Page is loading ...

Installing a genuine HoodLift® on a Jeep®
TJ 1997-2006
To print a full-color version of these instructions go to www.hoodlift.com/products.html.
Scroll down to the TJ HoodLift and click on the TJ HoodLift Installation. A pdf file should
download that you can print on your color printer.)
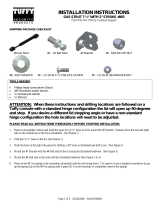
Figure 1
Figure 2
What it looks like if you have under hood insulation
What it looks like behind the insulation or if you have none

Page 2 of 8
Installing your HoodLift® on your Jeep® TJ
Congratulations on your purchase of a genuine HoodLift® made by the company
who invented the Jeep aftermarket HoodLift® in the mid-1990’s. It is made from
the finest components available and should give you years of trouble-free service.
Figure 1 and 2
show it once
you have it
installed.
Installation
should take
less than an
hour. Some
drilling is
required.
Please read the entire instructions through before beginning your install.
Tools needed
Supplied Parts
Drill motor. Preferably a cordless
drill.
(2) Gas springs (they look like shocks)
5/16” clearance drill bit. We used
an 11/32” drill bit.
(4) Ball studs
Sharp knife or razor blade
(4) 5/16” Nylock nuts
Socket driver
(2) U Bolt Ball-Stud Clamps with ½” nuts
(2) ½” wrenches, either socket or
end wrench
(4) Star Lock Washers
Masking tape
(2) flat ball stud clips
Measuring tape
(1) upper ball stud plate, wing-shaped
Pencil or pen
(2) 5/16” body bolts
Safety goggles
(2) nuts with bent rod attached
Chalk or white marker if under-hood insulation
Figure 3

Page 3 of 8
Note: when drilling, be sure to wear your safety goggles!!
1. Lift the hood and prop it up with the factory prop rod.
2. You will be mounting the lower U-Bolt Clamps on the horizontal radiator-to-
firewall braces. Note that Jeep did not put those braces in there symmetrically. The
one on the driver’s side is closer to the mid-line of the Jeep than the one on the
passenger side is. So you will use different measurements to install the U-Bolt
Clamps. First loosely assemble the lower ball stud clamps per the sketch. Use star
washers on the U-bolts. The Nylock washer does the job on the ball stud.
3. Now that you know how it’s
going to go on, remove the two nuts and star
washers from each lower ball stud mount
and fit them loosely on the radiator to
firewall rod per the photos. The one on the
passenger side should be nine inches from
the black gasket on the rear of the engine
compartment. The one on the driver’s side
should be 6 ½” from the black gasket. Don’t
tighten them up yet.
The photos of the lower ball stud mounts show the gas springs already on them but,
for now, just put them on loosely.
Figure 3
9 inches
Passenger side

Page 4 of 8
4. If your Jeep has insulation under the
hood, please also look at the photo of the
installation without insulation, Figure 2
above. There you can see that we will be
mounting the upper, wing-shaped ball
stud bracket to a rib that goes down the
middle of the hood. We will cut out the
insulation over two of the 2 ¼” holes and
slide the two nuts with bent rod attached
through those holes, finding the special
bolts and secure the wing-shaped ball
stud bracket with them.
5. Before you start drilling, wrap your
drill with masking tape all the way
down to the chuck, leaving about ¼”
of bare drill so the masking tape
makes a stop to prevent you from
drilling too far and denting or drilling
through the top of your hood!!
6 ½ inches
Driver’s Side
14 ¾”
18 7/8”
11 ½”
Bolt
Looking up at the center rib of the hood from below. This view shows how the upper
winged ball-stud bracket will look once it is mounted. If you have insulation on your
hood, you will have to cut out the insulation covering the access holes just above and
just below your bracket so you can install the nuts.

Page 5 of 8
6. Your measuring point on the
hood is the upper lightening hole
up near the latch. Note the black
plastic fasteners holding the
insulation blanket on. Use those to
determine the center of your hood.
Then measure down the center 11
½ inches to find your first place to
cut out the insulation. Use a sharp
knife and probe that hole through
the insulation and cut out the
insulation over the hole.
We used some chalk to mark the centerline. This
photo shows the lower hole already cut out.
7. Measure 14 ¾” from the lightening
hole shown in figure 10 above. Probe that
point to make sure it lands on the center
hood stiffener about one inch below the
upper access hole you just cut out. If in
doubt, use the one inch measurement.
Then drill a 5/16 inch clearance hole
there. We chose to drill a smaller pilot
hole first with the tape-wrapped bit above.
11 ½”
14 ¾”
19 ¾”
Figure 10
1 inch
Lightening hole near
top of open hood
Remove black
plastic fastener
from here, if you
have one

Page 6 of 8
8. Using one of the nuts with the bent rod
attached and one of the special bolts supplied,
attach the upper bolt to the nut. The special
bolt has a portion of it smaller so you can
more easily position the nut. Shown here, we
are using a regular bolt to do this and it is
much more difficult than using the special
bolts you have. Just make it snug.
9. Once the first bolt is snug, make sure the
bracket is lined up with the center line and
drill the second hole, using the ball stud
bracket as a template. This will assure that the
holes are aligned properly. Then install the
second bolt. We show ball studs attached to
the wings just finger tight so we know where
they are. After snugging down the bolts, put
the driver’s side ball stud in the middle hole
per the photo below and tighten it snug. No
need to go gorilla tight. The Nylock nut will
keep it tight. Put the passenger side stud in the
bottom hole and tighten it. Then snap on a gas
spring, making sure the large black part is up
and the thinner shaft is down.
Wrist tight with hand tool
Figure 11
Drill 2nd hole, using bracket as a
template, then install lower bolt as you
did the upper one.
Install driver’s side ball stud in middle hole.
Passenger side ball stud in lower hole

Page 7 of 8
10. Back to the lower ball stud mounts.
Make sure the ball stud nylock nut is tight.
Twist the gas springs 180 degrees so the
ball stud receptor aligns with the lower
ball stud. Then angle the lower brackets so
they line up with the gas springs and
tighten the ½” U-bolt nuts.
Remember! They are U-bolts and almost
all u-bolts seem to stretch and loosen as
they conform whatever they are wrapped
around. So go back and re-tighten them
after a week or so.
11. Go ahead and snap on the gas springs. That should do it.
If you ever have to remove a gas spring (or strut...they look like shocks) slip a
small screwdriver under the small semi-circular spring near the end and lift it up to
release it from the ball stud it is capturing. To replace a gas spring, just make sure
the semi-circular spring is back in its slots and snap the socket onto the ball stud.
If you have any suggestions on how to make the HoodLift better or improve these
instructions, please share them with me. Your fellow Jeepers and I will really
appreciate it.
Jim Piatt, Pres.
HoodLift® Ltd.
1-800-579-3024
www.hoodlift.com
Email me for 2 free
decals. Just include
your name, address
and the word
“decals” and they
will be on their way

Page 8 of 8
Now that you have a HoodLift®, take a look at the HoodLift® TailGate Prop™. It
holds that tailgate open instead of it hitting you in the buns when you least expect it.
Works with all sizes of spare tires attached to your tail gate. The sloped mounting
system allows the tail gate to glide open with a dampened stop from the oil inside
the nitrogen-filled gas spring lubricating the seal. Lifetime warranty!
1-800-579-3024
®
/