Page is loading ...

Step-by-step instructions for installing the best in
supercharger systems.
Installation Instructions for:
2006-10 JEEP CHEROKEE 6.1 Liter HEMI
INTERCOOLED SUPERCHARGER SYSTEM
Magnuson Products LLC
1990 Knoll Drive, Bldg A, Ventura, CA. 93003
(805) 289-0044 * (805) 677-4897 fax
magnusonproducts.com * magnacharger.com
ATTENTION!
Your MAGNUSON SUPERCHARGER
kit is sensitive to corrosion!
Take care of if by using 50/50
anti-freeze with de-ionized water.
89-89-61-071 Rev D
89-89-61-071 Rev D
* PREMIUM FUEL REQUIRED *
* PREMIUM FUEL REQUIRED *

INSTALLATION MANUAL
Magnuson Supercharger Kit
JEEP 6.1L HEMI Engine
Please take a few moments to review this manual thoroughly before you begin work: Make a quick parts
check to make certain your kit is complete (see shipper parts list in this package). If you discover shipping
damage or shortage, please call our offi ce immediately. Take a look at exactly what you are going to
need in terms of tools, time, and experience. Review our limited warranty with care. When unpacking the
supercharger kit DO NOT lift the supercharger assembly by the black plastic bypass actuator. This is pre-
set from the factory and can be altered if used as a lifting point!
Caution: Relieve the fuel system pressure before servicing fuel system components in order to reduce the
risk of fi re and personal injury. After relieving the system pressure, a small amount of fuel may be released
when servicing the fuel lines or connections. In order to reduce the risk of personal injury, cover the
regulator and fuel line fi ttings with a shop towel before disconnecting. This will catch any fuel that may leak
out. Place the towel in an approved container when the job is complete.
Use only premium fuel, 91 octane or better.
Use only premium fuel, 91 octane or better.
Magnuson Supercharger systems are manufactured to produce about 20 RWHP per pound of boost at sea
level. High altitudes will produce different numbers.
Our Magnuson Supercharger kits are designed for engines in good mechanical condition only. Installation
on high mileage or damaged engines is not recommended and may result in engine failure, for which we
are not responsible. Magnuson Superchargers is not responsible for the engine or consequential damages.
Magnuson Products supercharger kits are designed for use on stock vehicles. To that end, the alteration or
Magnuson Products supercharger kits are designed for use on stock vehicles. To that end, the alteration or
modifi cation of the fuel system, drive train, engine, and/or supercharger outside of stock parameters in any way
modifi cation of the fuel system, drive train, engine, and/or supercharger outside of stock parameters in any way
can result in engine damage or failure for which Magnuson Products is NOT responsible and will void Magnuson
can result in engine damage or failure for which Magnuson Products is NOT responsible and will void Magnuson
Products warranty and CARB certifi cation. Aftermarket engine recalibration devices that modify fuel and spark
Products warranty and CARB certifi cation. Aftermarket engine recalibration devices that modify fuel and spark
curve (including, but not limited to programmers) are not recommended and may cause engine damage or failure.
curve (including, but not limited to programmers) are not recommended and may cause engine damage or failure.
Use of non-Magnuson Products approved programming will void all warranties. If you have any questions, call us.
Use of non-Magnuson Products approved programming will void all warranties. If you have any questions, call us.
After you fi nish your installation and road test your vehicle, please fi ll out and mail in the limited warranty
card, so we can add you to our fi les (this is important for your protection).
A new fuel fi lter is recommended at the time of supercharger installation
Stock spark plugs and stock plug gap is recommended
Drive belt = Dayco# 5060990
Tools Required:
Metric wrench set
¼” - 3/8” and ½” drive metric socket set (Standard & Deep)
3/8”and ½” drive Foot pound and inch pound torque wrenches
Phillips and fl at head screwdrivers
Fuel line quick disconnect tools (included in kit)
Small or angled 3/8” drill motor
Drain pan
Hose cutters
Hose clamp pliers
Safety glasses
Metric Allen socket set 3/8” drive
Shop vacuum cleaner
Blue Loctite
Right Angle drill for pinning crank pulley. Helpful Tool: Air or electric impact wrench.
Contact Information:
Contact Information:
Magnuson Products LLC
Magnuson Products LLC
Magna Charger Division
Magna Charger Division
1990 Knoll Drive, Suite A
1990 Knoll Drive, Suite A
Ventura, CA, 93003
Ventura, CA, 93003
Sale/Tech Support (805) 289-0044
Sale/Tech Support (805) 289-0044
Web sites:
Web sites:
www.magnusonproducts.com
www.magnusonproducts.com
www.magnacharger.com
www.magnacharger.com
E-mail: [email protected]
E-mail: [email protected]

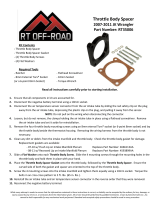
1. Jeep Grand Cherokee 6.1L HEMI
Install. To make the install a little easier,
we hyper-opened the hood for more
clearance using a cut dowel. These
instructions assume a factory-stock
starting point.
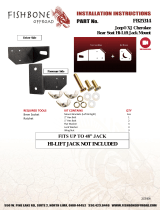
2. The fi rst real step in the installation
is to fl ash your computer to calibrate for
the new supercharger with your new
Diablo tuner. Follow the instructions
in the supplied Diablo tuning manual.
Locate your EO sticker and follow the
instructions for placing the sticker on
your supercharger.
NOTE: For now, the
NOTE: For now, the
customer will have to read the stock fi le
customer will have to read the stock fi le
from the vehicle using the tool, and must
from the vehicle using the tool, and must
email the fi le to calibration. Here the fi le
email the fi le to calibration. Here the fi le
will be modifi ed and emailed back to the
will be modifi ed and emailed back to the
customer for install in the car.
customer for install in the car.
3. Use a 10mm wrench to disconnect
the negative battery terminal. Set aside
where it cannot accidentally touch the
battery post.
2006 - 2010 Jeep Cherokee 6.1L HEMI
08/12
Page 3
www.magnusonproducts.com

4. Slowly remove the gas cap to
release fuel system pressure.
5. Open the drain valve located on
the bottom driver side of the radiator.
You can reach this valve through the
driver side front wheel well. Collect the
drained fl uid in a clean pan and set aside
for later re-use.
6. Remove the radiator cap to
facilitate draining. Upon drainage
completion, replace the cap loosely and
tighten up the drain valve.
7. The strut tower brace must be
removed to ease installation. Slide the
EVAP solenoid straight up to remove it
from its mount. Temporarily tuck it out of
the way over the oil dipstick.
2006 - 2010 Jeep Cherokee 6.1L HEMI
08/12
Page 4
www.magnusonproducts.com

8. Open the cover of the forward fuse
center just behind the battery on the
driver side of the engine compartment,
and un-snap the hinges from their posts
to remove the cover. Set aside for later
usage.
9. With the cover removed, use a
small screwdriver to release the three
hold down clips. The forward fuse center
should now be free to pull up.
10. Lift the forward fuse center and
unplug the two wire harness plugs from
the bottom of the fuse center. Pull the
fuse center up and over toward the
engine.
11. Again use a small screwdriver to
release the locking clips of the rear fuse
center located just forward of the brake
reservoir. Pull the rear fuse center up
off the mounting posts and push it over
toward the engine with the forward fuse
center.
2006 - 2010 Jeep Cherokee 6.1L HEMI
08/12
Page 5
www.magnusonproducts.com

12. There is a wiring harness that has
two clip locations that tie the harness to
the fuse center mounting bracket. Pry
these harness clips off of the fuse center
mounting bracket.
13. Use a 10mm wrench to remove
the three nuts holding the fuse center
mounting bracket to the strut tower/
interior tire well studs.
14. You now have access to the driver
side bolts holding the strut tower brace in
place. Use an 18mm wrench to remove
the nuts securing the strut tower brace
in position (two each side). We used an
impact wrench but this is not necessary.
15. Pull up on the strut tower brace
to pull it off the studs. On the driver
side, the mounting fl ange will hit the
bottom of the brake cylinder. Pull the
brace completely off the passenger side,
and angle the brace to the rear to gain
clearance to further pull the strut tower
brace from the vehicle. Set aside for
later use.
2006 - 2010 Jeep Cherokee 6.1L HEMI
08/12
Page 6
www.magnusonproducts.com

16. Remove the two HEMI coil covers
from the vehicle by pulling up to unsnap
from the mounting posts.
17. Disconnect the IAT sensor plug at
the intake air tube.
18. Use an 8mm wrench or fl athead
screwdriver to loosen the clamps on the
factory air intake tube at the throttle body
and air box on the passenger side.
19. Remove the intake air tube from
the vehicle. This will not be reused.
There is a PCV vent tube running from
the air box to the oil fi ll spout, this has a
soft mounting clip on the intake air tube.
Be careful to not damage the PCV vent
tube.
2006 - 2010 Jeep Cherokee 6.1L HEMI
08/12
Page 7
www.magnusonproducts.com

20. Pull the throttle body harness
anchoring clip from the throttle body
mounting bracket as shown.
21. Disconnect the ETC from the
throttle body. To achieve release, fi rst
press the red lock clip up to release the
lock, then squeeze below the lock clip
and pull the ETC away from the throttle
body.
22. Disconnect the eight fuel injectors
by pulling up on the red locking clip, then
squeezing the base below the locking
clip to release the injector control plugs.
23. Disconnect the MAP sensor
from behind the air intake manifold
on the passenger side behind the
OEM manifold. If you cannot get this
unplugged easily, you will have another
chance while you are removing the OEM
manifold a little later in the instructions.
2006 - 2010 Jeep Cherokee 6.1L HEMI
08/12
Page 8
www.magnusonproducts.com

24. Disconnect the brake booster
valve from the brake booster by pulling
the fi tting out of the mounting grommet.
The other end of this hose is connected
to the intake manifold and will have to
be routed when removing the manifold.
Temporarily lay the hose on the driver
side by the fuel rails.
25. Disconnect the PCV vent tube
running from the intake air box to the
oil fi ll spout. Set aside for use in a later
step.
26. Disconnect the EVAP hose from
the driver side of the manifold, just
behind the throttle body.
27. Remove the fuel line safety clip.
Set aside for later.
2006 - 2010 Jeep Cherokee 6.1L HEMI
08/12
Page 9
www.magnusonproducts.com

28. Use shop rags to catch residual
fuel and the fuel line removal tool
to disconnect the fuel line from the
passenger side fuel rail. First press
the fuel line further onto the fuel rail
barb, then push the fuel line removal
tool into the fuel line to release the
locking clip. Now pull the fuel line free.
We recommend plugging the fuel line
and capping the fuel rail barb. Clean
up residual fuel using shop rags and
dispose of the contaminated rags
properly.
29. Remove the ten 8mm bolts holding
the OEM intake manifold to the heads.
30. With the help of an assistant,
carefully lift the OEM intake assembly
from the vehicle. At this time if you didn’t
have success pulling the MAP sensor
plug free, with the manifold moved
slightly forward you should have an
easier access to disconnect the sensor.
Snake the brake booster hose around
the existing water heater hoses as
you pull the intake assembly out of the
vehicle. Set aside as we will be using
components later in assembly.
31. Use a shop vacuum to remove
any debris from the heads and adjacent
surfaces. Be careful to not allow any
debris to fall into the exposed ports.
2006 - 2010 Jeep Cherokee 6.1L HEMI
08/12
Page 10
www.magnusonproducts.com

32. Wipe the port surfaces clean using
shop rags and alcohol, lacquer thinner,
or acetone (or some other non-petroleum
based product).
33. Use tape or shop rags to cover the
exposed ports to prevent contamination.
34. Remove the two heater hose
clamps from the hard line barbs at the
rear of the valley by the fi rewall, they run
over the valley to the water pump.
35. Disconnect the two heater hoses
from the hard line barbs. There will
likely be some residual coolant in the
hoses and tubes, so take appropriate
precaution and dispose of contaminated
shop towels properly.
2006 - 2010 Jeep Cherokee 6.1L HEMI
08/12
Page 11
www.magnusonproducts.com

36. Use a 10mm wrench to remove
the nuts holding the ground wires and
ground sensor from the studs anchoring
the heater hard lines to the back of the
block. There are ground wires on both
the driver side and passenger side. Pull
these wires and the ground sensor from
their studs.
37. There are two zip-tie clamps
holding the wire harness to the heater
hard line mounting brackets. Cut these
zip-ties off the brackets.
38. Use a 10mm wrench to remove the
studs holding the two heater hard lines
to the back of the heads.
39. The driver side heater hard line
has two additional mounting bolts. Use
a 10mm wrench to remove the center
mounting bolt from the middle of the
valley.
2006 - 2010 Jeep Cherokee 6.1L HEMI
08/12
Page 12
www.magnusonproducts.com

40. Use a 10mm wrench to remove the
heater hard line mounting bolt from the
water pump.
41. Temporarily disconnect the
temperature sensor connection from the
sensor.
42. Use a large fl athead screwdriver to
carefully lever the heater hard line barb
from the water pump on the driver side
using the water pump as a fulcrum.
43. On the passenger side the heater
hard line needs to be pulled toward the
rear to remove it from the water pump.
Use the large screwdriver with the head
as a fulcrum to lever the hard line free
from the water pump.
2006 - 2010 Jeep Cherokee 6.1L HEMI
08/12
Page 13
www.magnusonproducts.com

44. Replace the driver side ground
sensor and ground wires to the head
using the original stud. Clock the
ground sensor toward the driver fender
to gain the clearance necessary for the
supercharger installation.
45. Replace the passenger side
ground wires to the head using the
original stud. Make sure you have
accounted for all the wires.
46. Place a generous bead of the
supplied Green Loctite on the two
supplied water pump hose barbs.
47. Use your fi ngers to press one of
the prepared barbs into the passenger
side hole in the back of the water pump
that was vacated by the passenger side
hard line heater pipe that ran under the
OEM intake manifold.
2006 - 2010 Jeep Cherokee 6.1L HEMI
08/12
Page 14
www.magnusonproducts.com

48. Use your fi ngers to press the other
prepared barb into the driver side hole
of the water pump that was vacated by
the removal of the driver side hard line
heater pipe that ran under the OEM
intake manifold.
49. Remove the stock center-most
heater hose from the fi rewall hose barb
on the passenger side of the engine
compartment.
50. Cut 2-1/2” off the short end of the
supplied 4” x 48” x 5/8” 90° elbow hose
and attach the short end to the barb
just installed on the passenger side of
the water pump using a provided spring
clamp.
51. Route the hose toward the
passenger side fender. Use the bolt hole
at the front of the passenger side head
near the water pump, add the supplied
spacer, then the Adel clamp with the lobe
up and pointed toward the rear of the
vehicle, and the supplied bolt to anchor
the heater hose as shown in this picture.
2006 - 2010 Jeep Cherokee 6.1L HEMI
08/12
Page 15
www.magnusonproducts.com

52. Install the supplied ¾” -5/8”
coupling (hose mender) in the supplied
¾” x 7” section of hose. Secure in place
with a supplied spring clamp.
53. Use the stock clamp removed from
the OEM heater hose removed earlier
to attach the 7” piece of hose to the
center-most heater barb at the fi rewall
on the passenger side of the engine
compartment.
54. Cut the passenger side hose
installed at the water pump to meet the
coupling (hose mender) installed on the
7” hose just installed. Press onto the
coupling and secure with a supplied
spring clamp.
55. Use a piece of the supplied
split loom to cover the hose over any
locations that may experience chaffi ng.
2006 - 2010 Jeep Cherokee 6.1L HEMI
08/12
Page 16
www.magnusonproducts.com

56. Cut about 1-1/2” from the end of
the other heater hose at the fi rewall that
used to run to the driver side hard line
running under the OEM intake manifold.
57. Install the provided 5/8” 90° elbow
on the end of the hose you just cut.
Secure the elbow on the hose so that
the open end points toward the driver
side fender and the handles of the hose
clamp point toward the passenger side
fender.
58. Attach the supplied 5/8” x 48”
hose to the driver side barb installed on
the water pump using a supplied spring
clamp.
59. Use the bolt hole on the front of the
driver side head, the supplied spacer,
then Adel clamp and bolt to anchor the
hose you just installed to the engine.
The lobe of the Adel clamp should be
pointing up and toward the front of the
vehicle.
2006 - 2010 Jeep Cherokee 6.1L HEMI
08/12
Page 17
www.magnusonproducts.com

60. Route the hose over the power
steering reservoir, between the dip stick
and front coil pack, back around the
remaining coil packs and cut to fi t at
the 90° elbow on the OEM heater hose.
Secure in place with a supplied spring
clamp.
61. Cover the hose at chaffi ng points
with the supplied split loom to protect the
hose from damage.
62. Remove the six push pin rivets
securing the fascia by prying up the
center spreading pin using a fl at head
screwdriver and then pull the pins out.
63. Pull forward and up to remove the
fascia grille. Set aside in a safe location
for later re-install.
2006 - 2010 Jeep Cherokee 6.1L HEMI
08/12
Page 18
www.magnusonproducts.com

64. Cut strips of the supplied adhesive
backed rubber and apply to the inside
surfaces of the heat exchanger mounting
brackets, on top of the strips applied, cut
and add the ½” adhesive backed rubber
as shown.
65. Use acetone or lacquer thinner
to clean the end caps of the heat
exchanger on the inside surface (the
side opposite the hose barbs). Cut strips
of the supplied adhesive backed foam to
fi t, and attach to the cleaned surfaces.
This should completely cover the tanks
and act as a buffer against the existing
heat exchanger.
66. Remove the two fascia support
braces from the bumper support and
upper cross member at the hood latch
using a 13mm wrench. Set aside for
later re-install.
67. Use pinch off pliers or (carefully)
vice grips to clamp off the two power
steering hoses prior to the power
steering cooler.
2006 - 2010 Jeep Cherokee 6.1L HEMI
08/12
Page 19
www.magnusonproducts.com

68. Use a drain pan to catch dripping
fl uid from the power steering cooler,
and cut the two hose clamps holding
the pinched hoses to the power steering
cooler. Pull the hoses off the hose barbs
of the power steering cooler, and pull the
cooler off the plastic tabs mounting the
cooler to the face of the air conditioning
condenser. Set the power steering
cooler aside for later reinstallation.
69. The existing power steering cooler
plastic mounting tabs will have to be
removed. We found the easiest solution
was to use a saw blade to cut the tabs
off of the mounting plate.
70. There is an existing threaded hole
in the top surface of the bumper support
on the driver side. Use a drill motor and
drill bit to open this hole to ¼”.
71. Measure over 19” toward the
passenger side, mark and drill another
¼” hole to match the setback of the
existing hole.
2006 - 2010 Jeep Cherokee 6.1L HEMI
08/12
Page 20
www.magnusonproducts.com
/