Page is loading ...

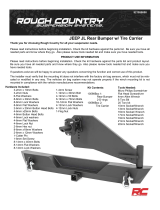
JEEP XJ WINCH BUMPER
Thank you for choosing Rough Country for all your suspension needs.
Please read instructions before beginning installation. Check the kit hardware against the parts list. Be sure you have all
needed parts and know where they go. Also please review tools needed list and make sure you have needed tools.
PRODUCT USE INFORMATION
Please read instructions before beginning installation. Check the kit hardware against the parts list and
product layout. Be sure you have all needed parts and know where they go. Also please review tools needed list and
make sure you have needed tools.
On 84-96 models XJ’s the lower part of the fender flare that is below the factory bumper line will have to
be cut off and removed.
If questions exist we will be happy to answer any questions concerning the function and correct use of this product.
The installer must verify that the mounting kit does not interfere with the factory air bag sensors, which must not be relo-
cated or modified in any way. The vehicles air bag system may not operate properly if the winch mounting kit is not
mounted in compliance with the vehicle manufacturers recommendations.
Optional Accessories are available for the Rough Country winch bumper including: See back page for info:
Part # 1055...Stinger
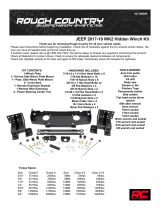
Kit Contents:
1057Box1
Bumper
1057Box2
Winch Plate
Frame Brackets
1057BAG1-
22-1/2” x 1 1/2” Bolt
22-1/2” Lock nuts
44-1/2” Flat Washers
4-7/16” x 4” Bolts
4-7/16” x 1 1/4” Bolts
14-7/16” Flat Washers
6-7/16” Lock Nuts
2-10mm x 35mm
2-10mm Flat Washers
2-12mm x 35mm Bolts
2-12mm Flange Lock nuts
1057BAG3-Accessrory Hardware Bag
14-1/2” X 1 1/2” Allen Head Bolts
14-Lock Nuts
92105700A
Tools Needed:
9/16” Socket/ Wrench
3/4” Socket / Wrench
Drill Motor
15/32” Drill Bit
T30 Torx Head Bit
T55 Torx head
5/16” Allen Head Wrench
Rachet
*1057BAG4*
1057BAG4

INSTALLATION INSTRUCTIONS
1. Place vehicle on a flat surface and set emergency brake.
2. Remove the front bumper end caps as shown in Photo 1 & Photo 2 using a 10mm wrench and remove the cap from
the bumper.
3. Remove the bumper as shown in Photo 3 by removing the bolts using a T30 torx head bit wrench.
4. Remove the bumper bolts ( three per side) as shown in Photo 4 from the uni-body using a 15mm socket.
5. Remove the rear most bumper bolt from the uni-body using a T55 torx bit. See Photo 5.
6. Remove the bumper from the vehicle.
7. Install the bumper bracket on the frame as shown with the 7/16” x 4” bolts, washers and lock nuts on the driver side.
See Photo 6. Do not tighten until all bolts have been installed.
Photo 1 Photo 2
Photo 3 Photo 4
Photo 5 Photo 6
Remove bumper caps Remove bumper caps
Remove bumper hardware Remove bumper hardware
Remove bumper brackets Install 7/16” x 4” bolts / hardware

8. Install the supplied 10mm x 35mm bolts as shown in the bracket and threaded hole in the uni-body. (Driver Side
Shown) Do not tighten until all bolts are installed in bracket. See Photo 7.
9. Install the supplied 7/16” x 1 1/4” bolts, washer and lock nuts as shown in Photo 8.
10. Proceed to pass side to install bracket.
11. Place the bracket on the uni-body and install the forward 7/16” x 4” bolt, washers & lock nuts, the 10mm x 35mm bolt
in threaded hole in uni-body and the two 7/16” x 1 1/4” bolts, washers and lock nuts. See Photo 9.
12. Drill the rear hole using a 15/32” drill bit and install the 7/16” x 4” bolts, washers and lock nut. See Photo 10.
13. Tighten the 7/16” hardware using a 9/16” socket/ wrench and the 10mm using a 17mm socket.
14. Install the winch plate in the bumper as shown with the supplied qty 8 (4 per side)1/2” x 1 1/2” bolts, washers and
lock nuts. Install the fairlead using the supplied 12mm x 35mm bolts and hardware before tightening the
winch plate. Tighten the 1/2” hardware with a 3/4” socket / wrench only after both sides of the winch plate has been
installed in the bumper and the fairlead bolts using an 18mm socket. See Photo 11.
15. Install the bumper on the bumper brackets with the supplied qty 14 (7 per side) 1/2” - 1 1/2” bolts, washers and lock
nuts. See Photo 12. Tighten using a 3/4” socket / wrench.
16. Included in this kit are bolts and nuts to mount the optional stinger, light-bar and d-ring kits. If these kits are not pur-
chased with this bumper, the hardware can be installed to cover the accessory locations. If desired install the sup-
plied 1/2” x 1 1/2” button head bolts in the top of the winch bumper and the front of the winch bumper.
Photo 7 Photo 8
Photo 9 Photo 10
Photo 11 Photo 12
Install 12mm x 35mm Bolt Install 7/16” x 1 1/4” bolts / hardware
Install the 7/16” x 4” Bolt/ hardware Drill and install 7/16” x 4” hardware
Install 1/2” x 1 1/2” bolts / hardware Install 1/2” x 1 1/2” bolts / hardware

MAINTENANCE INFORMATION
1. Failure to securely tighten all bolts on the winch plate, winch, and fairlead can result in product failure, which may
result in vehicle damage or operator injury. Check that all bolts are securely tightened prior to use.
2. Inspect all nuts and bolts on the winch, winch mount, and related hardware prior to each use. Tighten all nuts that
appear to be loose. Stripped, fractured, or bent bolts or nuts should be replaced.
3. Periodically check bolt for tightness.
THANK YOU FOR CHOOSING ROUGH COUNTRY FOR YOUR OFF ROAD NEEDS.
OPTIONAL ACCESSORIES FOR XJ WINCH BUMPER
CALL YOUR ROUGH COUNTRY DEALER TO ORDER
PART # 1055 STINGER KIT
PART # 1056 D-RING KIT
PART # 1058 LIGHT BAR/ WINCH GUARD
ROUGH COUNTRY ELECTRIC WINCH
AVAILABLE IN 9500LB & 12000LB
PART # RS120 WINCH
EXTENSION STRAP
PART # RS110 SYNTHETIC ROPE
WINCH COVER
/