Page is loading ...

JEEP JK MODULAR WINCH MOUNT
Thank you for choosing Rough Country for all your suspension needs.
Please read instructions before beginning installation. Check the kit hardware against the parts list. Be sure you have all
needed parts and know where they go. Also please review tools needed list and make sure you have needed tools.
PRODUCT USE INFORMATION
Please read instructions before beginning installation. Check the kit hardware against the parts list and product layout.
Be sure you have all needed parts and know where they go. Also please review tools needed list and make sure you
have needed tools.
If questions exist we will be happy to answer any questions concerning the function and correct use of this product.
The installer must verify that the mounting kit does not interfere with the factory air bag sensors, which must not be relo-
cated or modified in any way. The vehicles air bag system may not operate properly if the winch mounting kit is not
mounted in compliance with the vehicle manufacturers recommendations.
92105900
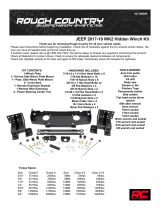
Tools Needed:
3/4” Socket / Wrench
8mm Allen Head Bit / Wrench
18mm Socket / Wrench
Phillips Screwdriver
Part#1059 Kit with
caps & Plate
Kit Contents:
1059-Winch Mount w/ Caps:
Winch Mount
1-Dr Side Cap
1-Pass Side Cap
2-Flag Nuts
OR
1062-Winch Mount w/ Light End
Caps:
Winch Mount
1-Dr Side Cap w/ Light Mount
1-Pass Side Cap w/Light Mount
1-Poly Bag
1059BAG1-End Caps
8-1/2” x 1 1/2” Allen Head Bolts
2-1/2” x 1 1/2” Bolts
10-1/2” Flat Washers
8-1/2” Lock Nuts
2-Flag Nuts
OR
1062BAG-Light Mount Caps
8-1/2” x 1 1/2” Allen Head Bolts
2-1/2” x 1 1/2” Bolts
10-1/2” Flat Washers
8-1/2” Lock Nuts
2-Flag Nuts
8-#10 X 24 Nut
Part#1062 Kit with Light
Mount caps & Plate

INSTALLATION INSTRUCTIONS
1. Place vehicle on a flat surface and set emergency brake.
2. Using a small phillips screwdriver, remove the 2 plastic screws on top of the front bumper cover. See Photo 1.
3. Remove the 4 plastic screws holding the skid plate to the front bumper, using a small Phillips screw driver. See
Photo 2.
4. Using a 18mm socket, remove the 4 bolts holding the bumper to the frame horn on the driver and passenger side.
See Photo 3.
5. Find the plug for the fog lights if equipped and unplug. See Photo 4.
6. Remove Bumper.
7. Remove the stock tow hook brackets if equipped.
8. Installation of the roller fairlead / hawse lead and winch on the winch plate is performed next in order to ease installa-
tion.
9. Install the roller fairlead / hawse lead with the appropriate hardware that was included with the winch and tighten.
See Photo 5.
10. Install the cable through the fairlead and install hook.
11. Install the winch on the winch plate with the hardware that was included with the winch and tighten. Bottom of winch
plate pictured. See Photo 6.
Photo 1 Photo 2
Photo 3 Photo 4
REMOVE BUMPER COVER HARDWARE REMOVE BUMPER COVER HARDWARE
REMOVE BUMPER HARDWARE REMOVE BUMPER COVER HARDWARE REMOVE BUMPER COVER HARDWARE
INSTALL ROLLER FAIRLEAD INSTALL WINCH ON PLATE
Photo 5 Photo 6

12. Place the winch plate assembly in between the frame rails of the Jeep and align holes in the frame. In this step it
does help to have someone hold the winch plate steady to allow the bolts to be inserted. Helpful Hint: Two bolts-one
on each side can be inserted in the front of the plate to temporarily hold the plate in position on the frame.
13. Install the supplied 1/2” x 1 1/2” bolt through the winch plate and through the frame as shown and secure with the
supplied flag nut. Tighten using a 3/4” wrench. See Photo 7 & 8.
14. If installing the optional d-ring mount at this time, place the mount on the plate and install the supplied button head
bolts and lock nuts on the front of the bumper and tighten using a 8mm allen wrench & 3/4” wrench. See Photo 9.
15. Install d-rings if mounts installed.
16. Route winch power / ground cables away from moving or sharp edges and install to battery.
17. Photo 10 shows winch installed.
18. If the 1062 kit was purchased’ Remove the fog lights from the factory bumper and install in the Light Mount caps with
the supplied 10x24 nuts in the 1062 kit. Tighten hardware.
19. Reroute the wiring hardness and reinstall on the fog lights. NOTE: It may be necessary to extend the wiring if the
wiring hardness is too short to reinstall on the fog lights. In that case longer wires may be added in to extend the har-
ness. Be sure to weather proof the connection when complete.
Photo 7 Photo 8
Photo 9 Photo 10
INSTALL 1/2” x 1 1/2” BOLTS INSTALL FLAG NUTS FOR 1/2” X 1 1/2” BOLTS
INSTALL BUTTON HEAD BOLTS / NUTS SHOWN INSTALLED WITH WINCH
OPTIONAL D-RING MOUNT INSTALLATION INSTRUCTIONS #1046 ( See Above)
1. Install with the supplied hardware included with the winch
plate as instructed above. See Photo 11 for a completed
view. Photo 10
ASSEMBLY SHOWN

MAINTENANCE INFORMATION
1. Failure to securely tighten all bolts on the winch plate, winch, and fairlead can result in product failure, which may
result in vehicle damage or operator injury. Check that all bolts are securely tightened prior to use.
2. Inspect all nuts and bolts on the winch, winch mount, and related hardware prior to each use. Tighten all nuts that
appear to be loose. Stripped, fractured, or bent bolts or nuts should be replaced.
3. Periodically check bolt for tightness.
THANK YOU FOR CHOOSING ROUGH COUNTRY FOR YOUR OFF ROAD NEEDS.
OPTIONAL ACCESSORIES FOR JK WINCH BUMPER
CALL YOUR ROUGH COUNTRY DEALER TO ORDER
ROUGH COUNTRY ELECTRIC WINCH
AVAILABLE IN 9500LB & 12000LB
PART # RS125 SNATCH BLOCK
PART # 1046 D-RING KIT
PART # RS120 WINCH
EXTENSION STRAP
PART # RS110 SYNTHETIC ROPE
WINCH COVER
/