Page is loading ...

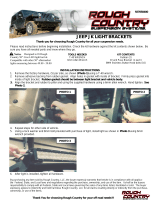
JEEP JL Rear Bumper w/ Tire Carrier
Thank you for choosing Rough Country for all your suspension needs.
Please read instructions before beginning installation. Check the kit hardware against the parts list. Be sure you have all
needed parts and know where they go. Also please review tools needed list and make sure you have needed tools.
PRODUCT USE INFORMATION
Please read instructions before beginning installation. Check the kit hardware against the parts list and product layout.
Be sure you have all needed parts and know where they go. Also please review tools needed list and make sure you
have needed tools.
If questions exist we will be happy to answer any questions concerning the function and correct use of this product.
The installer must verify that the mounting kit does not interfere with the factory air bag sensors, which must not be relo-
cated or modified in any way. The vehicles air bag system may not operate properly if the winch mounting kit is not
mounted in compliance with the vehicle manufacturers recommendations.
Kit Contents:
10598Box 1:
Rear Bumper
2-D-rings
10598Box 2:
Tire Carrier
921059800
Tools Needed:
Micro Philips Screwdriver
Flat Head Screwdriver
4mm Allen Wrench
8 Torx Bit
20 Torx bit
10mm Socket/Wrench
13mm Socket/Wrench
16mm Socket/ Wrench
17mm Socket/Wrench
19mm Socket/Wrench
21mm Socket/Wrench
22mm Socket/Wrench
Hardware Included:
3-2mm x 10mm Bolts
3-2mm Nuts
6-Flat Washers
8-8mm x 30mm Bolts
8-8mm Lock Washers
8-8mm Flat Washers
2-6mm x 20mm Button Head Bolts
4-6mm x25mm Bolts
4-6mm Button Head Bolts
4-6mm Lock washers
4-6mm Flat Washers
4-6mm Lock Nut
2-6mm Hex nut
8-6mm x18mm Washers
2-6mm x 12mm Washers
1-Cotter Pin
1-8mm Set Screw
8-14mm x 40mm Bolts
8-14mm Flat Washers
8-14mm Lock Washers
1-4mm Screw
1-12mm x 30mm Bolt
4-12mm x 50 Bolts
6-12mm x 70mm Bolts
16-12mm Flat Washers
4-12mm Lock Washers
4-12mm Lock Nuts
1-Flag Nut

INSTALLATION INSTRUCTIONS
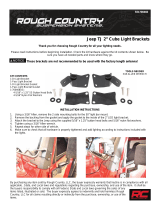
1. Remove the inner fender cover from bumper bracket using 8mm.
2. Using a 16mm socket remove the bolts from the side bumper brackets. See Photo 1.
3. On driver side unplug the license plate light connector and remove plastic pin from the body. See Photo 2.
4. Remove the bolts from bumper to frame using a 16mm socket. See Photo 3.
5. Remove bumper from the Jeep.
6. Remove factory tow hook and both bumper frame brackets using a 18mm socket for the 4 bolts and a 21mm socket for pas-
senger side bolts. See Photo 4 & 5.
7. Remove the 7 bolts from the brake light housing using a 20 torx bit and separate the housing. See Photo 6.
PHOTO 1 PHOTO 2
PHOTO 3 PHOTO 4
PHOTO 5 PHOTO 6

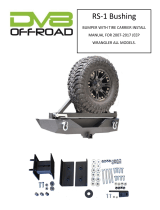
8. Using a 20 torx bit remove brake light from housing and unplug the light. See Photo 7. Only the brake light will be reused.
9. Remove the 2 bolts holding the camera and lug stud bracket using a 20 torx bit. See Photo 8.
10. Remove the 8 bolts from the tire carrier using a 13mm socket . See Photo 9. Remove the tire carrier being careful not to let
the camera hang by the wires.
11. Unclip camera wire from spare tire lug housing. Remove the 3 screws from camera using a 8torx and unplug camera. Take
care not to damage or lose the screws as they are very small. See Photo 10.
12. Remove the cabin pressure relieve from back door by using a small flat blade screwdriver pushing down on taps in between
door and the gasket. Take care not to scratch the door. See Photo 11.
13. Install the swing gate bracket to the door using stock bolts. See Photo 12. Do not fully tighten bolts.
PHOTO 7 PHOTO 8
PHOTO 9 PHOTO 10
PHOTO 11 PHOTO 12

14. Install the swing gate spud into bumper using the 4 supplied 12mm x 70mm bolts, lock washers and flat washers. Tighten
using a 19mm socket. See Photo 13.
15. Install the double flag nut into passenger side frame on both sides of the vehicle. See Photo 14.
16. Install bumper using the supplied 14mm X 40mm bolts. See Photo 15. Tighten bolts using a 22mm socket
17. Install the rubber bump stop to the bump stop bracket using the 2 supplied 6mm x 25mm bolts. See Photo 16. Use a 10mm
socket and a 4mm allen wrench to tighten. NOTE use caution not to over tighten.
18. Install the assembled bump stop onto swing gate using the 2 supplied 6mm x 25mm bolts, washers and nuts. See Photo
17. Use a 4mm allen and a 10mm socket to tighten.
19. Install heim joint assembly onto swing gate using the supplied 12mm x 50mm bolt, washer and lock nut. See Photo 18. Use
a 19mm wrench and socket to tighten.
PHOTO 13 PHOTO 14
PHOTO 15 PHOTO 16
PHOTO 17 PHOTO 18

20. Pack bearing with grease and install into swing gate with large washer and seal. See Photo 19 & 20.
21. Install swing gate onto spud and install top bearing, washer and nut. See Photo 21 & 22. Tighten nut until there is no slack
in the bearings.
22. Install cotter key then set screw. Use a 4mm allen wrench to tighten. See Photo 23 & 24.
PHOTO 19 PHOTO 20
PHOTO 21 PHOTO 22
PHOTO 23 PHOTO 24

23. Install RC dust cap. See Photo 25.
24. Install rear tire carrier bracket using the 2 supplied 12mm x 50mm bolts, washer and nuts. See Photo 26. Use a 19mm
wrench and socket to tighten. Kit also includes shim plates to install between this mount and the tire mount. The shim will be
slid in as the tire mount is installed.
25. Install the front tire carrier bracket using the 2 supplied 12mm x 70mm bolts, washers and nuts. See Photo 27.
26. Install the supplied 12mm x 30mm pinch bolt as shown in Photo 28. Use a 19mm socket and wrench to tighten all bolts.
27. Attach heim joint to door using the supplied 12mm x 50mm bolt, washers and nut. See Photo 29. Use a 19mm socket to
tighten.
28. Adjust heim joint to secure the tire carrier assembly firmly against the rubber snubber. See Photo 30. Tighten jam nuts using
a 17mm wrench.
PHOTO 29
PHOTO 28 PHOTO 27
PHOTO 26 PHOTO 25
PHOTO 30
Shims install here

29. Route camera wire into hole on tire carrier. See Photo 31.
30. Install camera into the camera bracket and secure using the 3 supplied 2mm x10mm bolts, washers and nuts. See Photo
32. Use a micro screw driver and a 4mm socket to tighten. Do not overtighten.
31. Install camera bracket onto carrier and plug in camera. Then install the camera cover. See Photo 33 & 34.
32. Install lower brake light bracket using the 2 supplied 6mm x 25mm bolts and supplied flag nut. See Photo 35. Use a 4mm
allen wrench to tighten.
33. Install stock brake light to upper brake light mount using stock bolts. See Photo 36. Use a 20 torx bit to tighten.
PHOTO 36 PHOTO 35
PHOTO 34 PHOTO 33
PHOTO 32 PHOTO 31

THANK YOU FOR CHOOSING ROUGH COUNTRY FOR YOUR OFF ROAD NEEDS.
By purchasing any item sold by Rough Country, LLC, the buyer expressly warrants that he/she is in compliance with all
applicable , State, and Local laws and regulations regarding the purchase, ownership, and use of the item. It shall be
the buyers responsibility to comply with all Federal, State and Local laws governing the sales of any items
listed, illustrated or sold. The buyer expressly agrees to indemnify and hold harmless Rough Country,
LLC for all claims resulting directly or indirectly from the purchase, ownership, or use of the items.
35. Install upper brake light mount to lower mount using the 2 supplied 6mm x 25mm bolts. See Photo 37. Adjust to fit tire size.
36. Install license plate bracket using the 2 supplied 6mm x 25mm bolts and washers. See Photo 38.
37. Install supplied small black LED license plate light in plate and route wiring out of harms way to driver side. The light will be
spliced into the factory wiring for LED to function.
38. Install spare tire on the mount. See Photo 39. PHOTO 33
PHOTO 38 PHOTO 37
PHOTO 39
/