Page is loading ...

ICON TECH LINE: 951.689.ICON www.iconvehicledynamics.com
JK PRO SERIES FRONT BUMPERS
WITH RECESSED WINCH MOUNT
INSTALLATION INSTRUCTIONS
DOCUMENT: INST_25215_REVC • UPDATED: NOV 2020
APPLICATION
These installation instructions apply to the following
products:
25215 07-18 JK PS FRONT BUMPER REC WINCH
MNT W/ BAR & TABS (Shown Above)
25242 07-18 JK PS FRONT BUMPER REC WINCH
MNT W/STINGER & TABS
25233 07-18 JK PS MID WIDTH FRONT BUMPER
REC WINCH MNT W/ STINGER & TABS
25234 07-18 JK PS MID WIDTH FRONT BUMPER
REC WINCH MNT W/ BAR & TABS
COMPONENTS INCLUDED
(1) PRO Series Front Bumper with Recessed
Winch Mount
HARDWARE INCLUDED
(8) 1/2-13 Gr8 Nylon Insert Lock Nut
(8) 1/2 Gr8 Flat Washer
TECH NOTES
NOTE: These installation instructions are based on a
clean installation on to a stock 2007-2018 Jeep JK
Wrangler. Previously modified vehicles may require
additional steps.
2012-19 Jeep Wrangler JK’s will require vacuum
pump relocation prior to installation of this bumper.
TOOLS REQUIRED
• Ratchet with 6” socket extension, 19mm deep
socket and 3/4” deep socket; torque wrench
• 10mm wrench
• 7/32” hex key
• Dead blow hammer or rubber mallet
• Phillips & flat head screwdrivers
• For ZEON Winches: Marker, cut-o wheel,
grinder or file, touch-up paint
IMPORTANT NOTICES - PLEASE READ FIRST
READ ALL INSTRUCTIONS THOROUGHLY
FROM START TO FINISH BEFORE BEGINNING
INSTALLATION! IF THESE INSTRUCTIONS ARE
NOT PROPERLY FOLLOWED SEVERE FRAME,
SUSPENSION AND TIRE DAMAGE MAY RESULT
TO THE VEHICLE!
ICON VEHICLE DYNAMICS RECOMMENDS
ALL INSTALLATION TO BE PERFORMED BY A
PROFESSIONAL SHOP/SERVICE TECHNICIAN.
PRODUCT FAILURE CAUSED BY IMPROPER
INSTALLATION WILL NOT BE COVERED UNDER
ICON’S WARRANTY POLICY.
INSTALLATION INSTRUCTIONS
1. Ensure the vehicle is placed on a flat level surface
with the transmission in PARK, the tires chocked,
and the emergency brake ON. Wear safety
glasses from this point forward.
2. Open the hood and use a 10mm wrench to
disconnect the negative battery terminal. Wrap
the terminal in a shop towel or glove so that it
doesn’t inadvertently come into contact with the
battery terminal or any other ground source.
3. Remove the plastic lower air dam. Use a push-
in retainer removal tool to pop out the plastic
push-in retainers along the front edge and also
underneath/behind the air dam where it attaches
to the crash bar. If you do not have a push-in
retainer tool, a flat-edge screwdriver or small pry-
bar may be used.
4. If your Jeep is equipped with factory fog
lamps, disconnect them from the vehicle wiring
Thank you for purchasing this ICON Vehicle Dynamics product. Please read through this entire document before proceeding with
installation. If you are not confident in your mechanical skills, please seek the help of a professional to perform the installation. Check your
packages immediately upon arrival to ensure that everything listed is included, and to check for damage during shipping. If anything is
missing or damaged, or if you need technical assistance with any aspect of this installation, call (951) 689-ICON as soon as possible.

P. 2
ICON TECH LINE: 951.689.ICON www.iconvehicledynamics.com
JK PRO SERIES FRONT BUMPERS WITH RECESSED WINCH MOUNT
harness. The pigtail harness on each lamp may
be disconnected from the vehicle wiring harness
by reaching behind the bumper. A small flat head
screwdriver may be useful to release the tangs on
the plug.
5. Remove any remaining accessories from the front
bumper such as winch or other lights.
6. Remove the eight (8) nuts that fasten the bumper
to the frame using a 19mm socket with 6”
extension and ratchet. There are two of these nuts
on the inner side, and two on the outer side, of
each frame rail where it joins the bumper.
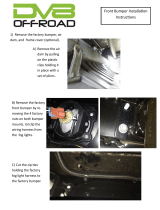
7. With the help of a friend, carefully slide the
bumper o of the frame rails and set it on the
ground. Remove the plastic top bumper cover.
You may be able to remove the two plastic screws
with a Phillips screwdriver. But it is likely they’re
“frozen” in place and will have to be pried up with
the push-in retainer removal tool.
FIG.5
8. On JK’s equipped with a vacuum pump, located
on the inboard side of the driver’s side frame rail,
below and forward of the grill, the pump will have
to be lowered for clearance of the bumper.
FIG.5
Use a 10mm wrench to remove the two bolts
attaching the vacuum pump to the frame bracket
(do not disconnect any of the wires or hoses from
the pump). Slide the pump away from the bracket
and re-position it so that the pump’s mounting
ears are below the frame bracket, and re-install
the two bolts from the bottom.
FIG.5
Use a hack saw, die grinder or cuto wheel to
remove the excess threads from the forward-most
of the two mounting bolts.
FIG.5
9. If mounting the bumper with a Warn Zeon
winch, trim the top-inside corner of the bumper
mounting flanges on each frame rail. Begin by
marking your cut as indicated by the white line in
the image below, leaving about 3/16 to 1/4 of an
inch of material around the edge of the bolt hole.
FIG.5

P. 3
ICON TECH LINE: 951.689.ICON www.iconvehicledynamics.com
JK PRO SERIES FRONT BUMPERS WITH RECESSED WINCH MOUNT
Use a die grinder or cuto wheel to cut the corner
of the bumper mounting flange.
FIG.5
Use a file, sander or grinder to de-burr the edges
of your cuts.
FIG.5
Use a paint pen or touch-up paint with a brush to
coat the bare metal at the edges of the cuts, to
prevent rust.
FIG.5
10. Use a soft dead blow hammer to tap the pre-
installed mounting bolts on the inside of the ICON
bumper, to break the retaining washers loose in
case they have been painted into place by the
powder coating process. The bolts will need to be
able to “float” slightly to reduce frustration when
installing the bumper.
FIG.5
11. Install a winch fairlead on to the bumper. Begin
by checking your fairlead’s mounting bolts against
the fairlead mounting holes in the ICON bumper.
Some fairleads come with larger mounting bolts,
in which case the holes in the bumper will need to
be drilled to the larger size. If you do this, make
sure to use touch-up paint on the exposed metal
of the drilled holes.
FIG.5
Bolt the winch fairlead into place, using the
hardware and procedures recommended by the
fairlead manufacturer.
FIG.5

P. 4
ICON TECH LINE: 951.689.ICON www.iconvehicledynamics.com
JK PRO SERIES FRONT BUMPERS WITH RECESSED WINCH MOUNT
12. Install the winch on to the ICON bumper, using the
hardware and procedures recommended by the
winch manufacturer.
FIG.5
13. If you wish to re-use your Jeep’s factory fog
lamps, Use a Phillips screwdriver to remove the
four (4) retaining screws from each lamp, on the
back side of the stock bumper, and remove the
lamps. Install them into the fog lamp mounts
in the back side of the bumper. Re-use the OE
retaining screws. These sheetmetal screws will
form their own threads as you drive them into
the holes in the retaining rings on the bumper, so
press firmly as you twist the screwdriver.
14. With the help of a friend, lift the Bumper into
place so that it is sitting on the frame mounts.
FIG.5
Before seating the bumper all the way into place,
route the winch power cables under and behind
the grille, and to wherever you will be making
those connections. This will be easier to do
before the Winch is seated into its final mounting
location.
FIG.5
15. Finish seating the bumper into place. There are
eight (8) pre-installed bolts located on the inside
of the bumper, which will correspond with the
bumper mounting holes on the frame. It may be
a tight fit due to slight manufacturing variances
from Jeep to Jeep, but the bumper will fit with
some gentle persuasion. You may need to use a
rubber mallet or soft dead-blow hammer to tap
the bumper into place. Be careful not to mar the
powdercoat finish.
16. Once the bumper is in its final mounting position,
install the supplied 1/2-13 nylon insert lock nuts
and 1/2” flat washers onto each of the eight
bumper mounting bolts at the outside and inside
of the frame rail on either side of the Jeep. Snug
these with the 3/4” deep socket, extension and
ratchet. Torque these nuts to 70 ft.-lbs.
FIG.5
17. Complete any electrical connections for winch,
fog lights and auxiliary lights according to their
manufacturer’s recommendations.
18. Re-connect the negative battery cable and use the
10mm wrench to tighten the terminal.
19. VERIFY ALL FASTENERS ARE PROPERLY
TORQUED BEFORE DRIVING VEHICLE.
Congratulations! Your installation is complete.

P. 5
ICON TECH LINE: 951.689.ICON www.iconvehicledynamics.com
JK PRO SERIES FRONT BUMPERS WITH RECESSED WINCH MOUNT
RETORQUE ALL NUTS, BOLTS AND LUGS AFTER 100 MILES AND PERIODICALLY THEREAFTER.
LIMITED LIFETIME WARRANTY
ICON Vehicle Dynamics warrants to the original retail purchaser who owns the vehicle on which the product
was originally installed. ICON Vehicle Dynamics does not warrant the product for finish, alterations,
modifications and/or installation contrary to ICON Vehicle Dynamics instructions. ICON Vehicle Dynamics
products are not designed, nor are they intended to be installed on vehicles used in race applications, for
racing purposes or for similar activities. (A “race” is defined as any contest between two or more vehicles, or
a contest of one or more vehicles against the clock, whether or not such contest is for a prize). This warranty
does not include coverage for police or taxi vehicles, race vehicles, or vehicles used for government or
commercial purposes. Also excluded from this warranty are sales outside of the United States of America and
Canada.
ICON Vehicle Dynamics’ obligation under this warranty is limited to the repair or replacement, at ICON Vehicle
Dynamics’ discretion, of the defective product. Any and all costs of removal, installation or re-installation,
freight charges and incidental or consequential damages are expressly excluded from this warranty. Items that
are subject to wear are not considered defective when worn and are not covered.
ICON Vehicle Dynamics components must be installed as a complete kit as shown in our current application
guide. Any substitutions or exemptions of required components will immediately void the warranty. Some
finish damage may happen to parts during shipping and is not covered under warranty.
This warranty is expressly in lieu of all other warranties expressed or implied. This warranty shall not apply to
any product that has been improperly installed, modified or customized subject to accident, negligence, abuse
or misuse.
7929 Lincoln Ave. Riverside, CA 92504
Phone: 951.689.ICON Fax: 951.689.1016
www.iconvehicledynamics.com
FOLLOW US ON FACEBOOK!
/