Page is loading ...

ARIESAUTOMOTIVE.COM
•
NEED ASSISTANCE?
•
877.287.8 634
•
RC
•
PAGE 1
INSTALLATION MANUAL FRONT
Center Section Parts List
1 TrailChaser
™
center section
6 Button head bolt, M4
6 Nylock nut, M4
4 Flat washer, M4
2 Hex bolt, M6 x 20mm
2 Flat washer, M6
3 Nylock nut, M6
8 Hex bolt, M12 x 40mm
16 Flat washer, M12 x 24mm
8 Lock washer, M12
8 Nut, M12
1 Allen wrench, 3mm
Torque Specifications
Metric
M6 bolt 7 ft-lbs.
M8 bolt 16 ft-lbs.
M10 bolt 33 ft-lbs.
M12 bolt 58 ft-lbs.
Use above torque setting unless otherwise noted
Tools Required
Ratchet Phillips screwdriver
Socket extension Flathead screwdriver
Socket set Allen wrench set
Cut-off tool Box wrench set
Level
Level of Difficulty
Moderate
Notes and Maintenance
Before you begin installation, read all instructions thoroughly.
Proper tools will improve the quality of installation and reduce the time required.
To protect the product, wax after installing. Regular waxing is recommended
to add a protective layer over the finish. Do not use any type of polish or wax
that may contain abrasives that could damage the finish.
For polished, gloss and other smooth finishes,
polish may be used to clear small scratches and scuffs on the finish.
Mild automotive detergent may be used to clean the product. Do not use dish detergent, abrasive
cleaners, abrasive pads, wire brushes or other similar products that may damage the finish.
Refer to the table to the left when securing hardware during the
installation process to help prevent damage to the product or vehicle.
Product Photo (center section only)
All hardware listed below will be
provided with the bumpers center
section. Additional hardware will be
supplied depending on the configuration
purchased. See individual component
installation sections for parts lists.
See pages 2 and 3 of this manual for configuration options

ARIESAUTOMOTIVE.COM
•
NEED ASSISTANCE?
•
877.287.8 634
•
RC
•
PAGE 2
2082020 aluminum
2082030 steel
2082023 aluminum
2082032 steel
2082059 aluminum
2082040 steel
2082047 aluminum
2082042 steel
2082054 aluminum
2082050 steel
2082058 aluminum
2082056 steel
2082046 aluminum
2082043 steel
2082055 aluminum
2082051 steel
2082044 aluminum
2082057 steel
2082052 aluminum
2082048 steel
FRONT TRAILCHASER
™
KITS

ARIESAUTOMOTIVE.COM
•
NEED ASSISTANCE?
•
877.287.8 634
•
RC
•
PAGE 3
Kit# Center# Side# Side Style LED Lights Guard# Guard Style Guards Included
2082020 2081001 2081201 Side extension Not included 2081254 Round Center and sides
2082023 2081001 2081201 Side extension Not included -- -- --
2082059 2081001 2081201 Side extension Not included 2081255 Round Center only
2082047 2081001 2081201 Side extension Not included 2081101 Angular Center only
2082046 2081001 2081205 Corner Included 2081101 Angular Center only
2082058 2081001 2081205 Corner Included 2081255 Round Center only
2082044 2081001 2081205 Corner Included -- -- --
2082055 2081001 2081207 Corner Not compatible 2081101 Angular Center only
2082054 2081001 2081207 Corner Not compatible 2081255 Round Center only
2082052 2081001 2081207 Corner Not compatible -- -- --
All TrailChaser
™
bumpers and components are finished with a textured black powder coat
Kit# Center# Side# Side Style LED Lights Guard# Guard Style Guards Included
2082030 2081000 2081204 Side extension Not included 2081250 Round Center and sides
2082032 2081000 2081204 Side extension Not included -- -- --
2082040 2081000 2081204 Side extension Not included 2081252 Round Center only
2082042 2081000 2081204 Side extension Not included 2081100 Angular Center only
2082043 2081000 2081200 Corner Included 2081100 Angular Center only
2082056 2081000 2081200 Corner Included 2081252 Round Center only
2082057 2081000 2081200 Corner Included -- -- --
2082051 2081000 2081206 Corner Not compatible 2081100 Angular Center only
2082050 2081000 2081206 Corner Not compatible 2081252 Round Center only
2082048 2081000 2081206 Corner Not compatible -- -- --
All TrailChaser
™
bumpers and components are finished with a textured black powder coat
FRONT STEEL TRAILCHASER
™
KITS
FRONT ALUMINUM TRAILCHASER
™
KITS

ARIESAUTOMOTIVE.COM
•
NEED ASSISTANCE?
•
877.287.8 634
•
RC
•
PAGE 4
1
/
FACTORY BUMPER REMOVAL
Step 1
Using a flat head screwdriver, pry and
remove four plastic push pins holding
the air dam in place. Remove the air
dam from underneath the vehicle.
Once removed, pry off the fasteners
holding the brackets to the frame.
Step 2
From behind the bumper, disconnect the wiring
harness attached to each fog light. Unclip the
wiring harness from the bumper cover.
Step 3
Locate two fasteners holding the frame
cover in place on top of the bumper.
Remove these with a phillips screwdriver.

ARIESAUTOMOTIVE.COM
•
NEED ASSISTANCE?
•
877.287.8 634
•
RC
•
PAGE 5
1
/
FACTORY BUMPER REMOVAL (CONT.)
Step 4
When facing the Jeep head-on, slide the
cover to the left to expose the driver side
bolts holding the bumper in place.
Remove the four nuts holding the bolts onto
the bumper frame with an 18mm socket.
Repeat this on the passenger side.
Step 5
When all the bolts have been removed
carefully lift the bumper from the frame
and set on a flat work surface.
Step 6
Remove the stock fog lights to be used
in the new ARIES TrailChaser
™
bumper.

ARIESAUTOMOTIVE.COM
•
NEED ASSISTANCE?
•
877.287.8 634
•
RC
•
PAGE 6
2A
/
SIDE EXT. INSTALL WITHOUT LEDS
Step 2
Repeat steps 1 and 2 on the opposite side.
With both extensions loosely installed, check to
make sure that the bumper corners match up.
Adjust if necessary and fully tighten all the
hardware with a 16mm socket and wrench
Side Extensions Parts List
1 Driver / left side extension
1 Passenger / right side extension
6 Hex bolt, M10 x 35mm
12 Flat washer, M10
6 Lock washer, M10
6 Nut, M10
Step 1
Set the new ARIES center section onto a flat
work surface. Lift the bumper side into place
and insert a 10mm hex bolt with a locking and
flat washer.
Secure the bolt with a second
flat washer and a hex nut.
Repeat this for all three
attachment points.
Snug the hardware at this time,
but do not tighten.
2081201 aluminum
2081204 steel
2081207 aluminum
2081206 steel

ARIESAUTOMOTIVE.COM
•
NEED ASSISTANCE?
•
877.287.8 634
•
RC
•
PAGE 7
2B
/
SIDE EXT. INSTALL WITH LEDS
Side Extensions Parts List
1 Driver / left side extension
1 Passenger / right side extension
8 Socket cap screw, M6 x 20mm
8 Flat washer, M6
8 Nylock nut, M6
6 Hex bolt, M10 x 35mm
12 Flat washer, M10
6 Lock washer, M10
6 Nut, M10
2 LED work light (#1501250)
1 Rubber gasket
2081205 aluminum
2081200 steel
Step 1
Set the side extensions onto a flat work
surface. Insert the rubber gasket and
LED light into place as shown.
Secure the four LED light attachment points
with an M6 socket cap screw, flat washer and
nylock nut at each point.
Repeat for the other side extension.
Tighten all hardware and repeat for
the second side extension and light.
Step 2
Set the new center section onto a flat work
surface. Lift the side extension into place
and insert an M10 hex bolt, lock washer and
flat washer. Secure the bolt with a second
flat washer and a hex nut.
Repeat this for all three attachment points.
Snug the hardware, but do not fully tighten.
Repeat on the opposite side.
With both extensions loosely installed, check to
make sure that the bumper corners match up.
Adjust if necessary and fully tighten all
hardware with a 16mm socket and wrench.

ARIESAUTOMOTIVE.COM
•
NEED ASSISTANCE?
•
877.287.8 634
•
RC
•
PAGE 8
3A
/
ANGULAR BRUSH GUARD INSTALL
Step 1
Place the cover plate on top of the brush guard.
Insert an M6 button head cap screw with flat
washer and secure with a nylock nut.
Repeat for all six attachment points.
Adjust if necessary and fully tighten
all hardware with an Allen wrench.
Step 2
Place the center section onto a flat work
surface. Lift the brush guard into place and
insert and M10 hex bolt with locking and flat
washer. Secure the bolt with a second
flat washer and a hex nut.
Repeat this for all four attachment points.
Adjust if necessary and fully tighten all the
hardware with a 16mm socket and wrench.
Angular Brush Guard Parts List
1 Angular brush guard
6 Buttonhead cap screw, M6 x 20mm
12 Flat washer, M6
6 Nylock nut, M6
4 Hex bolt, M10 x 25mm
8 Flat washer, M10
4 Lock washer, M10
4 Nut, M10
1 Cover plate
2081101 aluminum
2081100 steel

ARIESAUTOMOTIVE.COM
•
NEED ASSISTANCE?
•
877.287.8 634
•
RC
•
PAGE 9
3B
/
ROUND BRUSH GUARD INSTALL
Center & Sides, Brush Guard Parts List
1 Center brush guard
1 Driver / left brush guard
1 Passenger / right brush guard
6 Hex bolt, M10 x 35mm
6 Flat washer, M10
6 Lock washer, M10
6 Nut, M10
Center Only, Brush Guard Parts List
1 Center brush guard
2 Hex bolt, M10 x 35mm
2 Flat washer, M10
2 Lock washer, M10
2 Nut, M10
Step 1
If attaching the center guard only skip to step 2.
If installing the side brush guards, attach the
two side guards with the provided M10 hex
bolts, lock washers and flat washers.
Align and fully tighten the hardware
with a 16mm socket.
Step 2
Finalize the brush guard install by attaching
the center brush guard with two M10 hex bolts,
lock washers and flat washers.
Ensure the guard(s) are aligned properly and
fully tighten the hardware with a 16mm socket.
2081254 aluminum
2081250 steel
2081255 aluminum
2081252 steel

ARIESAUTOMOTIVE.COM
•
NEED ASSISTANCE?
•
877.287.8 634
•
RC
•
PAGE 10
4
/
TRAILCHASER
™
BUMPER INSTALL
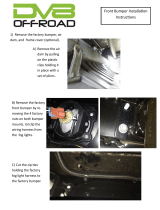
Step 1
For 2012 models and later, you will see a
vacuum pump on the driver side. This will need
to move to accommodate the new bumper.
With a 10mm socket, loosen the rear bolt and
fully remove the front bolt. Swing the vacuum
pump toward the rear of the vehicle. Snug the
rear bolt, but do not fully tighten.
Step 4
With help, lift the bumper into place over the
pre-mounted 12mm bolts in the factory bumper
mount locations.
If the winch receiver plate bracket was not
installed, the included M12 bolts will be
installed in step 7.
Step 2
With the vacuum pump moved, you will be
left with the factory bracket that originally
held the front post in place. This will need to
be removed to allow clearance for the winch
receiver plate.
Using a cutoff tool, carefully remove
the front post bracket.
Step 3
Insert the fog lights into the new bumper.
Each light will have three attachment points.
Insert an M4 socket cap screw with flat washer
and secure with a flat washer and nylock nut.
Tighten with a 7mm socket and the provided
Allen wrench. Repeat this for the other light.

ARIESAUTOMOTIVE.COM
•
NEED ASSISTANCE?
•
877.287.8 634
•
RC
•
PAGE 11
4
/
TRAILCHASER
™
BUMPER INSTALL (CONT.)
Step 5
Insert a M12 hex bolt with flat washer behind
the bumper bracket and secure with a flat and
lock washer with a hex nut.
Depending on the year of the Jeep,
there may be as few as two mounting points to
attach to. This example has three per side.
Snug all hardware at this time,
but do not fully tighten.
Step 8
Check to make sure the bumper is level.
Adjust if necessary and fully tighten
all of the hardware.
With the bumper installed, periodic
inspections should be performed to ensure
all mounting hardware remains tight.
To protect your investment, see the
'Notes and Maintenance' section on
the first page of this instruction manual.
Congratulations on the installation of your
new ARIES TrailChaser
™
bumper.
Step 6
Reattach the fog lights and wire harness to the
bumper.
Step 7
Take vacuum pump and place threaded bolt
through tab on bumper and attach with M6
nylock nut.
/