Page is loading ...

The Trusted Source
®
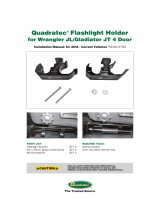
Quadratec®Aluminum
Front Bumpers
Installation Manual for ’18 - Current Wrangler JL Vehicles
#12057.0261 and 12057.0620
Full Width
Full Width Bumper
Narrow Bumper
Narrow Bumper
TO REDUCE RISK OF SERIOUS INJURY OR PROPERTY DAMAGE:
READ ALL SAFETY MESSAGES AND UNDERSTAND ALL
INSTRUCTIONS AND PROCEDURE NOTICES BEFORE
ATTEMPTING TO INSTALL OR USE THIS PRODUCT.
MOUNT WINCH USING ONLY APPROVED MOUNTING PLATE.
BUMPER/WINCH PLATE NOT INTENDED FOR WINCHES IN EX-
CESS OF 10000LBS. LOAD LIMITS FOR YOUR BUMPER/WINCH
MAY BE LESS DEPENDING ON CONDITION OF YOUR VEHICLE
AND ATTACHMENTS. FOLLOW ALL INSTRUCTIONS, LIMITATIONS
& WARNINGS WITH YOUR VEHICLE, THIS PRODUCT, YOUR
WINCH AND SAFE WINCHING PRACTICES SUPPLEMENT.
RISK OF EYE INJURY! SAFETY GLASSES MUST BE WORN AT
ALL TIMES WHILE INSTALLING OR MAINTAINING THIS PRODUCT.
TORQUE AND RECHECK FASTENERS AFTER 250 MILES AND
FREQUENTLY THEREAFTER. INSPECT BUMPER, WINCH AND
MOUNT BEFORE USE. DO NOT USE IF DAMAGED.
CHECK STATE AND LOCAL HIGHWAY SAFETY LAWS REGARDING
PERMITTED BUMPER TYPES AND HEIGHTS.
Q_ALUM_FBMPR_12057_0261_A4.qxp_A4 6/25/19 1:45 PM Page 1

The Trusted Source
®
2
READ ALL SAFETY MESSAGES AND ALWAYS WEAR
SAFETY GLASSES WHEN WORKING WITH TOOLS.
a hazardous situation which, if not avoided, could result in death or
serious injury. You CAN be KILLED or SERIOUSLY HURT if you don’t
follow instructions.
a hazardous situation which, if not avoided, could result in minor or
moderate injury. You CAN be moderately HURT and also may suffer
property damage if you don’t follow instructions.
Careful attention is required to this instruction or operation but does
generally not relate to personal injury. Damage to your Quadratec®
product or other property may result if you don’t follow instructions.
A Few Words About Product Safety:
Your Quadratec®Aluminum Front
Bumper is intended to enhance the util-
ity and enjoyment of your off road capa-
ble vehicle. Before installation, please
review the following safety information
and installation recommendations.
Throughout these instructions impor-
tant safety information is generally
preceded by one of three signal words
indicating the relative risk of injury,
property damage or adverse conse-
quence. The signal words mean:
Before You Begin Installation:
Congratulations on your purchase of
Quadratec®Aluminum Front Bumper for
your Jeep® Wrangler. This custom fit
front Bumper has been designed for
long life and a great look. Though con-
structed of only the finest materials, this
bumper must be maintained to keep its
look while performing under the tough-
est conditions. Please see page 10 for im-
portant care & maintenance tips to keep
your bumper looking like new. When
unpacking, check to make sure all parts
are included and not damaged due to
shipping. If any part is missing or
broken, please call Customer Service
at 800-745-6037 as soon as possible.
Thank you again for your purchase and
let’s start the installation process.
AS YOU UNPACK YOUR FRONT BUMPER, BE CAREFUL NOT TO
SCRATCH THE FINISH WITH A KNIFE OR RAZOR. WE SUGGEST
PLACING THE UNPACKED BUMPER BACK INTO THE ORIGINAL BOX
SO IT DOES NOT GET SCRATCHED BEFORE THE INSTALLATION BEGINS.
THIS BUMPER HAS A CUT-OUT FOR A VEHICLE RECOVERY WINCH.
THE BUMPER FEATURES AN INTEGRATED WINCH MOUNTING PLATE.
WELDED FRONT BUMPERS ARE HEAVY AND WE STRONGLY SUGGEST
THE ASSISTANCE OF AN ABLE-BODIED ASSISTANT DURING LIFTING
AND INSTALLATION OF YOUR BUMPER.
Q_ALUM_FBMPR_12057_0261_A4.qxp_A4 6/25/19 1:45 PM Page 2

The Trusted Source
®
3
THE MAJORITY OF THE INSTALLATION HAS TO DO WITH ADAPTING THE
ORIGINAL EQUIPMENT FOG LIGHTS AND WIRING TO THE NEW BUMPER.
THE PROCEDURE VARIES DEPENDING ON THE TRIM LEVEL OF YOUR JL
CHASSIS WRANGLER (SPORT VS. SAHARA OR RUBICON).
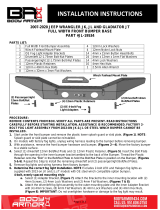
PARTS LIST:
A) Aluminum Front Bumper w/Overrider QTY 1
B) M12 x 30mm Hex Bolts QTY 8
C) 12mm Flat Washers QTY 16
D) 12mm Nylock Nuts QTY 8
E) 10mm Hex Bolts QTY 2
F) M10x30 Button Head Allen Bolts QTY 16
G) 10mm Flat Washers QTY 24
H) 10mm Nylock Nuts QTY 6
I) M6x16 Hex Bolts QTY 4
J) 6mm Flat Washers QTY 4
K) M4x16 Socket Head Caps Screws QTY 8
L) 4mm Flat Washers QTY 16
M) 4mm Nylock Nuts QTY 8
N) Spacer Plate Tabs QTY 4
REQUIRED TOOLS:
Safety Glasses
13, 16, & 18mm deep Sockets
19mm Socket
Extension & Ratchet
7mm & 5/16” Sockets & Rachet
7mm & 19mm Box End Wrenches
T-20 Torx Driver
3mm & 6mm Allen Hex Key Wrenches
Flat Blade Screwdrivers
Forked Clip/Trim Removal Tool
Torque Wrench (ft lbs)
A A
E
C
B
D
F
GH
I
JLM
KN
Quadratec Aluminum Front Bumper Parts & Tools:
Full-Width BumperNarrow Bumper
Q_ALUM_FBMPR_12057_0261_A4.qxp_A4 6/25/19 1:45 PM Page 3

The Trusted Source
®
4
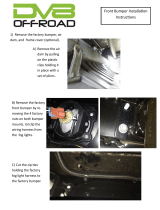
Aluminum JL Front Bumper Installation Prep:
Put on safety glasses. Start by removing
the factory splash guard. Remove the 8
plastic push rivets on the underside of
the bumper. (FIG1)
Remove the two screws on the under-
side using a 5/16” socket. (FIG2) Re-
move the splash guard. Note: This will
not be reused with your new bumper.
Remove the two bolts holding on the
Original Equipment cross shield using a
16mm socket. Remove the cross shield
by lifting upward and out.
Note: This will not be reused with
your new bumper. (FIG3)
Locate the frame guard plastic retainers
on either side. (FIG4)
Remove the plastic retainers using
a small flat blade screwdriver. (FIG5)
FIG1 FIG2
FIG3
FIG4
FIG5
Q_ALUM_FBMPR_12057_0261_A4.qxp_A4 6/25/19 1:45 PM Page 4

The Trusted Source
®
5
Aluminum JL Front Bumper Installation Prep:
Using a 18mm deep socket remove the
(8) bumper retaining nuts. There are 2
on the inside and outside of each frame
rail. (FIG6)
Lastly disconnect the fog light wiring
harness plug so the bumper can be
removed. (FIG7) Carefully remove the
bumper from the frame rails.
You will not be able to re-use your
original fog lamps. A set of “plastic
bumper” 10-18 JK or JL Sahara and Ru-
bicon fog lamps will need to be sourced.
You will still need to re-use the fog lamp
wiring harness though.
For Wrangler Sport Model Vehicles:
Locate the 7 screws on either side hold-
ing the splash shields to bumper and
remove using a 7mm socket. (FIG8)
Disconnect the factory wiring harness
from the bumper mounted fog lights.
(FIG9)
Locate the 4 bolts holding the metal sub
structure to bumper fascia and remove
using a 13mm socket. (FIG10)
FIG6 FIG7
FIG8
FIG9
Foglight Harness Removal from Original Bumper (Sport Model)
FIG10
Q_ALUM_FBMPR_12057_0261_A4.qxp_A4 6/25/19 1:45 PM Page 5

The Trusted Source
®
6
Locate the (8) nuts holding the metal
sub structure to bumper fascia and
remove using a 13mm deep socket.
(FIGS 14A & 14B)
Now you will be able to access the fog
light wiring harness. Remove harness
using a trim removal tool and set aside
for re use. (FIG11)
FIG11
Foglight Harness Removal from Original Bumper (Sport Model)
Foglight Harness Removal from Original Bumper (Sahara & Rubicon Models)
Locate the (6) plastic fasteners on either
side holding the splash shields to
bumper and remove using a flat
blade screwdriver. (FIG12)
Disconnect the factory wiring harness
from the bumper mounted fog lights.
(FIG13)
FIG12
FIG13
FIG14A FIG14B
Q_ALUM_FBMPR_12057_0261_A4.qxp_A4 6/25/19 1:45 PM Page 6

The Trusted Source
®
7
Foglight Harness Removal from Original Bumper (Sahara & Rubicon Models)
Remove the two fog light wiring harness
retainers from metal sub structure using
a trim removal tool. (FIG15)
Locate the six plastic fasteners holding
the frame guard to bumper and remove
using a flat blade screwdriver. (FIG16)
FIG15 FIG16
Locate the (24) screws holding bumper
halves together and remove using a
7mm socket. (FIG17) Note: Several not
shown in this Figure.
Separate bumper halves and turn over
to access the fog light wiring harness.
Remove harness using a trim removal
tool set aside for re-use. (FIG18)
FIG17 FIG18
Finally, Remove the four screws
retaining the fog lamps to bumper fascia
using a 7mm socket and set aside for
re-use. (FIG19)
FIG19
Q_ALUM_FBMPR_12057_0261_A4.qxp_A4 6/25/19 1:45 PM Page 7

The Trusted Source
®
8
JL Winch Mount Installation:
Remove the 4 bumper support brackets
using a 16mm socket and set hardware
aside for re-use later. (FIG 20)
Loosely install the winch mount to
frame rails with the supplied M12 Bolt,
two washers per bolt and a locking nut
using a 19mm wrench & socket. (FIG 21)
Loosely install the OEM hardware re-
moved in FIG 20 inside the frame rails
using spacer plates (if necessary) to
center winch mount best as possible.
(FIG 22)
Loosely install the over rider support
bracket to the outside of frame rails
using the OEM hardware removed in
FIG 20. (FIG 23)
Loosely secure the support brackets to
the winch mount using Two 10mm hex
head bolts, 4 washers and 2 nylock nuts.
(FIG 24)
Now tighten the 8 - 12mm bolts on front
of frame horns to 64ft lbs.
Next, tighten the OEM inner frame rail
bolts to 55ft lbs.
FIG20 FIG21
FIG22 FIG23
FIG24
Q_ALUM_FBMPR_12057_0261_A4.qxp_A4 6/25/19 1:45 PM Page 8

The Trusted Source
®
9
Fog Light Installation:
Aluminum Front Bumper: Install on Vehicle
Attach the fog lamps to the brackets as
shown with the supplied M4 hardware
using a 3mm hex key and 7mm wrench.
(FIGs 25A & B)
Secure the fog lamp brackets to the
winch plate with the supplied M6 bolts
and washers using a 10mm socket.
(FIG 26)
FIG25 FIG26
Loosely secure the bumper to winch
plate with (2) M10 allen head bolts
using a 6mm hex key through the
fairlead mounting holes. (FIG 27)
Install the tow hooks through the
bumper and into the winch plate with
the supplied M10 allen head bolts and
washers using a 6mm hex key. (FIG 28)
You may now torque the over rider bar
bracket to winch plate M10 hardware
to 55ft lbs.
Now is a good time to install your winch
and fairlead into the bumper according
to your winch installation instructions.
FIG27 FIG28
With the help of a friend lift the bumper into place on the frame of the Jeep.
WELDED FRONT BUMPERS ARE HEAVY AND WE STRONGLY SUGGEST
THE ASSISTANCE OF AN ABLE-BODIED ASSISTANT DURING LIFTING
AND INSTALLATION OF YOUR BUMPER.
Q_ALUM_FBMPR_12057_0261_A4.qxp_A4 6/25/19 1:45 PM Page 9

The Trusted Source
®
10
QRC Front Bumper: Install on Vehicle
Loosely install the over rider bar
through the bumper and into the sup-
port brackets with two M10 allen head
bolts and washers using a 6mm hex key.
(FIG 29)
Lastly, loosely install the final hardware
for the over rider bar using 4 M10 allen
head bolts, 8 washers and 4 nylock nuts
through the remaining holes. (FIG 30)
Final Adjustment:
You may now tighten the M10 allen head hardware through the tow hooks to 55ft
lbs. Torque the OEM hardware securing the over rider brackets to frame to 55ft lbs.
Now torque the remaining over rider bar M10 mounting hardware to 55ft lbs.
Installation is now complete.
FIG29 FIG30
Your Bumper has been designed and
manufactured to provide years of use.
However, like any product, general
maintenance is required to keep it
looking new.
Since the bumper is located on the front
of the vehicle, it is subject to potential
rock chips and other debris potentially
causing portions of the paint to chip off.
We recommend using a textured or gloss
black spray paint sprayed on a piece of
cardboard and Q-Tip to gently fill in
these chips. This will prevent any rust
from forming. On all bumpers there is a
chance of some surface rust showing
over time due to metal particles being
embedded in the paint. This surface rust
is easily removed by a non-abrasive
cleaner/ polish and a soft bristle brush
(not a metal brush!).
For bumpers with a textured finish,
wash only with soapy water and avoid
other waxes and polishes.
Bumper Care:
Q_ALUM_FBMPR_12057_0261_A4.qxp_A4 6/25/19 1:45 PM Page 10

The Trusted Source
®
11
Final Results:
Narrow Width Shown installed with the Quadratec
Q-Performance Stealth Winch (sold separately)
Full Width Shown installed with the Quadratec
Q-Performance Stealth Winch (sold separately)
Q_ALUM_FBMPR_12057_0261_A4.qxp_A4 6/25/19 1:45 PM Page 11

The Trusted Source
®
12
Quadratec® Exclusive
Three Year Limited Warranty
Your Quadratec®branded accessories are
covered by the following Limited Warranty
provided exclusively by Quadratec, Inc., 1028
Saunders Lane, West Chester PA 19380.
This Limited Warranty is the only warranty
made in connection with your purchase.
Quadratec neither assumes nor authorizes any
vendor, retailer or other person or entity to as-
sume for it any other obligation or liability in
connection with this product or Limited War-
ranty. This Limited Warranty does not apply
and is not cumulative to any accessory or part
distributed by Quadratec for which the Manu-
facturer provides a separate written warranty.
What is Covered: Subject to the terms, exclu-
sions and limitations herein and with respect
only to Quadratec branded accessories first sold
in the United States, Quadratec warrants to the
initial retail purchaser only that your
Quadratec accessory shall be free of defects in
material and workmanship: for a period of
three (3) years from date of retail purchase.
This Limited Warranty is not assignable and
shall terminate upon sale of the vehicle upon
which the Quadratec accessory is installed or
other transfer third persons.
All other warranties are hereby disclaimed, ex-
cept to the extent prohibited by applicable law
in which case any implied warranty of mer-
chantability or fitness for a particular purpose
on this product is limited to 3 year from date of
initial retail sale. Quadratec reserves the rights
to: (a.) require invoice or other proof your ac-
cessory is within the terms of this Limited
Warranty as a condition of warranty service
and, (b.) make future revisions to this product
and Limited Warranty without prior notice or
obligation to upgrade your product.
What is Not Covered:
Your Quadratec Limited Warranty does not
cover products or parts Quadratec determines
to have been damaged by or subjected to:
(a.) installation damage, alteration, modifica-
tion, combination with other parts, failure to
maintain or improper repair or service, (b.) nor-
mal wear & tear, cosmetic damage or damage
from moisture or water immersion, (c.) Acts of
God, accidents, misuse, negligence, inadequate
mounting or impact with vehicle(s), obstacles
or other aspects of the environment, (d.) theft,
vandalism or other intentional damage.
Remedy Limited to Repair/Replacement:
The exclusive remedy provided hereunder shall,
upon Quadratec inspection and at Quadratec’s
option, be either repair or replacement of prod-
uct or parts (new or refurbished) covered under
this Limited Warranty. Customers requesting
warranty consideration should first contact
Quadratec to obtain a RGA number
(610-701-3336). All labor, removal, shipping
and installation costs are customer’s
responsibility.
Other Limitations - Exclusion of Damages -
Your Rights Under State Law:
In consideration of the purchase price paid, nei-
ther Quadratec nor any independent Quadratec
distributor/licensee are responsible for any time
loss, rental costs, or for any incidental, conse-
quential, punitive or other damages you may
have or incur in connection with any part or
product purchased. Your exclusive remedy
hereunder for covered parts is repair/replace-
ment as described above.
This Limited Warranty gives you specific rights.
You may also have other rights that vary from
state to state. For example, some states do not
allow limitations of how long an implied war-
ranty lasts and /or do not allow the exclusion
or limitation of incidental or consequential
damages, so the limitations and exclusions
herein may not apply to you.
©Quadratec, Inc. 2019. All Rights Reserved.
A4 Version 6.25.19
Instructions Part #12999.3139
Q_ALUM_FBMPR_12057_0261_A4.qxp_A4 6/25/19 1:45 PM Page 12
1/12