Page is loading ...

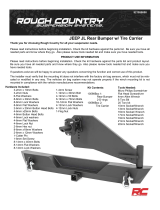
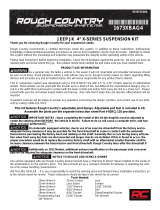
07-18 JEEP JK REAR BUMPER W/TIRE CARRIER
PRIOR TO INSTALLATION
• Make sure the kit is complete and you have read and fully understand these instructions thoroughly before beginning installa-
tion.
921059400
INSTALLATION INSTRUCTIONS
1. Remove the brackets from the stock bumper and frame as shown using a 16mm socket. See Photo 1 & 2.
2. Remove the upper bumper bolts (1 each side) as shown in Photo 3.
3. Remove the stock bumper from the vehicle. See Photo 4.
Photo 1 Photo 2
Photo 3 Photo 4

4. Using a 18mm socket, remove the stock tow hook. See Photo 5 & 6.
5. Remove the stock insert in the frame. See Photo 7.
6. Position the new bracket in the frame as shown in Photo 8 and align with the stock holes.
7. Position the bumper on the frame and secure with the 12mm x 40mm bolts, washers and lock washers. See Photo 9.
8. Install the supplied 12mm x 100mm bolts, flat washers, lock washers and nuts in the lower mounts. See Photo 10. Tighten
using a 18mm socket and wrench.
Photo 5 Photo 6
Photo 7 Photo 8
Photo 9 Photo 10

9. Install the bearing races in the carrier as shown in Photo 11 with a bearing tool or equivalent.
10. Grease the tire carrier lower bearing and install in the tire carrier. See Photo 12.
11. Install the supplied washer beside the bearing as shown. See Photo 13.
12. Gently tap on the edge of the in seal to install the mount. See Photo 14.
13. Lightly grease the stub shaft on the bumper and place the tire carrier on the stub shaft on the bumper. Grease and install the
upper bearing. See Photo 15.
14. Install supplied washer as shown. See Photo 16.
Photo 11 Photo 12
Photo 13 Photo 14
Photo 15 Photo 16

15. Install the supplied castle nut, cotter pin and set screw and install cap. Tighten castle nut with a 36mm socket. See Photo 17
& 18.
16. Install the handle assembly in the carrier and secure with the supplied 10mm x 65 bolt, washers and lock nut. Tighten with a
17mm wrench. See Photo 19.
17. Match the bolt pattern bracket up with the wheel and install the supplied wheel studs. See Photo 20.
18. Install the base mount on the carrier to accommodate tire size and tighten using a 18mm socket. Install wheel mount bracket
with the supplied 12mm x 35mm bolts, washers and lock nuts. Do not tighten at this time. See Photo 21.
19. Install the tire/wheel on the carrier and adjust the wheel mount bracket to bring in the tire/wheel firmly against the carrier.
See Photo 21 & 22. Tighten 12mm x 35mm bolts using a 18mm wrench and socket.
Photo 17 Photo 18
Photo 19 Photo 20
Photo 21 Photo 22

20. With the tire/wheel installed, swing the carrier to the bumper and check the spacing between the latch bracket and the carri-
er handle. See Photo 23.This kit includes several shim plates to accommodate different tire/wheel weights. See Photo 24.
21. Select the combination of shim thickness needed to allow the latch to operate freely and secure the bracket and shims with
the supplied 10mm x 40mm Bolts, washers and lock nuts. See Photo 25 & Photo 26.
22. Install supplied d-rings in the d-ring mounts. See Photo 27.
Photo 23 Photo 24
Photo 25 Photo 26
Photo 27

By purchasing any item sold by Rough Country, LLC, the buyer expressly warrants that he/she is in compliance with all applica-
ble , State, and Local laws and regulations regarding the purchase, ownership, and use of the item. It shall be the buyers re-
sponsibility to comply with all Federal, State and Local laws governing the sales of any items listed, illustrated or sold. The buy-
er expressly agrees to indemnify and hold harmless Rough Country, LLC for all claims resulting directly or indirectly from the
purchase, ownership, or use of the items.
Tools Required:
16mm Socket/Wrench
18mm Socket/Wrench
Kit Contents:
Driver Frame mount Bracket
Pass Fame Mount Bracket
Rear Bumper
Poly Bag Containing:
14-12mm Lock Washers
20-12mm Flat Washers
6-12mm Nuts
4-12mm x 40 Bolts
2-12mm x 100 Bolts
3-Wheel nuts
8-10mm Flat Washers
1-8mm Hex Screw
4-10mm Lock Nuts
1-24mm Hex Nut
3-10mm x 40mm Bolts
1-10mm x 65mm Bolt
4-12mm x 35mm Bolts
1-Cotter Pin
3-1/2” x 20 Wheel Studs
/