Page is loading ...

TJ, YJ WINCH MOUNTING PLATE
Thank you for choosing Rough Country
Please read instructions before beginning installation. Check the kit hardware against the parts list and product
layout. Be sure you have all needed parts and know where they go. Also please review tools needed list and
make sure you have needed tools.
If questions exist we will be happy to answer any questions concerning the design, function, and correct use of
this product.
The installer must verify that the mounting kit does not interfere with the factory air bag sensors, which must not
be relocated or modified in any way. The vehicles are bag system may not operate properly if the winch mount-
ing kit is not mounted in compliance with the vehicle manufacturers recommendations.
Winch mounting should only be performed on vehicles with standard OEM bumpers.
Kit Contents
1– Mounting Plate
1- Kit Bag including
2- Small Thick Washers.
2– Large Thick Washers
2– 10mm x 40mm Bolts
2– 10mm Flat Washers
4- 1/2” x 1.5” Bolts
4– 1/2” Flat Washers TJ INSTALLATION
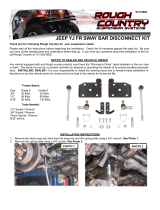
1. Place vehicle on a flat surface and set emergency brake.
2. Remove the front valence (sway bar cover), using a 3/8”
wrench. See PHOTO 1
3. Using a T55 torx socket, remove the front bumper mounting
hardware and tow hooks if equipped.
4. Using a 15mm socket remove the front stabilizer mounting
bolts.
5. If installing a winch at this time it is recommended that you
install the winch to the mounting plate, before installing the
plate on the vehicle.
6. Place mounting plate on the front bumper and align the
mounting holes on the bracket with the holes on the
bumper.
7. Install the two small washers over the holes where the two front sway bar mount bolts where removed to
level the plate. See PHOTO 2
8. Install the supplied 10mm x 40mm bolts in the sway bar mount holes and replace the 4 bumper bolts, using
a T55 Torx bit, and torque to 75 ft. lbs. If replacing tow hooks use a 3/4” socket, and install the provided
Tools Needed
T55 Torx bit
3/8” Wrench
3/4” Socket
15mm Socket
92118900B
TJ washer placement 10mm x 40mm bolt install here.
PHOTO 1
Sway bar cover removal
PHOTO 2 PHOTO 3

PHOTO 4
PHOTO 5
YJ INSTALLATION
1. Place vehicle on a flat surface and set emergency brake.
2. Remove the front valence, using a 3/8” wrench. Using a
T55 torx socket, remove the front bumper mounting hard-
ware and tow hooks if equipped.
3. If installing a winch at this time it is recommended that you
install the winch to the mounting plate, before installing the
plate on the vehicle.
4. Install the two large washers over the holes where the two
rear bolts where removed to level the plate. See PHOTO 1.
5. Place mounting plate on bumper and align holes. See
PHOTO 2.
6. Replace the 4 bumper bolts, using a T55 Torx bit, and
torque to 75 ft. lbs. If reinstalling aftermarket tow hooks use
a 3/4” socket, and install the provided bolts and washers,
and torque to 75 ft. lbs. See PHOTO 3
9. On the TJ the front valence can be replaced with some trimming, if you elect to keep the valance see
PHOTO 4 and 5 for required cutting.
10. Trim the valence as shown below and replace, using a 3/8” wrench.
11. Check the torque on all fasteners after the first use of the winch. Periodically inspect the components for
tightness.
YJ washer placement
YJ winch plate placement location. YJ bolt placement.
PHOTO 1
PHOTO 2
PHOTO 3
By purchasing any item sold by Rough Country, LLC, the buyer expressly warrants that he/she is in compliance with all
applicable , State, and Local laws and regulations regarding the purchase, ownership, and use of the
item. It shall be the buyers responsibility to comply with all Federal, State and Local laws governing
the sales of any items listed, illustrated or sold. The buyer expressly agrees to indemnify and hold
harmless Rough Country, LLC for all claims resulting directly or indirectly from the purchase, owner-
ship, or use of the items.
/