Moxa UPort 1200-1400-1600 Series Installation guide

Category
Serial converters/repeaters/isolators
Type
Installation guide
P/N: 180201400001D
*180201400001D*
UPort 1200/1400/1600 Series
Quick Installation Guide
USB-to-Serial Converter
Version 9.5, August 2022
Technical Support Contact Information
www.moxa.com/support
2022 Moxa Inc. All rights reserved.
- 2 -
WARNING
1. This unit is not intended for consumer use. It will only be
shipped to manufacturers or factories.
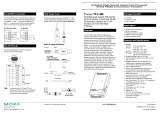
2. The DC source should come from a class external adapter
or a 12 to 48 VDC safety extra-low voltage (SELV) limited
power source (LPS), using a transfer device.
3. This unit should be installed or set up by a qualified
service person.
Overview
Moxa’s USB-to-serial product provides a wide range of easy-to-use
solutions for adding Windows COM ports, macOS, and Linux tty ports
through the USB port of a computer.
The UPort 1200/1400/1600 series are the following models:
UPort 1250: 2-port RS-232/422/485 USB-to-serial converter
UPort 1250I: 2-port RS-232/422/485 USB-to-serial converter w/
isolation protection
UPort 1410: 4-port RS-232 USB-to-serial converter
UPort 1450: 4-port RS-232/422/485 USB-to-serial converter
UPort 1450I: 4-port RS-232/422/485 USB-to-serial converter w/
isolation protection
UPort 1610-8: 8-port RS-232 USB-to-serial converter
UPort 1650-8: 8-port RS-232/422/485 USB-to-serial converter
UPort 1610-16: 16-port RS-232 USB-to-serial converter
UPort 1650-16: 16-port RS-232/422/485 USB-to-serial converter
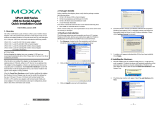
Before connecting UPort USB-to-serial converters to your computer’s
USB port, we recommend installing the UPort driver first. To do this,
follow the installation procedure described in the “Installing the UPort
1200/1400/1600 Driver” section below. The installation procedure was
done on a PC running a Windows platform. UPort converters can be
connected to any upstream type A USB port that is on the PC host or on
an upstream hub. UPort converters are hot pluggable, and therefore
there is no need to power down your computer prior to installation.
After installing the driver, connect the UPort to an upstream host or
hub. The Found New Hardware wizard will locate the appropriate
drivers automatically. Once the drivers are found, various windows will
pop up as the UPort’s serial port is being installed. When the Found
New Hardware Wizard finishes installing the UPort, use the operating
system’s Device Manager to check and/or modify the port settings.
The new COM port will be listed under Ports (COM & LPT).
- 3 -
Ordering Information
Package Checklist
Before installing the UPort, verify that the package contains the
following items:
1 UPort 1200/1400/1600 USB-to-serial converter
USB cable: CBL-USBA/B-100
100 to 240 VAC power adapter (excluding the UPort 1250/1410)
1 power cord suitable for your region (UPort 1600-16 models
only)
1 serial adapter: mini DB9F-to-TB (excluding UPort 1410/1610
series)
WK-45-01: 19-inch rackmount L brackets (2 L-shaped plates with
8 M3 x 8 mm screws for the UPort 1600-16 models only
Quick installation guide (printed)
Warranty card
NOTE
Notify your sales representative if any of the above items is
missing or damaged.
Optional Accessory
DIN-rail kits:
DK-UP1200: DIN rail (25 x 48.3 mm) with 2 screws (FMS M3 X 6);
for the UPort 1200 models.
DK-UP-14168: DIN rail with 2 plates (89 x 19 mm) and 6 screws
(FMS M3 x 5 mm); for the UPort 1400 (V1.5.0) and 1600-8
(V1.4.0) models.
Wall-mounting Kits:
WK-35-02: Wall-mounting kit with 2 plates (35 x 24 mm) and 6
screws (FMS M3 x 4 mm); for the UPort 1200 models.
WK-UP-14168: Wall-mounting kit with 2 plates (35 x 44 mm) and
6 screws (FMS M3 x 4 mm); for the UPort 1400 and UPort 1600-
8 models.
Rack-mounting Kits:
WK-45-01: Rack-mounting kit with 2 L-shaped plates (44 x 57.5
mm) and 8 screws (FMS M3 x 8 mm); for the UPort 1600-16
models.
NOTE
The operating temperature of the power adapter in the box is
from 0 to 40°C. If your application is not in this range,
please
use UL
-listed power adapter (t
he power output meets SELV and
LPS and
is rated 12 to 48 VDC, the minimum current is 580 mA
or 5 VDC, the minimum current is 0.5 A, min. 55°C).
NOTE
If you are using a Class I adapter, the power cord should be
connected to a socket outlet with an earthing connection.
- 4 -
Refer to the table below to see whether external power is needed for
your UPort. If applicable, connect the UPort to an external power
source.
UPort
1250
UPort
1250I
UPort
1400
UPort
1600-8
UPort
1600-16
Power Input Specifications
UPort 1250
5 VDC (bus power), 360 mA
UPort 1250I
12 to 48 VDC, 200 mA (max. in 12 VDC)
UPort 1410/1450
12 to 48 VDC, 260 mA (max. in 12 VDC); 5 VDC
(bus power), 0.5 A
UPort 1450I
12 to 48 VDC, 360 mA (max. in 12 VDC)
UPort 1600-8
12 to 48 VDC, 580 mA (max. in 12 VDC)
UPort 1600-16
100 to 240 VAC, 220 mA, 47-63 Hz (max. in 100
VAC)
Hardware Installation Procedure
The UPort 1200/1400/1600 models come with two metal attachment
plates to attach the UPort model to a wall or the inside of a cabinet.
First, use two screws per bracket to attach the brackets at the rear of
the UPort model. Next, use two screws per bracket to attach the UPort
model to a wall or cabinet.
The heads of the screws and shaft size maximum size are defined as
below:
Screw head
Shaft
UPort 1200
4.0 mm
3.0 mm
UPort 1400
4.0 mm
3.0 mm
UPort 1600-8
4.0 mm
3.0 mm
UPort 1600-16
8.0 mm
3.0 mm
- 5 -
Installing the UPort 1200/1400/1600 Driver
1. Connect the UPort to the PC using the USB cable.
2. After turning your PC’s power on, Windows will automatically
detect the UPort.
3. Run the Setup program that you may find on Moxa’s support
website http://www.moxa.com/support/. Click Next to start
installing the driver.
4. Read and accept the agreement. Click Next to set the indicated
folder.
5. Set Start Menu Folder location
- 6 -
6. Click Install to proceed with the installation.
7. The installation will take a few minutes to complete.
8. After the driver has been installed successfully, you can click Scan
to review the installation results if the UPort is connected to your
computer.
- 7 -
9. Check Launch Windows Driver Manager after finish to
configure the UPort after quitting the driver installer.
Installing the macOS Driver
For macOS 10.12 and later, follow the steps below to install the driver:
1. Enter recovery mode.
2. Disable System Integrity Protection (SIP) by typing 'csrutil disable'
in the terminal.
3. Return to normal mode.
4. Launch the UPort driver installer and finish the installation
procedure.
5. Enter recovery mode again.
6. Enable System Integrity Protection (SIP) by typing 'csrutil enable'
in the terminal.
7. Return to normal mode.
For detailed instructions, please refer to the UPort 1200/1400/1600
User’s Manual on the product webpage or the ‘readme.txt’ in the driver
installation package.
Installing the Linux Driver Linux Kernel
Execute the following commands from the Linux prompt:
# CD /moxa
# tar xvfz driv_linux_uport_[VERSION]_[BUILD].tgz
Find "Makefile" in /moxa/mxuport, then run
# make install
# modprobe mxuport
For further information, please refer to readme.txt that comes with the
driver.
- 8 -
Serial Port Pin Assignments
The serial ports on the UPort 1200/1400/1600 have DB9 male
connectors. Refer to the following table below for the RS-232 and RS-
422/485 pin assignments.
NOTE
For UPort with DB Male Serial Ports, you may refer to DB9 Male
Ports pin assignment section to loo
p back pin 2 and pin 3 for
the RS-232 interface to carry out a self-test on the device.
Male DB9
Pin RS-232
RS-422/
RS-485 4W
RS-485 2W
1
DCD
TxD-(A)
2
RxD
TxD+(B)
3
TxD
RxD+(B)
Data+(B)
4
DTR
RxD-(A)
Data-(A)
5
GND
GND
GND
6
DSR
7
RTS
8
CTS
9
Mini DB9F-to-TB
DB9F
TB
1
2
2
1
3
3
4
4
5
5
  • Page 1 1
  • Page 2 2
  • Page 3 3
  • Page 4 4
  • Page 5 5
  • Page 6 6
  • Page 7 7
  • Page 8 8

Moxa UPort 1200-1400-1600 Series Installation guide

Category
Serial converters/repeaters/isolators
Type
Installation guide

Ask a question and I''ll find the answer in the document

Finding information in a document is now easier with AI