Page is loading ...

— 1 — — 2 — — 3 —
UPort 1100 Series
USB-to-Serial Adaptor
Quick Installation Guide
Third Edition, January 2008
1. Overview
The UPort 1100 Series is part of Moxa’s UPort Line of USB-to-Serial
adaptors. The UPort product line provides a wide range of easy-to-use
solutions for adding Windows COM ports and Linux tty ports through a
PC’s USB port. The UPort 1100 series includes the following models:
UPort 1110: 1-port RS-232 USB-to-Serial Adaptor
UPort 1130: 1-port RS-422/485 USB-to-Serial Adaptor
UPort 1150: 1-port RS-232/422/485 USB-to-Serial Adaptor
UPort 1150I: 1-port RS-232/422/485 USB-to-Serial Adaptor
w/ Isolation Protection.
ATTENTION
Before plugging the adaptor into your computer’s USB port, we
recommend installing the driver first. Please refer to Section 3 for driver
installation procedures.
After the driver is installed, the adaptor can be plugged into any
upstream type A USB port, either on a PC host or on an upstream hub.
The adaptor is hot-pluggable, so there is no need to power down your
computer prior to installation. The Found New Hardware wizard will
automatically locate the appropriate drivers, and various windows will
appear as the adaptor is being installed.
After the Found New Hardware wizard finishes installing the adaptor,
the Windows Device Manager may be used to modify the settings for
the new COM port. The new COM port will be listed under Ports
(COM & LPT) and the new adapters will be listed under Multi-port
serial adapters. For more information about port configuration, please
refer to the UPort 1100 Series user manual.
2. Package Checklist
Before installing the adaptor, please verify that the package contains
the following items:
y UPort 1100 Series USB-to-Serial Adaptor
y UPort Documentation and Software CD-ROM
y UPort 1100 Series Quick Installation Guide
y 5-year Warranty Statement
The UPort 1130/1150/1150I will also come with the following item:
y Mini DB9F-to Terminal-Block Converter
NOTE: Please notify your sales representative if any of the above items
are missing or damaged.
3. Hardware Introduction
The following instructions and screenshots are from a PC running
Windows XP(32-bit), but the same instructions apply for Windows
98/ME/2000 and Windows XP/2003/Vista (32-bit and 64-bit).
1. Run Setup.exe, located on the Documentation and Software
CD-ROM. Click on Next to begin installing the driver.
2. Click on Next to install the driver in the indicated folder.
3. Click on Install to proceed with installation.
4. The next window cautions you that this software has not passed
Windows logo testing. This is a standard warning, and Moxa has
thoroughly tested the driver for safe Windows operation. Please
click Continue Anyway to proceed.
5. A window will appear indicating that all files have been installed.
Click Finish.
4. Installing the Hardware
1. Plug the adaptor into any upstream USB port (e.g., a USB port on
your computer). Windows are done with hardware installation at this
point and may continue on to port configuration. Windows will
auto-detect the UPort cable and show Found New Hardware in the
System Tray.
2. The following window will appear. Select No, not this item click
Next.
P/N: 1802011002010

— 4 — — 5 — — 6 —
3. Select Install the software automatically (Recommended), and
then click Next to proceed.
4. The next window cautions you that this software has not passed
Windows logo testing. This is a standard warning, and Moxa has
thoroughly tested the driver for safe Windows operation. Please click
Continue Anyways to proceed.
5. A window will appear showing the model name and indicating that
Windows has completed the driver installation. Click Finish.
5. Installing the Port Driver
1. The Found New Hardware Wizard will automatically open to
install the driver for the new serial port. Select No, not this time,
then click Next.
2. Select Install the software automatically (Recommended), and
then click Next to proceed.
3. The next window cautions you that this software has not passed
Windows logo testing. This is a standard warning, and Moxa has
thoroughly tested the driver for safe Windows operation. Please click
Continue Anyways to proceed.
4. After all files have been copied to the system, the Completing the
Found New Hardware Wizard window will open to indicate that
the wizard has finished installing the new COM port. Please click
Finish.
6. Installing the Linux Driver for the UPort 1100
Series.
1. Execute the following commands from the Linux prompt:
#mount /dev/cdrom /mnt/cdrom
#cd /
#mkdir moxa
#cd moxa
#cp /mnt/cdrom/<driver
directory>/driv_linux2.6_uport1p_vx.x_build_xx.tgz
#tar xvfz driv_linux2.6_uport1p_vx.x_build_xx.tgz
2. #cd mxu11x0/driver
#make clean; make install
3. #modprobe mxu11x0
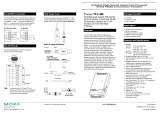
7. Serial Port Pin Assignments
The UPort 1100 series uses male DB9 connectors. Pin assignments are
shown in the following diagram:
Male DB9
54321
9876
Pin RS-232
RS-422/485
(4-wire)
RS-485
(2-wire)
1 DCD (in) TxD-(A) ---
2 RxD (in) TxD+(B) ---
3 TxD (out) RxD+(B) Data+(B)
4 DTR (out) RxD-(A) Data-(A)
5 GND GND GND
6 DSR (in) --- ---
7 RTS (out) --- ---
8 CTS (in) --- ---
The UPort 1130/1150/1150I comes with a DB9 to terminal block
converter, with pin assignments as shown below:
Terminal Block
Pin
RS-422/485
(4-wire)
RS-485
(2-wire)
1 TxD+(B) ---
2 TxD-(A) ---
3 RxD+(B) Data+(B)
4 RxD-(A) Data-(A)
5 GND GND
Note that the converter maps pin 1 on the DB9 connector to pin 2 on
the terminal block, and pin 2 on the DB9 connector to pin 1 on the
terminal block.
8. Certification
This product complies with Chinese RoHS
(Restriction of Hazardous Substances) regulations
for Electronic Information Products.
Copyright © 2008
Moxa Inc.
All rights reserved.
Reproduction without permission is prohibited.
Tel: +886-2-8919-1230 www.moxa.com
Fax: +886-2-8919-1231 support@moxa.com
/