Page is loading ...


UPort 1110 and 1130 User’s Manual
The software described in this manual is furnished under a license agreement and may be used only in
accordance with the terms of that agreement.
Copyright Notice
Copyright © 2006 MOXA Technologies Co., Ltd.
All rights reserved.
Reproduction without permission is prohibited.
Trademarks
MOXA is a registered trademark of The MOXA Group.
All other trademarks or registered marks in this manual belong to their respective manufacturers.
Disclaimer
Information in this document is subject to change without notice and does not represent a commitment on the
part of MOXA.
MOXA provides this document “as is,” without warranty of any kind, either expressed or implied, including, but
not limited to, its particular purpose. MOXA reserves the right to make improvements and/or changes to this
manual, or to the products and/or the programs described in this manual, at any time.
Information provided in this manual is intended to be accurate and reliable. However, MOXA assumes no
responsibility for its use or for any infringements on the rights of third parties that may result from its use.
This product may include unintentional technical or typographical errors. Changes are periodically made to the
information herein to correct such errors, and these changes are incorporated into new editions of the
publication.

Table of Contents
Chapter 1 Introduction ...............................................................................................1-1
Overview.............................................................................................................................. 1-2
Package Checklist................................................................................................................. 1-2
Product Features................................................................................................................... 1-2
Product Specifications.......................................................................................................... 1-3
LED Indicators..................................................................................................................... 1-4
Chapter 2 Installation and Configuration .................................................................2-1
Initial Driver Installation...................................................................................................... 2-2
Hardware Installation ........................................................................................................... 2-5
Windows 98 and Windows 2000.................................................................................. 2-5
Windows XP and Windows 2003................................................................................. 2-6
Configuring the COM Port................................................................................................. 2-12
Configuring the Adaptor..................................................................................................... 2-13
Removing the Adaptor........................................................................................................ 2-15
Uninstalling the Driver....................................................................................................... 2-16
Appendix A. Pin Assignments ......................................................................................A-1
UPort DB9 Pin Assignments ............................................................................................... A-1
Terminal Block Pin Assignments......................................................................................... A-1
Appendix B. Service Information..................................................................................B-1
MOXA Internet Services......................................................................................................B-2
Technical Support E-mail Address...............................................................................B-2
Website for Product Information..................................................................................B-2
Problem Report Form...........................................................................................................B-3
Product Return Procedure.....................................................................................................B-4

1
1
Chapter 1 Introduction
The UPort 1110 and the UPort 1130 are USB-to-serial adaptors, an easy way to add a COM port to
your system. The UPort 1110 provides one RS-232 port and the UPort 1130 provides one
RS-422/RS-485 port. As a plug and play USB device, the adaptors are perfect for mobile,
instrumentation, and point-of sale applications.
The following topics are covered in this chapter:
Overview
Package Checklist
Product Features
Product Specifications
LED Indicators

UPort 1110 and 1130 User’s Manual Introduction
1-2
Overview
The UPort 1110 and UPort 1130 are part of Moxa’s UPort line of USB-to-serial adaptors. The
UPort line provides a range of easy-to-use solutions for adding COM ports through a PC’s USB
port. Simply install the drivers, connect the UPort to your computer, plug in your serial devices,
and you’re ready to go. Programming is not required, and you do not need to worry about IRQs,
configuring a board, power requirements, or connection schemes.
The UPort 1110 and UPort 1130 provide single COM port expansion. The UPort 1110 adds one
RS-232 port to your computer, which is the same type of COM port that is built into most PC
motherboards. The UPort 1130 adds one port that is configurable for RS-422, 2-wire RS-485, and
4-wire RS-485 modes. Both models can operate at speeds of up to 12 Mbps, which is much faster
than the current maximum serial transfer rate.
The adaptor is bus-powered, so no external power supply is required.
Package Checklist
The following items are included in your UPort package:
y UPort 1110 or UPort 1130 USB-to-Serial Adaptor
y UPort Documentation and Software CD
y UPort 1110/1130 Quick Installation Guide
y 5-year Warranty Statement
The UPort 1130 also comes with the following item:
y Mini DB9F-to-Terminal-Block Converter
NOTE: Notify your sales representative if any of the above items is missing or damaged.
Product Features
The UPort adaptor has the following features:
y Full-Speed USB operation at up to 12 Mbps
y Additional I/O or IRQ not required
y Serial transmission speed up to 921.6 Kbps
y 64-byte FIFO and built-in hardware and software flow control
y Built-in 15 KV ESD protection
y Support for RS-422, 2-wire RS-485, and 4-wire RS-485 (UPort 1130 only)
y Terminal block adaptor (UPort 1130 only)

UPort 1110 and 1130 User’s Manual Introduction
1-3
Product Specifications
USB
Version USB 1.1 (also compatible with USB 1.0 and 2.0)
Connector USB type B
Speed 12 Mbps
Serial Interface
No. of Ports 1
RS-232 (UPort 1110) TxD, RxD, RTS, CTS, DTR, DSR, DCD, GND
RS-422 (UPort 1130) TxD+(B), TxD-(A), RxD+(B), RxD-(A),GND
RS-485 (UPort 1130) 4-wire: TxD+(B), TxD-(A), RxD+(B), RxD-(A), GND
2-wire: Data+(B), Data-(A), GND
Connector Male DB9
FIFO 64 bytes
Serial line protection 15 KV ESD for all signals
Serial Communication Parameters
Parity None, Even, Odd, Space, Mark
Data bits 5, 6, 7, 8
Stop bits 1, 1.5, 2
Flow control RTS/CTS, XON/XOFF
Speed 50 bps to 921.6 Kbps
Power Requirements
Power Consumption 30 mA@5 VDC
Mechanical
Dimensions 37.5 x 20.5 x 60 mm (L x W x H)
Material ABS + PC
Gross Weight 60 g (0.13 lb)
Environmental
Operating Temperature 0°C to 55°C (32°F to 131°F)
Storage Temperature -20°C to 85°C (-4°F to 185°F)
Operating Humidity 5% RH to 95% RH
Regulatory Approvals
EN55022 Class B, EN55024, EN61000-3-2, EN61000-3-3, IEC
61000-4-2, IEC 61000-4-3, IEC 61000-4-4, IEC 61000-4-5, IEC
61000-4-8, FCC Part 15 Class B
Warranty
5 years

UPort 1110 and 1130 User’s Manual Introduction
1-4
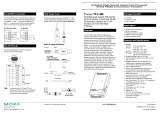
LED Indicators
Active
RxD
TxD
1110
RS-232
USB-to-Serial Adaptor
Active
RxD
TxD
1130
RS-422/485
USB-to-Serial Adaptor
UPort 1110
UPort 1130
Name Description
Active
This LED indicates normal operation. If the driver is installed correctly and the
adaptor is plugged into a functioning USB port, the Active LED will light up
and remain on. If the LED does not light up, there may be a problem with the
adaptor, the driver installation, or PC configuration.
TxD This LED blinks when the adaptor transmits data through its COM port.
RxD This LED blinks when the adaptor receives data through its COM port.

2
2
Chapter 2 Installation and Configuration
Installation of the adaptor is a simple process. First install the driver, then plug the adaptor into a
USB port. When the adaptor is plugged in, Windows will load the correct drivers for the adaptor
and the new COM port. In this chapter, basic installation and configuration procedures are
explained. Although the installation screens will be for Windows 2000, the procedures are
essentially the same for Windows 98 and later versions.
The following topics are covered in this chapter:
Initial Driver Installation
Hardware Installation
¾ Windows 98 and Windows 2000
¾ Windows XP and Windows 2003
Configuring the COM Port
Configuring the Adaptor
Removing the Adaptor
Uninstalling the Driver

UPort 1110 and 1130 User’s Manual Installation and Configuration
2-2
Initial Driver Installation
The Documentation and Software CD will contain the drivers for the adaptor. You may also
download the drivers at
www.moxa.com. The installation procedure is the same for all Windows
operating systems.
Use Windows Explorer to locate the driver installation file, which will be Setup or Install.
On the Documentation and Software CD, this file will be located in the UPort 1100/Software
folder, filed by operating system. Double-click the Setup or Install file.
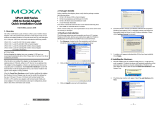
1. The Setup Wizard will open. Click Next to begin installing the driver.

UPort 1110 and 1130 User’s Manual Installation and Configuration
2-3
2. Click Next to install the driver in the indicated folder, or use the drop-down folder list to
locate a different folder.
3. Click Install to proceed with the installation.

UPort 1110 and 1130 User’s Manual Installation and Configuration
2-4
4. Wait while the driver is installed on your hard drive.
5. A window will pop up cautioning you that this software has not passed Windows logo testing.
This is a standard warning, and Moxa has thoroughly tested the driver for safe Windows
operation. Please click Ye s to proceed.

UPort 1110 and 1130 User’s Manual Installation and Configuration
2-5
6. Click Finish to complete the installation of the driver.
Hardware Installation
After installing the driver, plug the adaptor into any upstream USB port, such as a USB port on
your computer. Windows will automatically detect the adaptor and begin installing the driver.
When the Windows finishes installing the driver for the adaptor, it will then detect a new COM
port, and will then install another driver for the new COM port..
ATTENTION
For best results, we recommend that you install the driver before plugging the adaptor into the
USB port. Please refer to the previous section on
Initial Driver Installation for instructions.
Windows 98 and Windows 2000
The following instructions are for Windows 98 and Windows 2000 systems:
1. After plugging the adaptor into a USB port, the Found New Hardware window should open
automatically. The USB icon indicates that the USB port is being installed. No action is
required.

UPort 1110 and 1130 User’s Manual Installation and Configuration
2-6
2. Windows 98 users may skip to the next step. On Windows 2000 systems, a window will pop
up cautioning you that this software has not passed Windows logo testing. This is a standard
warning, and Moxa has thoroughly tested the driver for safe Windows operation. Please click
Yes to proceed.
3. Windows will automatically detect and install the new serial port. No further action is
required
Windows XP and Windows 2003
The following instructions are for Windows XP and Windows 2003 systems.
1. After plugging the adaptor into a USB port, Windows will automatically detect the new
device. The Found New Hardware balloon will appear in the bottom right corner of the
Windows desktop. No action is required yet.

UPort 1110 and 1130 User’s Manual Installation and Configuration
2-7
2. After a moment, the Found New Hardware Wizard will open. If you see the following screen,
select No, not this time, then click Next.
3. On the next window that appears, select Install the software automatically
(Recommended), then click Next.

UPort 1110 and 1130 User’s Manual Installation and Configuration
2-8
4. The installation wizard will search for the correct drivers. After a moment, a window will pop
up cautioning you that this software has not passed Windows logo testing. This is a standard
warning, and Moxa has thoroughly tested the driver for safe Windows operation. Please click
Continue Anyway to proceed.
5. Windows will spend a few moments installing the UPort driver..

UPort 1110 and 1130 User’s Manual Installation and Configuration
2-9
6. The next window indicates that Windows has completed the installation. Click Finish to
continue with installation procedure.
7. After Windows has completed installing the adaptor, it will automatically detect the new
COM port. The Found New Hardware balloon will appear in the bottom right corner of the
Windows desktop.

UPort 1110 and 1130 User’s Manual Installation and Configuration
2-10
8. After a moment, the Found New Hardware Wizard will open. Select Install the software
automatically (Recommended), then click Next.
9. The installation wizard will search for the correct drivers. After a moment, a window will pop
up cautioning you that this software has not passed Windows logo testing. This is a standard
warning, and Moxa has thoroughly tested the driver for safe Windows operation. Please click
Continue Anyway to proceed.

UPort 1110 and 1130 User’s Manual Installation and Configuration
2-11
10. Windows will spend a few moments installing the driver.
11. The next window indicates that Windows has completed the installation. Click Finish to
proceed with installation procedure.
12. The Found New Hardware balloon will reappear, indicating that the installation was
successful.

UPort 1110 and 1130 User’s Manual Installation and Configuration
2-12
Configuring the COM Port
After the driver and hardware have been successfully installed, the new COM port will have a
COM number and can be accessed and controlled just like your PC’s built-in COM ports. If you
need to change the baud rate, parity, or other COM port settings, you may use your serial
communication application to make those changes. You may also go to Device Manager and
right-click the MOXA USB Serial Port, which will be listed under Ports along with your PC’s
built-in COM ports. In the context menu that pops up, you may select Properties in order to
modify the COM port settings.

UPort 1110 and 1130 User’s Manual Installation and Configuration
2-13
Configuring the Adaptor
If you need to change the COM number that the adaptor assigns to the COM port, or adjust other
advanced settings, you may go to Device Manager and right-click the UPort adaptor, which will be
listed under Multi-port serial adaptors. In the context menu that pops up, you may select
Properties in order to modify the COM port settings.
In the Port Configuration tab, you will see the new COM port listed. Click Port Setting to
modify the COM number and other parameters.
/