Page is loading ...


UPort 1400/1600-G2 Series User Manual
The software described in this manual is furnished under a license agreement and may be used only in accordance
with the terms of that agreement.
Copyright Notice
© 2023 Moxa Inc. All rights reserved.
Trademarks
The MOXA logo is a registered trademark of Moxa Inc.
All other trademarks or registered marks in this manual belong to their respective manufacturers.
Disclaimer
• Information in this document is subject to change without notice and does not represent a commitment
on the part of Moxa.
• Moxa provides this document as is, without warranty of any kind, either expressed or implied, including,
but not limited to, its particular purpose. Moxa reserves the right to make improvements and/or
changes to this manual, or to the products and/or the programs described in this manual, at any time.
• Information provided in this manual is intended to be accurate and reliable. However, Moxa assumes no
responsibility for its use, or for any infringements on the rights of third parties that may result from its
use.
• This product might include unintentional technical or typographical errors. Changes are periodically
made to the information herein to correct such errors, and these changes are incorporated into new
editions of the publication.
Technical Support Contact Information
www.moxa.com/support

Table of Contents
1. Introduction ......................................................................................................................................... 4
Overview .............................................................................................................................................. 5
Automatic Data Direction Control (ADDC) for RS-485 ................................................................................. 5
Automatic Recovery Data Communication (ARDC) ..................................................................................... 5
Ordering Information ............................................................................................................................. 5
Package Checklist ........................................................................................................................... 5
Optional Accessories (can be purchased separately) ........................................................................... 6
Product Features ................................................................................................................................... 7
Product Specification .............................................................................................................................. 7
Panel Layout and Dimensions .................................................................................................................. 7
UPort 1400-G2 ............................................................................................................................... 7
UPort 1600-8-G2 and -Hub .............................................................................................................. 9
2. Product Installation ............................................................................................................................ 10
Hardware Description and Installation .................................................................................................... 10
Using an External Power Source ..................................................................................................... 10
LED Indicators ............................................................................................................................. 10
Connecting to a Serial Device ........................................................................................................ 11
Serial Port Pin Assignments ........................................................................................................... 11
Wiring Adapters Pin Assignments ................................................................................................... 11
Adjustable Pull High/low Resistors for the RS-485 Port ...................................................................... 12
Buzzer ........................................................................................................................................ 13
Latching USB Cable User Guide ...................................................................................................... 13
Ground Screw .............................................................................................................................. 15
Reset .......................................................................................................................................... 15
Mounting ..................................................................................................................................... 15
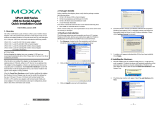
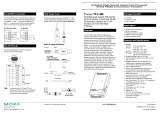
Software Driver Installation .................................................................................................................. 21
Installing the Windows Driver ........................................................................................................ 21
Installing the Linux Driver ............................................................................................................. 31
Installing the Mac Driver for macOS ................................................................................................ 34
3. Useful Companion Utilities .................................................................................................................. 37
ViewCOM ............................................................................................................................................ 37
PComm Terminal Emulator .................................................................................................................... 38
A. How to Become a Registered User of Moxa Website ........................................................................... 42

UPort 1400/1600-G2 Series User Manual
4
1. Introduction
The Moxa UPort 1400-G2/1600-G2 Series comprises USB 3.2-to-serial converters that add four or eight
serial ports to a PC through the PC’s USB port. The UPort 1400/1600 is compatible with both new and
legacy RS-232 or RS-422/485 devices. These plug-and-play USB-to-serial converters are ideal for mobile,
instrumentation, and point-of sale applications.
In this manual, we refer to the products in the series collectively as the UPort 1400/1600-G2 Series, or
simply as the UPort. The UPort 1400/1600-G2 Series includes the following models:
4-port models
UPort 1410-G2
RS-232 USB-to-serial converter
0 to 60°C (32 to 140°F)
UPort 1450-G2
RS-232/422/485 USB-to-serial converter
0 to 60°C (32 to 140°F)
UPort 1450-G2-T
RS-232/422/485 USB-to-serial converter
-40 to 75°C (-40 to 167°F)
UPort 1450I-G2
RS-232/422/485 USB-to-serial converter with
2 kV isolation protection 0 to 60°C (32 to 140°F)
UPort 1450I-G2-T
RS-232/422/485 USB-to-serial converter with
2 kV isolation protection -40 to 75°C (-40 to 167°F)
8-port models
UPort 1610-8-G2
RS-232 USB-to-serial converter
0 to 60°C (32 to 140°F)
UPort 1650-8-G2
RS-232/422/485 USB-to-serial converter
0 to 60°C (32 to 140°F)
UPort 1650-8-G2-T
RS-232/422/485 USB-to-serial converter
-40 to 75°C (-40 to 167°F)
UPort 1650I-8-G2
RS-232/422/485 USB-to-serial converter with
2 kV isolation protection
0 to 60°C (32 to 140°F)
UPort 1650I-8-G2-T
RS-232/422/485 USB-to-serial converter with
2 kV isolation protection
-40 to 75°C (-40 to 167°F)
UPort 1650-8-G2-Hub
RS-232/422/485 USB-to-serial converter with 3
downstream USB type-A slots 0 to 60°C (32 to 140°F)

UPort 1400/1600-G2 Series User Manual
5
Overview
The UPort 1400/1600-G2 Series is easy to install and use. After installing the drivers on your PC, connect
the UPort to your computer, plug in your serial devices, and you’re ready to go. Programming is not
required, and you do not need to worry about IRQs, configuring a board, power requirements, or connection
schemes.
The UPort 1400/1600-G2 Series complies with USB 3.2, 2.0, and 1.1 specifications, and meets the 5 Gbps
of Super-Speed USB 3.2. Connecting serial devices to your computer’s USB ports reduces the total cost of
ownership, investment in hardware, and long-term management and integration costs.
Most models of the UPort 1400/1600-G2 Series supports bus power and external power, and only the UPort
1650I-8-G2 and UPort 1650-8-G2-Hub converters require external power. You may refer to the Power
Input Supply section on page 9 for the applicable table.
When an external power adapter or power cord is used, the UPort will only draw 100 mA through the laptop
or workstation’s USB port.
Automatic Data Direction Control (ADDC) for
RS-485
Automatic Data Direction Control (ADDC) simplifies the management of 2-wire RS-485 half-duplex
connections, eliminating software interference. Thus, it is unnecessary to write extra code for Windows
applications to control the half-duplex protocol. ADDC intelligence is built into the UPort 1200/1400/1600
USB-to-serial converters that support RS-485 serial interfaces.
Automatic Recovery Data Communication
(ARDC)
Automatic Recovery Data Communication (ARDC) simplifies the auto recovery of data transmissions even if
a cable gets unplugged accidentally. Thus, you do not need to worry about reconfiguring complex settings to
ensure smooth data transmissions. If the USB cable is accidentally unplugged, just plug it back into the
same port, and the converter will automatically reconnect with the host and continue transferring data. This
feature not only reduces reconfiguration time but also the probability of data loss.
Ordering Information
Package Checklist
Moxa’s UPort 1400/1600-G2 products are shipped with the following items:
• 1 UPort 1400-G2/1600-8-G2/1650-8-G2-Hub USB-to-serial converter
• 1 USB cable with a latch and screw
- CBL-USB3-BA-G-120 for all models except for the UPort 1650-8-G2-Hub, 1.2 m, with hook and screw
- CBL-USB3-BA-G-028 for the UPort 1650-8-G2-Hub, 28 cm, with hook and screw 100 to 240 VAC
• Power adapter for the UPort 1650I-8-G2 and UPort 1650-8-G2-Hub only
• Quick installation guide (printed)
• Warranty card
NOTE
Please notify your sales representative if any of the above items are missing or damaged.

UPort 1400/1600-G2 Series User Manual
6
Optional Accessories (can be purchased separately)
Power adapters
PWR-12300-WP*-S2
0 to 40°C
(32 to 140°F)
PWR-12050-*-S2
0 to 40°C
(32 to 140°F)
PWR-12150-**-SA-T
-40 to 75°C
(-40 to 167°F)
UPort 1410-G2
UPort 1450-G2
UPort 1450-G2-T
UPort 1450I-G2
UPort 1450I-G2-T
UPort 1610-8-G2
UPort 1650-8-G2
UPort 1650-8-G2-T
UPort 1650I-8-G2
UPort 1650I-8-G2-T
UPort 1650-8-G2-Hub
* EU/USJP/CN/UK/AU/KR
** EU/USJP/CN/UK/AU
NOTE
This product is intended to be supplied by an approved external power source (UL listed/IEC 60950-1/IEC
62368-1) which output complies with ES1/SELV, PS2/LPS, output rating 12 to 48 VDC, 2.25 A minimum
(by DC jack) or 5 VDC, 0.61 A minimum (by USB port), ambient temperature 75°C minimum. If further
information or help is needed, please contact your Moxa representative. If a Class I power source is used,
the power cord should be connected to a socket outlet with an earthing connection.
Cable:
• CBL-USB3-BA-G-120: USB 3.2 Gen 1 cable with latch 1.2 M
• CBL-USB3-BA-G-028: USB 3.2 Gen 1 cable with latch 0.28 M
• CBL-USB3-BA-B-120: Standard USB 3.2 Gen 1 cable 1.2 M
DIN-rail Kits:
• DK-UP1400-G2 (for UPort 1400-G2 models)
• DK-UP1600-G2 (for UPort 1600-G2 models)
Wall-mounting Kits:
• WK-UP400A-BOT-BK: Wall mounting for 4/8-port models
Rack-mounting Kits:
• RK-UP1600-G2: 1U tray rack-mounting kit
Serial Adapters:
• LB-DB9F-G-01: Serial loopback adapter
• ADP-RJ458P-DB9F: DB9F-to-RJ45 adapter
• Mini DB9F-to-TB: DB9F-to-TB adapter

UPort 1400/1600-G2 Series User Manual
7
Product Features
UPort 1400/1600-G2 Series has the following features:
• SuperSpeed USB 3.2 supported (up to 5 Gbps)
• Additional I/O or IRQ not required
• Serial transmission speed up to 921.6 Kbps
• 512-byte FIFO and on-chip H/W, S/W flow control
• COM port assignments maintained across different PCs
• Drivers for Windows, Linux, and macOS
• Bus-powered capabilities for most models
• Suitable for 4-wire RS-422/485 and 2-wire RS-485 applications (with additional an adapter)
• Easy maintenance with dual-sided LED indication
• IP20, rugged metal case
• Optional loopback adapter for easy communication checking
• Wall-mount, DIN-rail, and rackmount accessories available
Product Specification
NOTE
The latest specifications for Moxa's products can be found at https://www.moxa.com
Panel Layout and Dimensions
UPort 1400-G2

UPort 1400/1600-G2 Series User Manual
8

UPort 1400/1600-G2 Series User Manual
9
UPort 1600-8-G2 and -Hub

UPort 1400/1600-G2 Series User Manual
10
2. Product Installation
We recommend installing the UPort driver first before connecting the UPort to your computer’s USB port.
Hardware Description and Installation
NOTE
1. A maximum of 4 UPort converters can be connected to one PC host. Connecting more than 4 UPort
converters may strain system resources and potentially destabilize the computer.
2. We recommend connecting the UPort directly to your PC’s USB port.
3. Although your UPort supports USB 1.1, we recommend using a USB 3.2 host controller or hub for the
best and most stable performance.
Installing the driver before connecting the UPort to your PC. Some UPort models require an external power
adapter or cord; other models may support both external and bus power.
USB 2.0 bus power
USB 3.2 bus power
Power adapter 12 to 48 V
UPort 1410-G2
UPort 1450-G2
UPort 1450I-G2
UPort 1610-8-G2
UPort 1650-8-G2
UPort 1650I-8-G2
UPort 1650-8-G2-
Hub
Using an External Power Source
The UPort 1650I-8-G2 and UPort 1650-8-G2-Hub come with a power adapter for connecting to an external
AC power source. Others can purchase a power adapter separately if necessary.
If the power is properly supplied and the system ready, the Ready LED will glow solid green. For other LED
color definitions, please refer to the section below.
LED Indicators
Function
Color
Definition
Ready
Red
Power is on and the system is not yet ready
Green
The system is up and ready
Green blinks
Location in action
Off
The unit is not powered or out of operation
TX
Green blinks
Transmitting data
Off
No data is transmitting, or the serial device is not connected or out of operation
RX
Orange
blinks Receiving data
Off
No data has been received, or the serial device is not connected or out of
operation

UPort 1400/1600-G2 Series User Manual
11
Connecting to a Serial Device
Use the proper serial cables to connect your serial devices to the UPort’s serial ports, which support RS232
and/or RS-422/485 interfaces. The UPort’s serial ports use DB9 male connector with standard pin
assignment. Please refer below for the detailed pin assignments.
Serial Port Pin Assignments
The serial ports on the UPort 1400/1600-G2 have DB9 male connectors. Refer to the following table below
for the RS-232 and RS-422/485 pin assignments.
Serial Port (Male DB9)
Pin RS-232
RS-422/
RS-485-4W RS-485-2W
1
DCD
TxD-(A)
–
2
RXD
TxD+(B)
-
3
TXD
RxD+(B)
Data+(B)
4
DTR
RxD-(A)
Data-(A)
5
GND
GND
GND
6
DSR
–
-
7
RTS
–
-
8
CTS
–
–
9
–
–
–
NOTE
For the UPort with DB Male serial ports, you may refer to the DB9 Male Ports pin assignment section to
loop back pin 2 and pin 3 for the RS-232 interface to carry out a self-test on the device. You may refer to
Communication Testing in the Software Installation section below for how to use the loopback
connector in the box to perform the communication test.
Wiring Adapters Pin Assignments
Mini DB9F-to-TB
Pin
TB
1
2
2
1
3
3
4
4
5
5
ADP-RJ458P-DB9F
Pin
TB
1
6
2
4
3
5
4
1
5
3
6
8
7
7
8
2

UPort 1400/1600-G2 Series User Manual
12
ADP-RJ458P-DB9F-ABC01
Pin
TB
1
6
2
5
3
4
4
8
5
3
6
1
7
2
8
7
Adjustable Pull High/low Resistors for the RS-485 Port
The UPort uses DIP switches to set the pull high/low resistor values for each serial port.
To set the pull high/low resistors to 150 KΩ, make sure both SW 1 and SW 2 switches are in the OFF
position. This is the default setting.
To set the pull high/low resistors to 1 KΩ, make sure both SW 1 and SW 2 switches are in the ON
position.
To set the termination on, SW 3 should be set to the ON position.
You will need to unscrew the DIP switch cover to access the DIP switches.
Switch
1
2
3
4
Pull High
Pull Low
Termination
–
ON
1K Ω
1K Ω
120 Ω
–
OFF
150K Ω
150K Ω
–
–
UPort 1400 DIP Switches Location
UPort 1600-8 DIP Switches Location

UPort 1400/1600-G2 Series User Manual
13
Buzzer
The UPort will sound the built-in buzzer twice when the power is turned on. You will also hear the buzzer
when using the Locate function from the driver property page of the UPort.
Latching USB Cable User Guide
Here is how you can plug in Moxa’s USB cable into the UPort and computer securely.
The new latch USB cable comes with a latch on the side of a type A connector and a screw on the type B:
Always press both latches when plugging the connector into the receptacle on your computer.
Plugging in the USB cable to a host computer
Step 1: Press both latches.
Step 2: Plug in.

UPort 1400/1600-G2 Series User Manual
14
Plugging out a USB cable from a host computer
Step 1: Press both latches hard and make sure
they are pushed to the end.
Step 2: Plug out the cable 90 degrees horizontally to
the USB s
lot.
Caution on plugging in or out the latch connector
1. Always press both latches when plugging in or pulling out the cable.
2. If the type A connector doesn't come off smoothly, DO NOT pull the cable out by force as it will
deform the hook on the connector, and you may not be able to use the cable again. Try again by
pushing the latch hard and shaking the connector from left to right gently.
NOTE
The latch cable locks to most computer USB slots, however, there may be some slots designed with a
slight difference, preventing the latch from locking to your computer USB slots perfectly.
Plugging in an USB cable to the host computer
The screw on the side of type B connector is for fixing the cable firmly to the UPort. Please remember to
swivel bolt after plugging in and before pulling out the connector.
Step 1: Plug in type B connector.
Step 2: Swivel the bolt about 5 rounds.

UPort 1400/1600-G2 Series User Manual
15
Pulling out an USB cable from the host computer
Step 1: Swivel the bolt about 5 rounds until it is loose.
Step 2: Pulling out the type B connector.
Ground Screw
All the product’s certifications are performed with ground-screw wiring. We strongly recommended to wire
the ground screw before any operation takes place. With without wiring to a ground screw, please consider
the product’s environment and prevent any possible surge that may damage the product or cause
interference to the communication.
Reset
The reset button is on the front panel of the UPort, and the button is to restart the UPort when necessary. If
it is required to reset the UPort to default settings, you will need to access the function in the driver
property. Please refer to Reset to Default in the Configuring UPort section below.
Mounting
UPort 1400-G2
Dimensions
Unit = mm (inches)

UPort 1400/1600-G2 Series User Manual
16
Wall Mounting
The mounting kit is 2 mm in height, and the two centers of the
mounting kit on each plate are 208 mm (8.19 in).
First, attach the brackets to the bottom of the UPort™
1400
-G2 with screws, where the circles show. The
recommended screw tightening torque: 4.5 kgf
-cm
+/
- 0.5, screw type: type F, PH2. Next, mount the
unit to a wall with the screws.
Screws should be less than 3.5 mm in head diameter, and less than 3.0 mm in shaft
diameter.
The wall screws should use the M3 type, and the length should
be no less than 7 mm.
DIN-rail Mounting
The UPort 1400-G2 models have a DIN-rail kit option to allow installation on a DIN rail. DIN-rail
attachments can be purchased separately to attach the product to a DIN rail. The DIN-rail attachments
should be oriented with the metal springs on top.
First, attach the DIN-rail attachments to the rear of the UPort™ 1400-G2 with screws, showed by the
circles. The recommended screw tightening torque: 4.5 kgf-cm +/- 0.5, screw type: type F, PH2.

UPort 1400/1600-G2 Series User Manual
17
Next, mount the UPort™ 1400-G2 onto the mounting rail.
STEP 1: Insert the upper lip of the DIN-rail kit into
the mounting rail.
STEP 2: Press the UPort™ 1400-G2 towards the
mounting rail until it snaps into place.
To remove the UPort™ 1400-G2 from the DIN rail, do the following:
STEP 1:
Pull down the latch on
the DIN-rail kit with a screwdriver.
STEP 2 & 3:
Slightly pull the UPort
™ 1400-G2 forward and lift it up to remove it
from the mounting rail.
UPort 1600-G2
Dimensions
Unit: mm (inches)

UPort 1400/1600-G2 Series User Manual
18
Wall Mounting
The mounting kit is 2 mm in height, and the two centers of the
mounting kit on each plate
are 239 mm (9.41 in).
First, attach the brackets to the bottom of the UPort™
1600
-G2 with screws, where the circles show. The
recommended screw tightening torque: 4.5 kgf
-cm
+/
- 0.5, screw type: type F, PH2. Next, mount the
unit to a wall with the screws.
Screws should be less than 3.5 mm in head diameter, and less than 3.0 mm in shaft
diameter.
The wall screws should use the M3 type, and the length should
be no less than 7 mm.
DIN-rail Mounting
The UPort 1600-G2 models have a DIN-rail kit option to allow installation on a DIN rail. DIN-rail
attachments can be purchased separately to attach the product to a DIN rail. The DIN rail attachments
should be oriented with the metal springs on top.
First, attach the DIN-rail attachments to the rear of the UPort™ 1600-G2 with screws, showed by the
circles. The recommended screw tightening torque: 4.5 kgf-cm +/- 0.5, screw type: type F, PH2.

UPort 1400/1600-G2 Series User Manual
19
Next, mount the UPort™ 1600-G2 onto the mounting rail.
STEP 1: Insert the upper lip of the DIN-rail kit into
the mounting rail.
STEP 2: Press the UPort™ 1600-G2 towards the
mounting rail until it snaps into place.
To remove the UPort™ 1600-G2 from the DIN rail, do the following:
STEP 1:
Pull down the latch on the DIN
-rail kit with a screwdriver.
STEP 2 & 3:
Slightly pull the UPort
™ 1600-G2 forward and lift it up to remove it
from the mounting rail.
Rackmount mounting
UPort 1400/1600-G2 can be mounted on rackmount along with RK-UP16G2 which is designed with a
standard 19-inch rackmount, which can carry maximum 2 of either 4 or 8 port UPort G2 models.
Before you install the UPort to the rackmount kit, please remove the DIN-rail, wall-mount kit or rubber pad
from the front panel of the UPort. The button is to restart the UPort when necessary. If resetting the UPort
to default settings is required, you will need to access the function in the driver property. Please refer to
Reset to Default in the Configuring UPort below.
UPort 1400-G2 screw holes
Screw holes for the UPort 1400
-G2 models

UPort 1400/1600-G2 Series User Manual
20
UPort 1600-G2 screw holes
First, attach the UPort at the bottom of the RK-UP16G2 with the screws that come with the product box for
the wall-mount kit.
Tightening torque: 4.5 kgf-cm +/- 0.5
NOTE
If you require more screws, please contact your reseller or Moxa sales representative.
If the UPort models on the rackmount are connected directly to a computer or have an external power
source from a power adapter, it is fine to place an 8-port or 4-port model on either the right-hand or left-
hand side. If you would like to leverage the UPort 8-port hub model’s USB bus output power to include other
UPort models, the UPort 8-port hub model needs to be placed on the right-hand side of the rackmount tray
(left-hand side from the rear view). However, please note it is necessary to use a USB 3.2 compatible cable
to ensure enough power.
Rear-side view
2U Rackmount Illustration
Rear-side view
NOTE
The UPort 1650-8-G2-Hub can cascade and power on up to three UPort 1400-G2 or UPort 1600-G2 models
(UPort 1650-8-G2-Hub excluded), with USB 3.2 cable.
CBL-USB3-BA-G-
028
(Recommended)
UPort 1650-8-G2-Hub
/