Page is loading ...

P/N: 1802012005001
*1802012005001*
UPort™ 1200-G2 Series
Quick Installation Guide
Version 1.0, March 2024
Technical Support Contact Information
www.moxa.com/support
2024 Moxa Inc. All rights reserved.

- 2 -
Overview
Moxa’s USB-to-serial products provide a wide range of easy-to-use
solutions for adding Windows COM ports, macOS, and Linux tty ports
through a USB port of a computer. The UPort 1200-G2 Series comprises
the following models:
2-port Models
UPort 1250-G2
RS-232/422/485 USB-to-serial
converter
0 to 60°C
(32 to 140°F)
UPort 1250-G2-T
RS-232/422/485 USB-to-serial
converter
-40 to 75°C
(-40 to 167°F)
UPort 1250I-G2
RS-232/422/485 USB-to-serial
converter with isolation protection
0 to 60°C
(32 to 140°F)
UPort 1250I-G2-T RS-232/422/485 USB-to-serial
converter with isolation protection
-40 to 75°C
(-40 to 167°F)
Package Checklist
After opening the box, verify that the package contains the following
items:
• 1 UPort 1200-G2 USB-to-serial converter
• 1 USB cable with latch, CBL-USB3-BA-G-120, hook and screw,
1.2m
• Quick installation guide (printed)
• Warranty card (printed)
NOTE
Notify your sales representative if any of the above items are
missing or damaged.
Accessories
WARNING
This product is intended to be supplied by an approved external
power source (UL listed/IEC 60950
-1/IEC 62368-1), which
output complies with ES1/SELV, PS2/LPS, output rating 5 VDC,
1 A minimum (by USB port),
and ambient temperature of 75°C
minimum. If further information or help is needed, please
contact your Moxa representative. If
a Class I power source is
used
, the power cord should be connected to a socket outlet
with an earthing connection.
Cables
• CBL-USB3-BA-G-120: USB 3.2 Gen 1 cable with latch, 1.2 M
• CBL-USB3-BA-G-028: USB 3.2 Gen 1 cable with latch, 0.28 M
• CBL-USB3-BA-B-120: Standard USB 3.2 Gen 1 cable, 1.2 M
DIN-rail Kits:
• DK-UP1200, 2 WK-35-02 wall-mount plates, and 2 DK35A DIN-rail
plates

- 3 -
Wall-mounting Kits:
• WK35A: 2 WK-35-02 plates (35 x 24 x 1.2 mm) with 6 screws
(FTSx6 M3x4 mm)
Adapters:
• LB-DB9F-G-01: Serial loopback adapter
• ADP-RJ458P-DB9F: DB9F-to-RJ45 adapter
• Mini DB9F-to-TB: DB9F-to-TB adapter
Hardware Introduction
USB Cable Usage Guide
The new Moxa latch USB cable
comes with a latch on each side of
the Type
-A connector and a screw
on the Type
-B connector.

- 4 -
Plugging in the USB Cable Using the Type A Connector
To plug in the USB cable to the host computer and secure it, do the
following:
Step 1:
Press both latches on the
connector
.
Step 2:
Plug the connector into the
USB slot
.
Removing the USB Cable
Step 1:
Press both latches on the
USB cable connector
hard
so that
they are pushed to the
maximum.
Step 2:
Unplug and pull out the
cable 90 degree
s horizontal to the
USB socket.
ATTENTION
Be c
autious when plugging in or out the latch connector.
1.
When the cable is plugged into a host computer or pulled
out every time, always press both latches. Then, plug the
connector into the receptacle on your computer or vice
versa.
2.
If the type A connector doesn’t come off easily, DO NOT
pull the cable out by force as it will deform the hook on the
connector, and you
may not be able to use the cable again.
Try again by pushing the latch hard and shake the
connector left to right gently.

- 5 -
NOTE
The latch cable locks to most USB slots on computers;
however, there may be some s
lots that are designed with a
slight margin
al difference, which may cause the latch not to
lock to your computer’s USB slots perfectly.
Plugging in a USB Cable to the Host Computer Using Type B
Connector
The screw on the side of type B connector is for fixing the cable firmly
to the UPort. Please remember to swivel the bolt after plugging in and
before pulling out the connector.
Step 1: Plug in type B connector.
Step 2: Swivel the bolt about five rounds.
Pulling out a USB cable from the host computer
Step 1: Swivel the bolt about five rounds until it becomes loose.
Step 2: Pulling out type B connector.
LED Indicators
The LED indicators on the front panel are used to display the status as
follows:
Function
Color
Definition
READY
Red
Power is on and the system is not yet ready
Green
System is up and ready
Green blinks
Locate in action
Off
Unit is not powered or out of operation
P1/P2
Green blinks
Transmitting data
Orange blinks
Receiving data
Off No data is being received, or the serial
device is not connected or out of operation

- 6 -
Serial Port Pin Assignments
The serial ports on the UPort 1200-G2 have DB9 male connectors. Refer
to the following table below for the RS-232 and RS-422/485 pin
assignments.
Serial Port
(Male DB9)
Pin RS-232
RS-422/
RS-485-4W
RS-485-2W
1
DCD
TxD-(A)
–
2
RXD
TxD+(B)
–
3
TXD
RxD+(B)
Data+(B)
4
DTR
RxD-(A)
Data-(A)
5
GND
GND
GND
6
DSR
–
–
7
RTS
–
–
8
CTS
–
–
9
–
–
–
NOTE
For
the UPort with DB9 male serial ports, you may refer to the
Serial Port Pin Assignments
section to loop back pin 2 and pin 3
for the RS
-232 interface to carry out a self-test on the device.
You may refer to
Communication Testing in the Software
Installation
section in this document for how to use the
loopback connector in the box to perform the communication
test.
Adjustable Pull High/low Resistors for the RS-485 Port
The UPort uses DIP switches to set the pull high/low resistor values for
each serial port.
To set the pull high/low resistors to 150 KΩ, make sure both SW 1
and SW 2 switches are in the OFF position. This is the default setting.
To set the pull high/low resistors to 1 KΩ, make sure both SW 1
and SW 2 switches are in the ON position.
To set the termination on, SW 3 should be set to the ON position.
Switch
1
2
3
4
Pull High
Pull Low
Termination
–
ON
1 KΩ
1 KΩ
120 Ω
–
OFF
150 KΩ
150 KΩ
–
–
ATTENTION
Do not use the 1
-kΩ setting on the UPort when using an RS-
232 interface. Doing so will degrade the
RS-232 signals and
shorten the maximum allowed communication distance.

- 7 -
DIP Switches Location
Software Installation
To install the UPort driver, please follow the installation procedure
described in the Mounting the UPort 1200-G2 section. UPort converters
can be connected to any upstream type A USB port that is on the PC
host or an upstream hub. UPort converters are hot-pluggable, so there
is no need to power down your computer prior to installation.
After successfully installing the UPort, you can use the operating
system's device manager to check and/or change the port settings. In
Windows, the new COM port will be listed under Ports (COM & LPT).
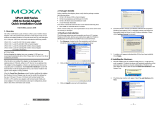
Installing the Windows Driver
Download and run the Setup program from the UPort’s product
page and follow the installation steps.
A few things to note:
1. We recommend also installing companion utilities for future use.
For an introduction of the utility, refer to the User Manual.

- 8 -
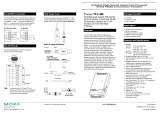
2. After successfully installing the driver, connect the UPort to your
computer. Then, click Scan to review the installation results and
confirm that the UPort is connected to your computer.
3. Check Launch Windows Driver Manager to configure the UPort
after the setup is completed.
4. If you have installed ViewCOM, you can mouse over the
ViewCOM icon in the system tray to see the relevant COM port
information.
The right-click context menu has the shortcut to Windows
Device Manager and Auto Startup utilities if needed.

- 9 -
For configuration details, check the COM Port Configuration section in
the User Manual.
Installing the Linux Driver
Run the following commands from the Linux prompt:
# CD /moxa
# tar xvfz moxa-uport-1200-1400-1600-series-linux-kernel-
[kernel version]-driver-v[driver version].tgz
Find the Makefile file in /moxa/mxuport and run the commands:
# make install
# modprobe mxuport
For further information, refer to the User Manual or the readme.txt
that comes with the driver package.
Installing the Linux Driver for Arm-based Platforms
Please refer to the Tech Note: UPort Driver Arm-based Platform
Porting Guide on the product page or the readme.txt that comes
with the driver package.
Installing the macOS Driver
For macOS 10.12 and later, follow the steps below to install the driver:
1. Enter recovery mode.
2. Disable System Integrity Protection (SIP) by running the csrutil
disable command from the terminal.
3. Return to normal mode.
4. Launch the UPort driver installer and complete the installation
procedure.
5. Re-enter the recovery mode.
6. Enable System Integrity Protection (SIP) by running the csrutil
enable command from the terminal.
7. Return to normal mode.
For detailed instructions, please refer to the User Manual on the product
page or the readme.txt that comes with the driver package.
Communication Testing
There are Moxa companion utilities for serial communication testing.
For this purpose, you may use PComm Terminal. For other useful
utilities, please refer to the UPort’s User Manual for an introduction.

- 10 -
Mounting the UPort 1200-G2
Dimensions
Unit = mm (inches)
Wall Mounting
The mounting kit is 2 mm in height, and the two centers of the
mounting kit on each plate are 91 mm (3.58 in).
First, attach the brackets to the bottom of the
UPort 1
200-G2 with screws, where the circles
show
. The recommended screw tightening
torque: 4.5 kgf
-cm +/- 0.5, screw type: type F,
PH2. Next, mount the unit to a wall with the
screws.
Screws should be less than 3.5 mm in head diameter and less than 3.0
mm in shaft diameter.
Screw information:
Type
M3
Quantity
4
Length
4 mm
Head diameter
Less than 5.0 mm
Shaft diameter
Less than 3.0 mm

- 11 -
DIN-rail Mounting
The UPort 1200-G2 models have a DIN-rail kit option, - DK35A,
allowing installation on a DIN rail. DIN-rail attachments can be
purchased separately to attach the product to a DIN rail.
First, attach the wall-mount brackets to the bottom of the UPort 1200-
G2 with screws. Then, attach the DIN-rail attachments to the wall-
mount kit with screws, as shown by the circles in the figure below. The
recommended screw type is M3, 4 mm in length, tightening torque: 4.5
kgf-cm +/- 0.5, screw type: type F, PH2; 4 screws.
Screws should be less than 5 mm in head diameter and less than 3.0
mm in shaft diameter.
Next, mount the UPort 1200-G2 onto the mounting rail.
STEP 1:
Insert the upper lip of
the DIN
-rail kit into the mounting
rail.
STEP 2:
Press the UPort 1200-G2
towards the mounting rail until it
snaps into place.
To remove the UPort 1200-G2 from the DIN rail, do the following:
STEP 1:
Pull down the latch on the DIN
-rail kit.
STEP 2 & 3:
Slightly pull the
UPort 1200-G2
forward and
lift it up to remove it from the mounting
rail.
Screw information:
Type
M3
Quantity
4
Length
4 mm
Head diameter
Less than 5.0 mm
Shaft diameter
Less than 3.0 mm

- 12 -
Product Specifications
USB Interface
Standard USB 3.2/2.0/1.1 compliant
5 Gbps (SuperSpeed USB), 480 Mbps (Hi-Speed
USB) and 12 Mbps (Full-Speed USB)
Upstream
1 USB port, Type B connector
Downstream
2 serial ports, DB9 connectors
Physical Characteristics
Housing
Metal (SECC) + Aluminum
Environmental Limits
Operating
Temperature
Standard Models: 0 to 60°C (32 to 140°F)
Wide Temp. Models: -40 to 75°C (-40 to 167°F)
Operating
Humidity
5 to 95% RH
(For use in Pollution Degree 2 environments)
Storage
Temperature
-40 to 75°C (-40 to 167°F)
Power Requirements
USB 2.0 bus power
(500 mA)
USB 3.2 bus power
(900 mA)
UPort 1250-G2
UPort 1250I-G2
Power Consumption
5 V @ USB 2.0
5 V @ USB 3.2
UPort 1250-G2
160 mA
320 mA
UPort 1250I-G2
240 mA
400 mA
Regulatory Approvals
EN IEC 61000-4-4, EN IEC 61000-4-5, EN IEC 61000-4-6,
EN IEC 61000-4-8, EN IEC 61000-4-11, EN IEC 61000-6-2,
EN IEC 61000-6-4
FCC Part 15B Class A,
IEC/EN/UL 62368-1, LVD, KC
Warranty
Warranty Period
5 years
Details
See www.moxa.com/warranty
The latest specifications for Moxa's products can be found at
https://www.moxa.com.
Certifications
CE Warning
This is a Class A product. In a domestic environment, this product may
cause radio interference in which case the user may be required to take
appropriate measures.
Federal Communications Commission Statement
FCC - This device complies with part 15 of the FCC Rules. Operation is
subject to the following two conditions: (1) This device may not cause
harmful interference, and (2) this device must accept any interference
received, including interference that may cause undesired operation.

- 13 -
FCC Warning
This equipment has been tested and found to comply with the limits for
a Class A digital device, pursuant to part 15 of the FCC Rules. These
limits are designed to provide reasonable protection against harmful
interference when the equipment is operated in a commercial
environment. This equipment generates, uses, and can radiate radio
frequency energy and, if not installed and used in accordance with the
instruction manual, may cause harmful interference to radio
communications. Operation of this equipment in a residential area is
likely to cause harmful interference in which case the user will be
required to correct the interference at his own expense.
KC Certification
사용자안내문 (User Guide)
이 기기는 업무용 환경에서 사용할 목적으로 적합성평가를 받은
기기로서가정용 환경에서 사용하는 경우 전파간섭의 우려가 있습니다.
(This equipment has KC approval for use in industrial environments and
could possibly interfere with household equipment.)
기 종별
Type of Equipment
사용자안내문
User Guide
A 급 기기 (업무용 방송
통신기 자재)
Class A Equipment
(Broadcasting and
Communication Equipment for
Industrial and Commercial Use)
이 기기는 업무용 (A 급) 전자파 적합
기기로서 판매자 또는 사용자는 이
점을 주의하시기 바라며 가정 외의
지역에서 사용하는 것을 목적으로
합니다.
This equipment is the EMC conformity
equipment (Class A) for I
ndustrial and
Commercial Use. The seller or user
should take note of this as this
equipment can be used in places that
exclude homes.
B 급 기기 (가정용 방송 통신
기자재)
Class B Equipment
(Broadcasting and
Communication Equipment for
Home Use)
이 지기는 가정용 (B 급) 전자파적합
기기로서 주로 가정에서 사용하는
것을 목적으로 하며, 모든 지역에서
사용할 수 있습니다.
This equipment is the EMC conformity
equipment (Class B) for Home Use
and can be used mainly at homes, as
well as in other areas.
/