Page is loading ...

1 of 2 Workrite Ergonomics | (800) 959–9675 www.workriteergo.com
3⅝"
3⅜"
¼"
ø ⅛" × ¾" deep Pilot Hole
9½"
Front edge of worksurface (dashed line)
CL
ø ⅛" × ¾" deep Pilot Hole
Keyhole
Keyhole
⅛" gap
Pilot Holes
⅛" gap
Pilot Holes
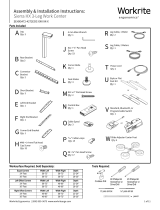
Installation Template:
Pinnacle 2
Tape Template to Underside of
Worksurface
Position template so dashed line runs along
front edge of worksurface
Drill Pilot Holes
Drill " diameter x " deep pilot holes at
marked locations.
Remove template.
Continued on other side.
Note: Make sure this template
is printed at 100% scale. Select
"None" in Page Scaling menu
in printer dialog box.
Note: Front edge of track may be recessed
up to 2" from front edge of worksurface for
increased stowability.
CAUTION!
Do not drill all the way through the
worksurface! You may wish to mark your drill
bit so you do not drill any further than ".
See page 2 for Parts Included and Tools Required
for this installation.
Note: Do not remove Arm or Front End Trim from
Track for installation.
1
1
2
a
a
a
b

2 of 2 Workrite Ergonomics | (800) 959–9675 www.workriteergo.com
1500145 Rev C
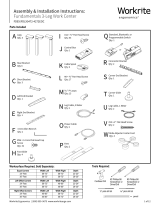
#2 Phillips screwdriver or drill/driver
Tape
Worksurface
Adjustable Keyboard Platform
0.4126"
#3 Drive
0.134"3/4"
0.216"
#12 Screw Size
⅛" gap
Pilot Holes
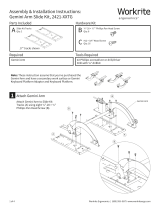
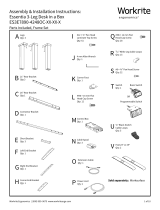
Assembly & Installation Instructions:
Keyboard Arms With Nylon Glide Track
Mounting for the following
Pinnacle 2 Value Pinnacle AD Value Fundamentals 173
A Keyboard Arm on Nylon
Glide Track
Qty: 1 B #12 × " Phillips
Screws
Qty: 8 D Track Cover
Qty: 1
Parts Included
Tools RequiredRequired
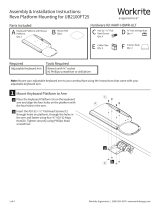
Pinnacle Value Arm shown
Install Pilot Screws in Pilot Holes
Install two #12 × " Phillips Screws (B) into Pilot Holes. Leave
a gap of approximately " between the head of the screw and
worksurface.
Mount Track
Remove the two #10-24 × ½" Screws (C) then the Track Cover (D).
Slide Arm o Track.
Slide Track on Pilot Screws. Tighten Pilot Screws securely.
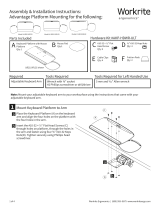
Drill " diameter x " deep pilot holes at marked locations.
Install remaining #12 × " Wood Screws (B) into Pilot Holes.
CAUTION!
Do not drill all the way through the worksurface! You may wish to
mark your drill bit so you do not drill any further than 3/4".
Tighten Securely.
Install Arm
Replace Arm on Track.
Replace the two #10-24 × ½" Screws (C).
Tighten screws securely.
Continued from other side
C #10-24 × ½" Pan
Head Screws
Qty: 2
3
4
5
a
a
a
a
b
bb
b
c
cc
c
B
B
C
C
D
/