Page is loading ...

1 of 2 Workrite Ergonomics | (800) 959–9675 www.workriteergo.com
#2 Phillips screwdriver or drill/driver
" Allen Wrench (G) included
Wrench with ⅜" socket if installing on some non-Workrite tracks
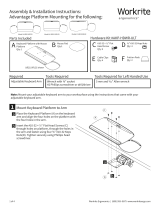
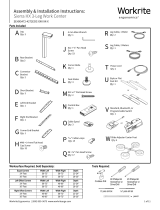
A Corner Maker
Qty: 1 B #-20 × 1" Ultra Low
Profile Screw
Qty: 2 D #10-32 × " Phillips
Head Screw
Qty: 2 F #8 × 1" Phillips Head
Wood Screw
Qty: 2
G " Allen Wrench
Qty: 1
E #10-32 Keps
Nut
Qty: 2
C #-20 × 1" Ultra Low
Profile Screw
Qty: 2
Part Included
Assembly & Installation Instructions:
Adjustable Corner Maker, 179ACD
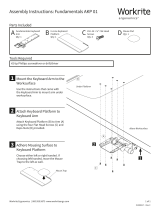
Select Correct Size Clamping Screw
Measure the thickness of the worksurfaces.
If your worksurfaces are from 1"–1" thick, use the #-20
× 1" Ultra Low Profile Screws (B) that are pre-installed.
If your worksurfaces are 1¾"–2¼" thick, you will need to
replace them with the longer #-20×1" Ultra Low Profile
Screws (C).
Use the included " Allen Wrench (G) to remove and add
Low Profile Screws as needed.
Be sure to leave a bit of room to slide the Corner Maker onto
the worksurfaces. It will be clamped down in Step 4c.
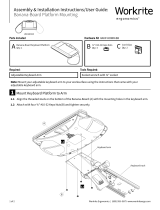
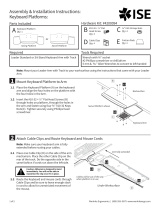
Attach Keyboard Platform Arm to Corner Maker
If your are installing a Corner Maker without a keyboard
platform arm, skip to Step 3.
Mount the Pinnacle 2 Track to the Adjustable Corner Maker
(A) using two #10-32× ½" Phillips Head Screws (D) through
the front track mounting holes and into the threaded holes in
the bottom clamp bracket.
If installing non-Workrite tracks, you may need to use
included #10-32 Keps Nuts (E) and the oval holes located
next to the front track mounting holes.
Note: These instruction assume that you've purchased the Pinnacle 2 Arm, a Workrite keyboard platform and
two rectangle worksurfaces from 1" thick to 2" thick. The Adjustable Corner Maker can also be used on
worksurfaces with a corner radius as large as 9".
179ACD
Tools Required
1
2
Pinnacle 2 track
shown without
arm for clarity
Use with some
non-Workrite
tracks along with
Keps Nuts (E)
Pre-installed
D
B
C
G

2 of 2 Workrite Ergonomics | (800) 959–9675 www.workriteergo.com
1500063 Rev B
Slide Corner Maker and Pinnacle Arm Onto Worksurface(s)
Slide the assemble Corner Maker and Arm onto corner of the
worksurface(s) making sure Corner Maker is centered between
worksurfaces with equal overlap on both.
Move or swivel Keyboard Arm on the Track to access mounting
locations as needed.
Attach Corner Maker and Keyboard Arm to Worksurface(s)
Use the instructions that came with your Pinnacle
Arm to attach the Platform to the bottom of the
worksurfaces.
Attach the Corner Maker to the worksurfaces with the
two #8 × 1" Phillips Head Wood Screws (F).
Tighten the Low Profile Screws (B
or C) from above using provided
Allen Wrench (G) to clamp the
Corner Maker in place.
Attach Keyboard Platform to Arm
Use the instruction that came with your
keyboard platform to mount to arm.
Worksurface 1
Worksurface 2
3
4
5
Note: Support the Keyboard
Track and Arm while installing.
The next two steps are best
performed by two people.
Hardware
included
with track
a
a
a
b
b
a
b
c
cc
b
F
F
G
Shown without arm for clarity
Keyboard Arm
/