
P/N: 1802011002016
*1802011002016*
UPort
TM
1100 Series
Quick Installation Guide
Version 7.0, July 2019
Technical Support Contact Information
www.moxa.com/support
Moxa Americas:
Toll
-free: 1-888-669-2872
Tel:
1-714-528-6777
Fax:
1-714-528-6778
Moxa China (Shanghai office):
Toll
-free: 800-820-5036
Tel:
+86-21-5258-9955
Fax:
+86-21-5258-5505
Moxa Europe:
Tel:
+49-89-3 70 03 99-0
Fax:
+49-89-3 70 03 99-99
Moxa Asia-Pacific:
Tel:
+886-2-8919-1230
Fax:
+886-2-8919-1231
Moxa India:
Tel:
+91-80-4172-9088
Fax:
+91-80-4132-1045
2019 Moxa Inc. All rights reserved.

- 2 -
Overview
The UPort 1100 series is part of Moxa’s UPort Line of USB-to-Serial
adaptors. The UPort product line provides a wide range of easy-to-use
solutions for adding Windows COM ports and Linux tty ports through a
PC’s USB port. The UPort 1100 series includes the following models:
UPort 1110:
1-port RS-232 USB-to-Serial Converter.
UPort 1130:
1-port RS-422/485 USB-to-Serial Converter.
UPort 1130I:
1-port RS-422/485 USB-to-Serial Converter w/ Isolation
Protection.
UPort 1150:
1-port RS-232/422/485 USB-to-Serial Converter.
UPort 1150I:
1-port RS-232/422/485 USB-to-Serial Converter w/
Isolation Protection.
ATTENTION
Before plugging the adaptor into your computer’s USB port, we
recommend installing the driver first. Please refer to Section 3
for driver installation procedures.
After the driver is installed, the adaptor can be plugged into any
upstream type A USB port, either on a PC host or on an upstream hub.
The adaptor is hot-pluggable, so there is no need to power down your
computer prior to installation. The Found New Hardware wizard will
automatically locate the appropriate drivers, and various windows will
appear as the adaptor is being installed.
After the Found New Hardware wizard finishes installing the adaptor,
the Windows Device Manager may be used to modify the settings for
the new COM port. The new COM port will be listed under Ports (COM &
LPT) and the new adapters will be listed under Multi-port serial
adapters. For more information about port configuration, please refer to
the UPort 1100 series user manual.
Package Checklist
Before installing the adaptor, please verify that the package contains
the following items:
• UPort 1100 series USB-to-Serial Converter
• Quick installation guide (printed)
• Warranty card
The UPort 1130/1130I/1150/1150I will also come with the following
item:
• Mini DB9F-to Terminal-Block Converter
NOTE: Please notify your sales representative if any of the above items
are missing or damaged.
Hardware Introduction
The following instructions and screenshots are from a PC running
Windows XP (32-bit), but the same instructions apply for a Windows
64-bit platform. If you want to know which Windows OSs Moxa

- 3 -
supports, please go to support center on Moxa’s website to download
the latest driver.
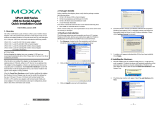
1. Run the Setup program, which you will find on Moxa’s support
website http://www.moxa.com/support/
, under the Product page.
Click Next to start installing the driver.
2. Click on Next to install the driver in the indicated folder.
3. Click on Install to proceed with installation.
4. Then, click Finish to complete the driver installation.

- 4 -
Installing the Hardware
1. Case 1: The UPort Driver is Certified
If the UPort driver that you installed has been certified by Microsoft,
the UPort and the UPort’s serial ports will be installed automatically
when you plug the UPort into your computer’s USB port.
Case 2: The UPort Driver is NOT Certified
If the UPort driver that you installed has not been certified by
Microsoft, then plugging the driver into your computer’s USB port
will activate the UPort installation program. The first part of the
installation procedure installs the software for the UPort itself (the
second part of the procedure installs the serial ports).
Plug the adaptor into any upstream USB port (e.g., a USB port on
your computer). Windows are done with hardware installation at
this point and may continue on to port configuration. Windows will
auto-detect the UPort cable and show Found New Hardware in
the System Tray.
2. The following window will appear. Select No, not this item click
Next.
3. Select Install the software automatically (Recommended),
and then click Next to proceed.

- 5 -
4. The next window cautions you that this software has not passed
Windows logo testing. This is a standard warning, and Moxa has
thoroughly tested the driver for safe Windows operation. Please
click Continue Anyways to proceed. Then, click Finish to
complete the driver installation.
5. Repeat Step2 to Step 4 until COM port is installed.
Installing the Linux Driver for the UPort 1100
Series
Linux Kernel 2.4.x
Execute the following commands from the Linux prompt:
# tar -xvfz driv_linux2.4_uport1p_vx.x_build_yymmddhh.tgz
# cd /mxu1100_24/driver
# make clean
# make install
# modprobe mxuport1100_24
NOTE
yy = year, mm = month, dd = day, hh = hour
For All Other Kernels
Please refer to readme.txt that is included in the driver file for detailed
instructions. The driver file can be downloaded from Moxa’s website,
under the Product page.
# tar xvfz driv_linux_uport1p_v1.x_build_xx.tgz
# make clean; make install
# modprobe mxu11x0
Installing the Win CE 5.0/6.0 Driver
Moxa provides two installation procedures that can be used to install
the Windows CE 5.0/6.0 driver: by “CAB file” and with the “installation
package.” In this document, we only cover the CAB file installation. If
you need to use package to install the WinCE driver, please refer to the
user’s manual.
Installation with a CAB File
Step 1: Install Microsoft ActiveSync on the source PC. Before running
ActiveSync on the source PC, use an RS-232 null modem cable to
connect the WinCE device (CEPC) to the PC.
Step 2: Go to the “Command Prompt” on the WinCE device and
execute the repllog command. A new partnership window will appear.
Select “No” and then click on “Next.” You will see “Connected” in
ActiveSync.
Step 3: Click on the “Explore” button in the ActiveSync window, and
then copy the
UP1100_COM_v1.0_Setup.CAB (For WinCE 6.0) or
UP1100_COM_v1.1_Setup.CAB (For WinCE 5.0)
file to the Mobile/Target Device.
Step 4: Double click on the CAB file to start installing the UPort 1100
series WinCE driver.

- 6 -
After installing the driver, plug the UPort 1100 series device into the
USB port of the WinCE Device. The driver will be loaded automatically.
At this point, the UPort 1100 series is ready to use.
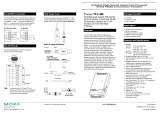
Serial Port Pin Assignments
The UPort 1100 series uses male DB9 connectors. Pin assignments are
shown in the following diagram:
Male DB9
Pin RS-232
RS-422/485
(4-wire)
RS-485
(2-wire)
1
DCD (in)
TxD-(A)
–
2
RxD (in)
TxD+(B)
–
3
TxD (out)
RxD+(B)
Data+(B)
4
DTR (out)
RxD-(A)
Data-(A)
5
GND
GND
GND
6
DSR (in)
–
–
7
RTS (out)
–
–
8
CTS (in)
–
–
The UPort 1130/1130I/1150/1150I comes with a DB9 to terminal block
converter, with pin assignments as shown below:
Terminal Block
Pin
RS-422/485
(4-wire)
RS-485
(2-wire)
1
TxD+(B)
–
2
TxD-(A)
–
3
RxD+(B)
Data+(B)
4
RxD-(A)
Data-(A)
5
GND
GND
Note that the converter maps pin 1 on the DB9 connector to pin 2 on
the terminal block, and pin 2 on the DB9 connector to pin 1 on the
terminal block.
-
 1
1
-
 2
2
-
 3
3
-
 4
4
-
 5
5
-
 6
6


Moxa UPORT 1100 series Quick setup guide
- Type
- Quick setup guide
- This manual is also suitable for
Ask a question and I''ll find the answer in the document
Finding information in a document is now easier with AI
Related papers
-
Moxa UPORT 1100 series Quick setup guide
-
Moxa Technologies UPort 2000 Series Quick Install Guide
-
Moxa UPort 2210/2410 Series Quick setup guide
-
Moxa UPORT 1650-8 User manual
-
Moxa Technologies UPort 1200/1400/1600 Series Quick Install Guide
-
Moxa UPort 1200/1400/1600 Series Quick setup guide
-
-
-
Moxa UPort 1200-1400-1600 Series Installation guide
-
Other documents
-
 Moxa Technologies 1100 User manual
-
Moxa Technologies 1150 User manual
-
 Moxa Technologies UPORT 1110 User manual
-
Moxa Technologies Uport 1400/1600 User manual
-
-
-
 Moxa Technologies TCC-80I User manual
-
RCS EPSILON ES4 User manual
-
Danfoss DECS 2.0 Operating instructions
-


